Commonmark migration
Source Link

Assuming the tiles are seamless patterns which do not require any rotating and merely need to be duplicated and aligned..... I would actually use Place and Effects with linked files.... A couple minutes of set up to make any future pattern change take only a few seconds.


So you have 1 file, and you know the size is 100x100px....

enter image description here

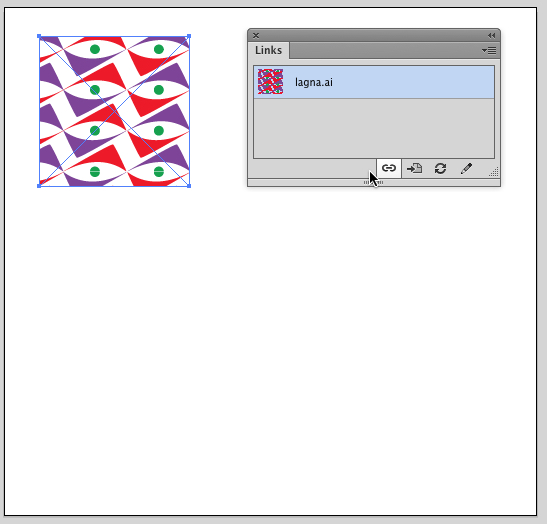
Open a new AI file and choose File > Place and select your file. This links to the single file.

enter image description here

Select the Linked image and choose Effect > Distort & Transform > Transform.

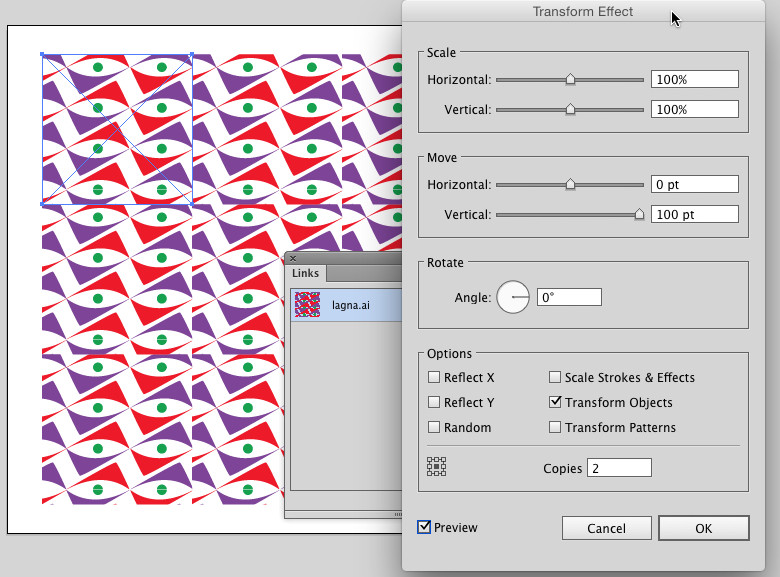
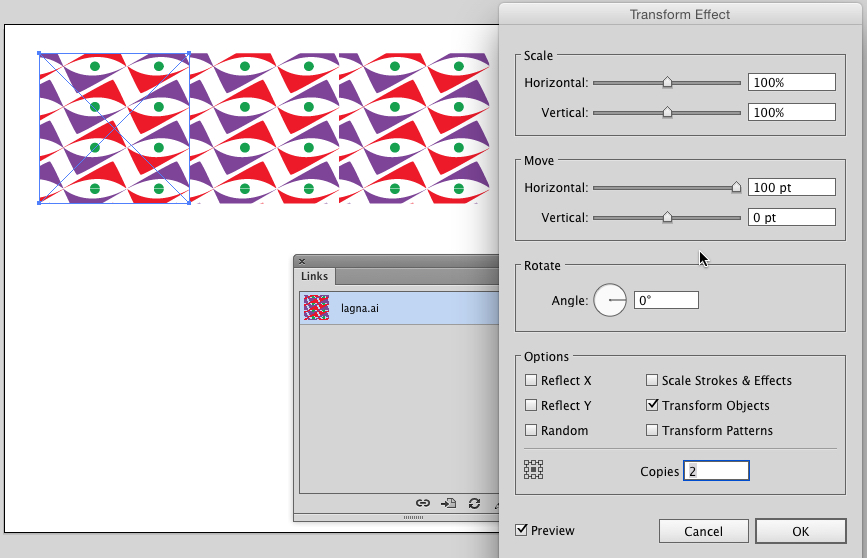
Enter a value in the Move - Horizontal area which correlates to the width of your tile, in my case I used 100pts/px. And enter 2 in the Copies field since you want 2 copies to appear....

enter image description here

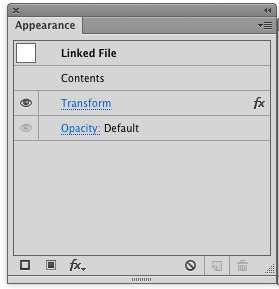
Click OKAY and you'll see the effect in the Appearance Panel (Window > Appearance).

enter image description here

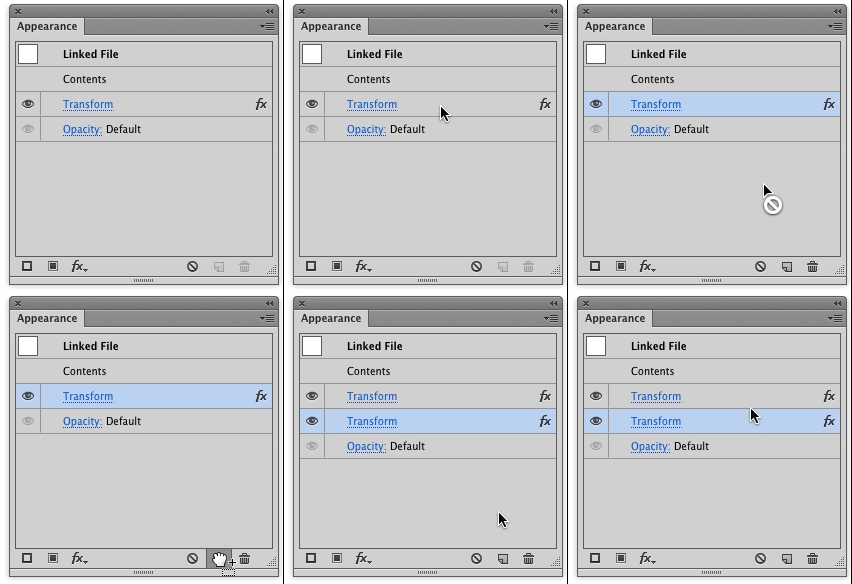
Click-drag that Transform Effect to the "New" icon at the bottom of the Appearance Panel to duplicate it:

enter image description here

Now click one the Transform effects in the panel, either one, it doesn't matter which.

The Transform Effect Options window will appear again. This time enter the Vertical distance in the Move area, and set the Horizontal back to zero. Copies should still be set at 2, leave that as it is.

enter image description here

And Click OKAY.

You now have a 3x3 grid based on a single placed link. Save this as a "Master" working file if you'd like.

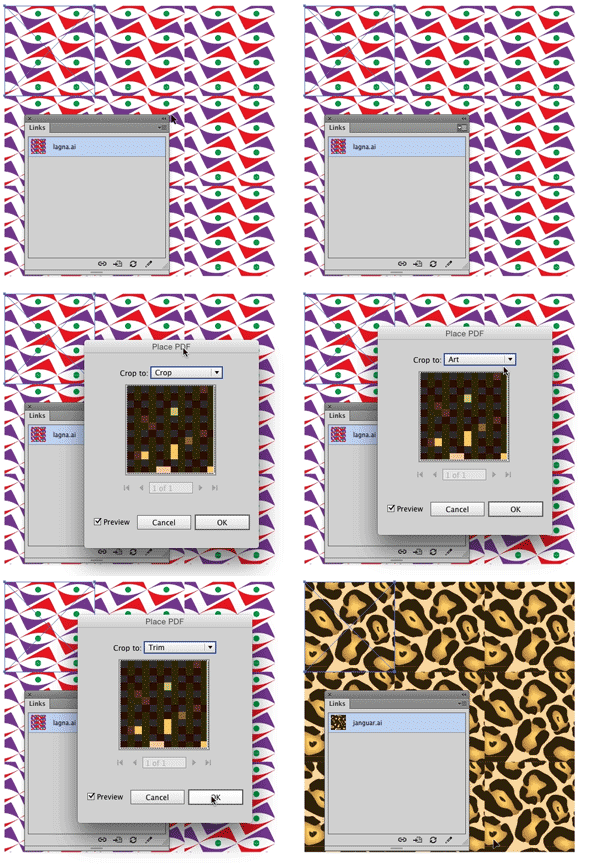
To change patterns, use the Links Panel (Window > Links) to merely relink the image, and all the subsequent duplicates will update as well....

enter image description here

Then simply save as whatever you need.


Note I really don't know the native tiles size for these patterns so numbers are rounded for general clarity. Tiles won't line up correctly due to this.


#Update after comments.....

Update after comments.....


It appears you are using svg files that are not actually patterns, but rather just expanded artwork. Illustrator embeds these files rather than linking to them. The above still works. However... You'll need to plan differently for changing the initial tile.

  • Place the tile
  • Follow the Effect > Distort & Transform > Transform settings
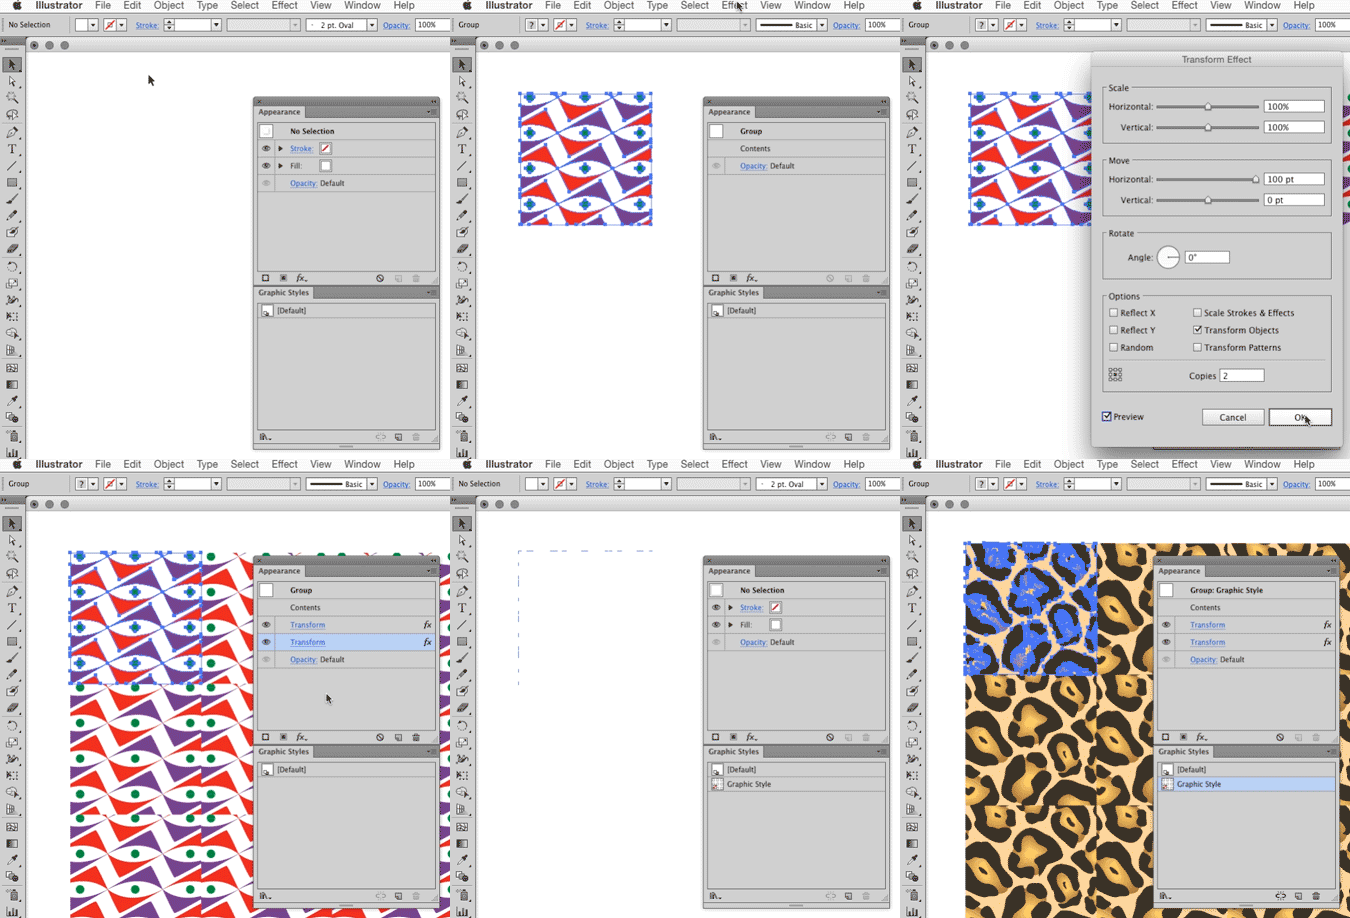
  • When you get the end and you have the 3x3 grid of tiles, Select the initial tile and drag it to the Graphic Styles Panel (Window > Graphic Styles)

For the next pattern....

  • Select All
  • Delete
  • Place next pattern
  • Click the graphic style you created (It should automatically create the 3x3 grid.)

enter image description here

(I'm using Place with expanded art svg files in the above animation.)

You could choose to resave the svg assets as .ai files, or make the svg files actual pattern-filled rectangles rather than expanded art, then the link method will work.


Assuming the tiles are seamless patterns which do not require any rotating and merely need to be duplicated and aligned..... I would actually use Place and Effects with linked files.... A couple minutes of set up to make any future pattern change take only a few seconds.


So you have 1 file, and you know the size is 100x100px....

enter image description here

Open a new AI file and choose File > Place and select your file. This links to the single file.

enter image description here

Select the Linked image and choose Effect > Distort & Transform > Transform.

Enter a value in the Move - Horizontal area which correlates to the width of your tile, in my case I used 100pts/px. And enter 2 in the Copies field since you want 2 copies to appear....

enter image description here

Click OKAY and you'll see the effect in the Appearance Panel (Window > Appearance).

enter image description here

Click-drag that Transform Effect to the "New" icon at the bottom of the Appearance Panel to duplicate it:

enter image description here

Now click one the Transform effects in the panel, either one, it doesn't matter which.

The Transform Effect Options window will appear again. This time enter the Vertical distance in the Move area, and set the Horizontal back to zero. Copies should still be set at 2, leave that as it is.

enter image description here

And Click OKAY.

You now have a 3x3 grid based on a single placed link. Save this as a "Master" working file if you'd like.

To change patterns, use the Links Panel (Window > Links) to merely relink the image, and all the subsequent duplicates will update as well....

enter image description here

Then simply save as whatever you need.


Note I really don't know the native tiles size for these patterns so numbers are rounded for general clarity. Tiles won't line up correctly due to this.


#Update after comments.....


It appears you are using svg files that are not actually patterns, but rather just expanded artwork. Illustrator embeds these files rather than linking to them. The above still works. However... You'll need to plan differently for changing the initial tile.

  • Place the tile
  • Follow the Effect > Distort & Transform > Transform settings
  • When you get the end and you have the 3x3 grid of tiles, Select the initial tile and drag it to the Graphic Styles Panel (Window > Graphic Styles)

For the next pattern....

  • Select All
  • Delete
  • Place next pattern
  • Click the graphic style you created (It should automatically create the 3x3 grid.)

enter image description here

(I'm using Place with expanded art svg files in the above animation.)

You could choose to resave the svg assets as .ai files, or make the svg files actual pattern-filled rectangles rather than expanded art, then the link method will work.
Assuming the tiles are seamless patterns which do not require any rotating and merely need to be duplicated and aligned..... I would actually use Place and Effects with linked files.... A couple minutes of set up to make any future pattern change take only a few seconds.


So you have 1 file, and you know the size is 100x100px....

enter image description here

Open a new AI file and choose File > Place and select your file. This links to the single file.

enter image description here

Select the Linked image and choose Effect > Distort & Transform > Transform.

Enter a value in the Move - Horizontal area which correlates to the width of your tile, in my case I used 100pts/px. And enter 2 in the Copies field since you want 2 copies to appear....

enter image description here

Click OKAY and you'll see the effect in the Appearance Panel (Window > Appearance).

enter image description here

Click-drag that Transform Effect to the "New" icon at the bottom of the Appearance Panel to duplicate it:

enter image description here

Now click one the Transform effects in the panel, either one, it doesn't matter which.

The Transform Effect Options window will appear again. This time enter the Vertical distance in the Move area, and set the Horizontal back to zero. Copies should still be set at 2, leave that as it is.

enter image description here

And Click OKAY.

You now have a 3x3 grid based on a single placed link. Save this as a "Master" working file if you'd like.

To change patterns, use the Links Panel (Window > Links) to merely relink the image, and all the subsequent duplicates will update as well....

enter image description here

Then simply save as whatever you need.


Note I really don't know the native tiles size for these patterns so numbers are rounded for general clarity. Tiles won't line up correctly due to this.


Update after comments.....


It appears you are using svg files that are not actually patterns, but rather just expanded artwork. Illustrator embeds these files rather than linking to them. The above still works. However... You'll need to plan differently for changing the initial tile.

  • Place the tile
  • Follow the Effect > Distort & Transform > Transform settings
  • When you get the end and you have the 3x3 grid of tiles, Select the initial tile and drag it to the Graphic Styles Panel (Window > Graphic Styles)

For the next pattern....

  • Select All
  • Delete
  • Place next pattern
  • Click the graphic style you created (It should automatically create the 3x3 grid.)

enter image description here

(I'm using Place with expanded art svg files in the above animation.)

You could choose to resave the svg assets as .ai files, or make the svg files actual pattern-filled rectangles rather than expanded art, then the link method will work.
added 1017 characters in body
Source Link
Scott
  • 211.5k
  • 21
  • 297
  • 575

Assuming the tiles are seamless patterns which do not require any rotating and merely need to be duplicated and aligned..... I would actually use Place and Effects with linked files.... A couple minutes of set up to make any future pattern change take only a few seconds.


So you have 1 file, and you know the size is 100x100px....

enter image description here

Open a new AI file and choose File > Place and select your file. This links to the single file.

enter image description here

Select the Linked image and choose Effect > Distort & Transform > Transform.

Enter a value in the Move - Horizontal area which correlates to the width of your tile, in my case I used 100pts/px. And enter 2 in the Copies field since you want 2 copies to appear....

enter image description here

Click OKAY and you'll see the effect in the Appearance Panel (Window > Appearance).

enter image description here

Click-drag that Transform Effect to the "New" icon at the bottom of the Appearance Panel to duplicate it:

enter image description here

Now click one the Transform effects in the panel, either one, it doesn't matter which.

The Transform Effect Options window will appear again. This time enter the Vertical distance in the Move area, and set the Horizontal back to zero. Copies should still be set at 2, leave that as it is.

enter image description here

And Click OKAY.

You now have a 3x3 grid based on a single placed link. Save this as a "Master" working file if you'd like.

To change patterns, use the Links Panel (Window > Links) to merely relink the image, and all the subsequent duplicates will update as well....

enter image description here

Then simply save as whatever you need.


Note I really don't know the native tiles size for these patterns so numbers are rounded for general clarity. Tiles won't line up correctly due to this.


#Update after comments.....


It appears you are using svg files that are not actually patterns, but rather just expanded artwork. Illustrator embeds these files rather than linking to them. The above still works. However... You'll need to plan differently for changing the initial tile.

  • Place the tile
  • Follow the Effect > Distort & Transform > Transform settings
  • When you get the end and you have the 3x3 grid of tiles, Select the initial tile and drag it to the Graphic Styles Panel (Window > Graphic Styles)

For the next pattern....

  • Select All
  • Delete
  • Place next pattern
  • Click the graphic style you created (It should automatically create the 3x3 grid.)

enter image description here

(I'm using Place with expanded art svg files in the above animation.)

You could choose to resave the svg assets as .ai files, or make the svg files actual pattern-filled rectangles rather than expanded art, then the link method will work.
Assuming the tiles are seamless patterns which do not require any rotating and merely need to be duplicated and aligned..... I would actually use Place and Effects with linked files.... A couple minutes of set up to make any future pattern change take only a few seconds.


So you have 1 file, and you know the size is 100x100px....

enter image description here

Open a new AI file and choose File > Place and select your file. This links to the single file.

enter image description here

Select the Linked image and choose Effect > Distort & Transform > Transform.

Enter a value in the Move - Horizontal area which correlates to the width of your tile, in my case I used 100pts/px. And enter 2 in the Copies field since you want 2 copies to appear....

enter image description here

Click OKAY and you'll see the effect in the Appearance Panel (Window > Appearance).

enter image description here

Click-drag that Transform Effect to the "New" icon at the bottom of the Appearance Panel to duplicate it:

enter image description here

Now click one the Transform effects in the panel, either one, it doesn't matter which.

The Transform Effect Options window will appear again. This time enter the Vertical distance in the Move area, and set the Horizontal back to zero. Copies should still be set at 2, leave that as it is.

enter image description here

And Click OKAY.

You now have a 3x3 grid based on a single placed link. Save this as a "Master" working file if you'd like.

To change patterns, use the Links Panel (Window > Links) to merely relink the image, and all the subsequent duplicates will update as well....

enter image description here

Then simply save as whatever you need.


Note I really don't know the native tiles size for these patterns so numbers are rounded for general clarity. Tiles won't line up correctly due to this.


#Update after comments.....


It appears you are using svg files that are not actually patterns, but rather just expanded artwork. Illustrator embeds these files rather than linking to them. The above still works. However... You'll need to plan differently for changing the initial tile.

  • Place the tile
  • Follow the Effect > Distort & Transform > Transform settings
  • When you get the end and you have the 3x3 grid of tiles, Select the initial tile and drag it to the Graphic Styles Panel (Window > Graphic Styles)

For the next pattern....

  • Select All
  • Delete
  • Place next pattern
  • Click the graphic style you created (It should automatically create the 3x3 grid.)

enter image description here

(I'm using Place with expanded art svg files in the above animation.)

You could choose to resave the svg assets as .ai files, or make the svg files actual pattern-filled rectangles rather than expanded art, then the link method will work.
added 66 characters in body
Source Link
Scott
  • 211.5k
  • 21
  • 297
  • 575

Assuming the tiles are seamless patterns which do not require any rotating and merely need to be duplicated and aligned..... I would actually use Place and Effects with linked files.... A couple minutes of set up to make any future pattern change take only a few seconds.


So you have 1 file, and you know the size is 100x100px....

enter image description here

Open a new AI file and choose File > Place and select your file. This links to the single file.

enter image description here

Select the Linked image and choose Effect > Distort & Transform > Transform.

Enter a value in the Move - Horizontal area which correlates to the width of your tile, in my case I used 100pts/px. And enter 2 in the Copies field since you want 2 copies to appear....

enter image description here

Click OKAY and you'll see the effect in the Appearance Panel (Window > Appearance).

enter image description here

Click-drag that Transform Effect to the "New" icon at the bottom of the Appearance Panel to duplicate it:

enter image description here

Now click one the Transform effects in the panel, either one, it doesn't matter which.

The Transform Effect Options window will appear again. This time enter the Vertical distance in the Move area, and set the Horizontal back to zero. Copies should still be set at 2, leave that as it is.

enter image description here

And Click OKAY.

You now have a 3x3 grid based on a single placed link. Save this as a "Master" working file if you'd like.

To change patterns, use the Links Panel (Window > Links) to merely relink the image, and all the subsequent duplicates will update as well....

enter image description here

Then simply save as whatever you need.


Note I really don't know the native tiles size for these patterns so numbers are rounded for general clarity. Tiles won't line up correctly due to this.

I would actually use Place and Effects with linked files.... A couple minutes of set up to make any future pattern change take only a few seconds.


So you have 1 file, and you know the size is 100x100px....

enter image description here

Open a new AI file and choose File > Place and select your file. This links to the single file.

enter image description here

Select the Linked image and choose Effect > Distort & Transform > Transform.

Enter a value in the Move - Horizontal area which correlates to the width of your tile, in my case I used 100pts/px. And enter 2 in the Copies field since you want 2 copies to appear....

enter image description here

Click OKAY and you'll see the effect in the Appearance Panel (Window > Appearance).

enter image description here

Click-drag that Transform Effect to the "New" icon at the bottom of the Appearance Panel to duplicate it:

enter image description here

Now click one the Transform effects in the panel, either one, it doesn't matter which.

The Transform Effect Options window will appear again. This time enter the Vertical distance in the Move area, and set the Horizontal back to zero. Copies should still be set at 2, leave that as it is.

enter image description here

And Click OKAY.

You now have a 3x3 grid based on a single placed link. Save this as a "Master" working file if you'd like.

To change patterns, use the Links Panel (Window > Links) to merely relink the image, and all the subsequent duplicates will update as well....

enter image description here

Note I really don't know the native tiles size for these patterns so numbers are rounded for general clarity. Tiles won't line up correctly due to this.

Assuming the tiles are seamless patterns which do not require any rotating and merely need to be duplicated and aligned..... I would actually use Place and Effects with linked files.... A couple minutes of set up to make any future pattern change take only a few seconds.


So you have 1 file, and you know the size is 100x100px....

enter image description here

Open a new AI file and choose File > Place and select your file. This links to the single file.

enter image description here

Select the Linked image and choose Effect > Distort & Transform > Transform.

Enter a value in the Move - Horizontal area which correlates to the width of your tile, in my case I used 100pts/px. And enter 2 in the Copies field since you want 2 copies to appear....

enter image description here

Click OKAY and you'll see the effect in the Appearance Panel (Window > Appearance).

enter image description here

Click-drag that Transform Effect to the "New" icon at the bottom of the Appearance Panel to duplicate it:

enter image description here

Now click one the Transform effects in the panel, either one, it doesn't matter which.

The Transform Effect Options window will appear again. This time enter the Vertical distance in the Move area, and set the Horizontal back to zero. Copies should still be set at 2, leave that as it is.

enter image description here

And Click OKAY.

You now have a 3x3 grid based on a single placed link. Save this as a "Master" working file if you'd like.

To change patterns, use the Links Panel (Window > Links) to merely relink the image, and all the subsequent duplicates will update as well....

enter image description here

Then simply save as whatever you need.


Note I really don't know the native tiles size for these patterns so numbers are rounded for general clarity. Tiles won't line up correctly due to this.

Source Link
Scott
  • 211.5k
  • 21
  • 297
  • 575
Loading