edited body
Source Link
Billy Kerr
  • 89.4k
  • 6
  • 82
  • 178
  1. Click and drag an image file onto the page.

  2. Scale it to the correct size if necessary by clicking and dragging the corner handles. Holding down Shift as you click and drag maintains the aspect ratio, preventing distortion of the image.

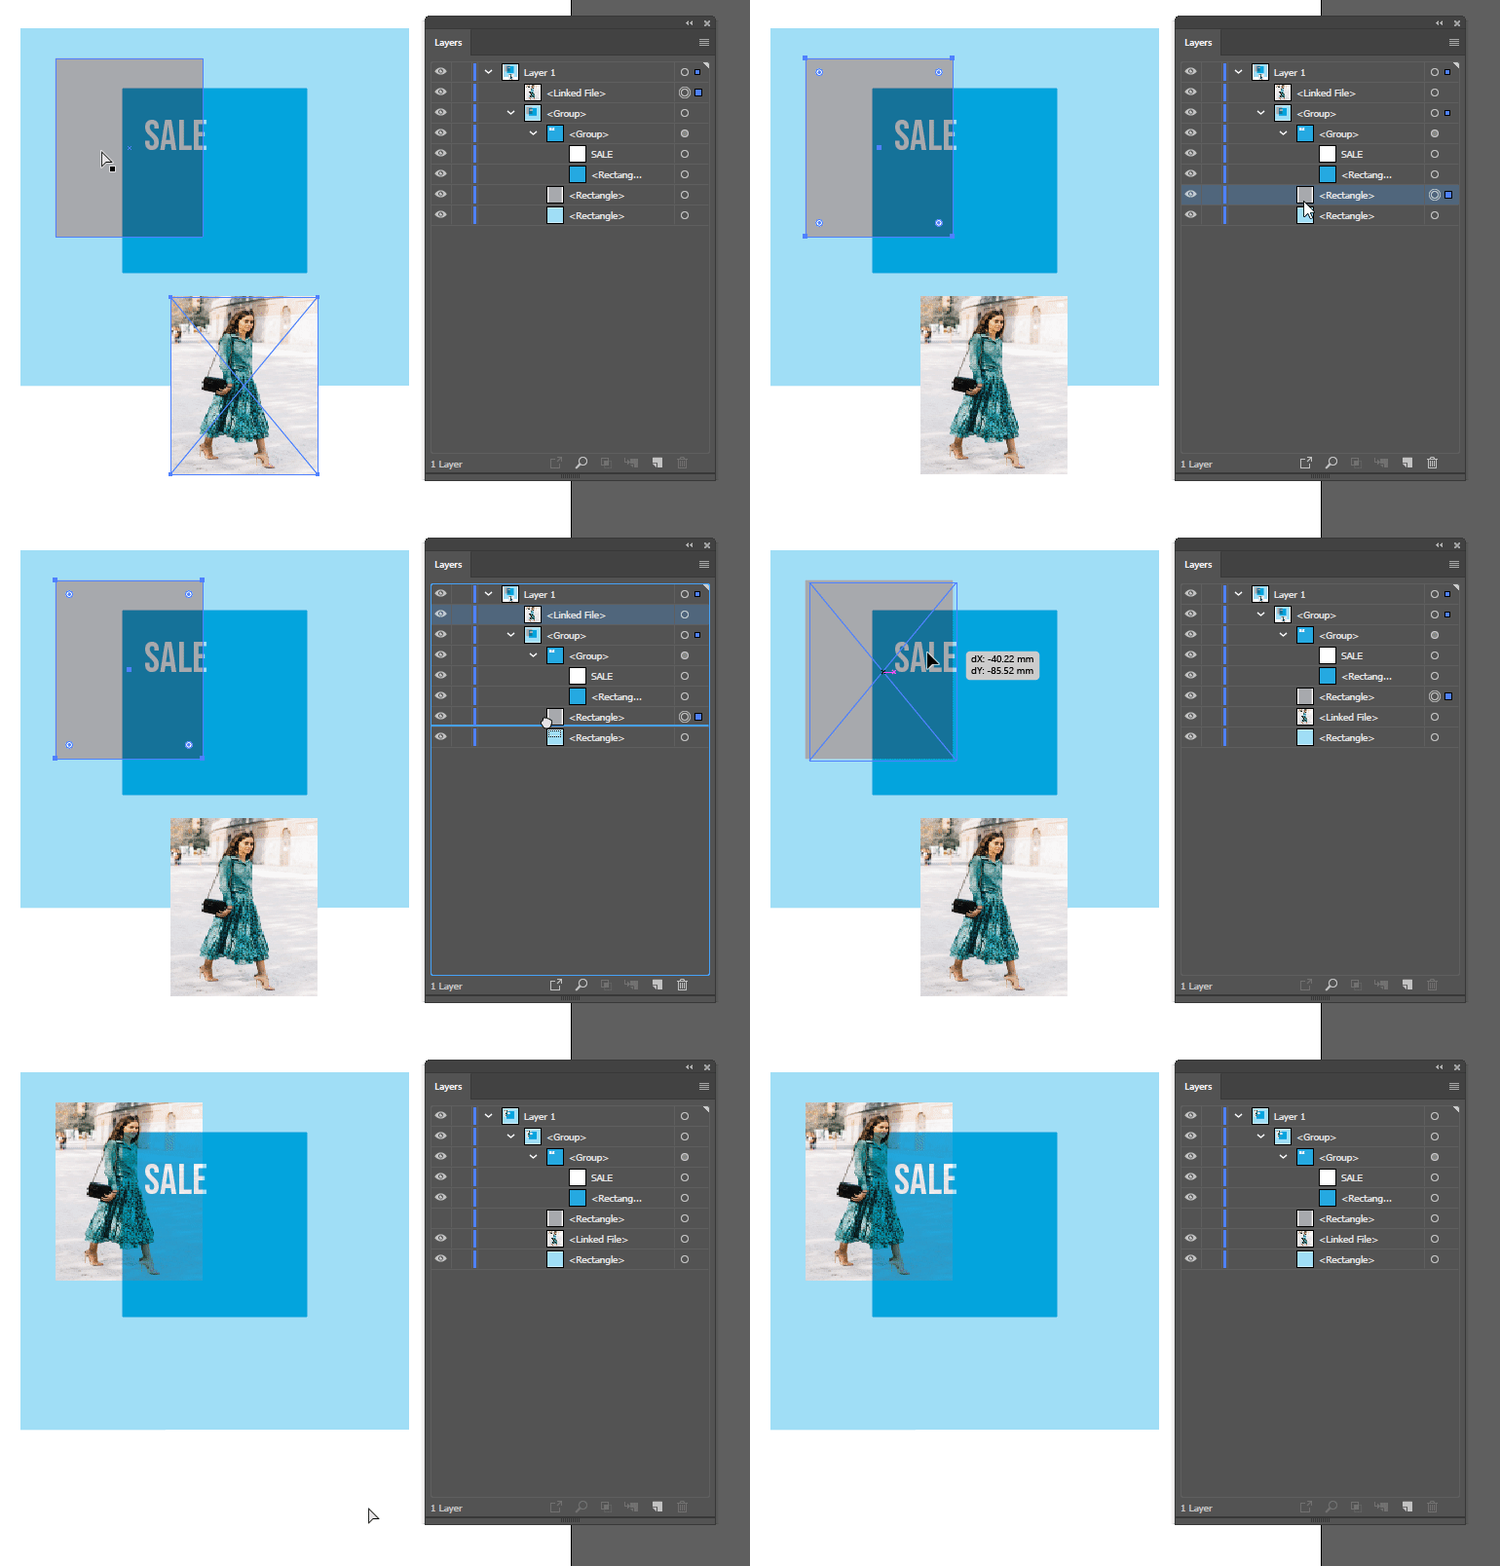
  3. With the Direct Selection tool A, select the grey rectangle, and take a note of where it appears in the layers panel.

  4. Click and drag the image under the grey rectangle

  5. Move the image into position

  6. Hide the grey rectangle

Example showing steps 3 to 6:

enter image description here

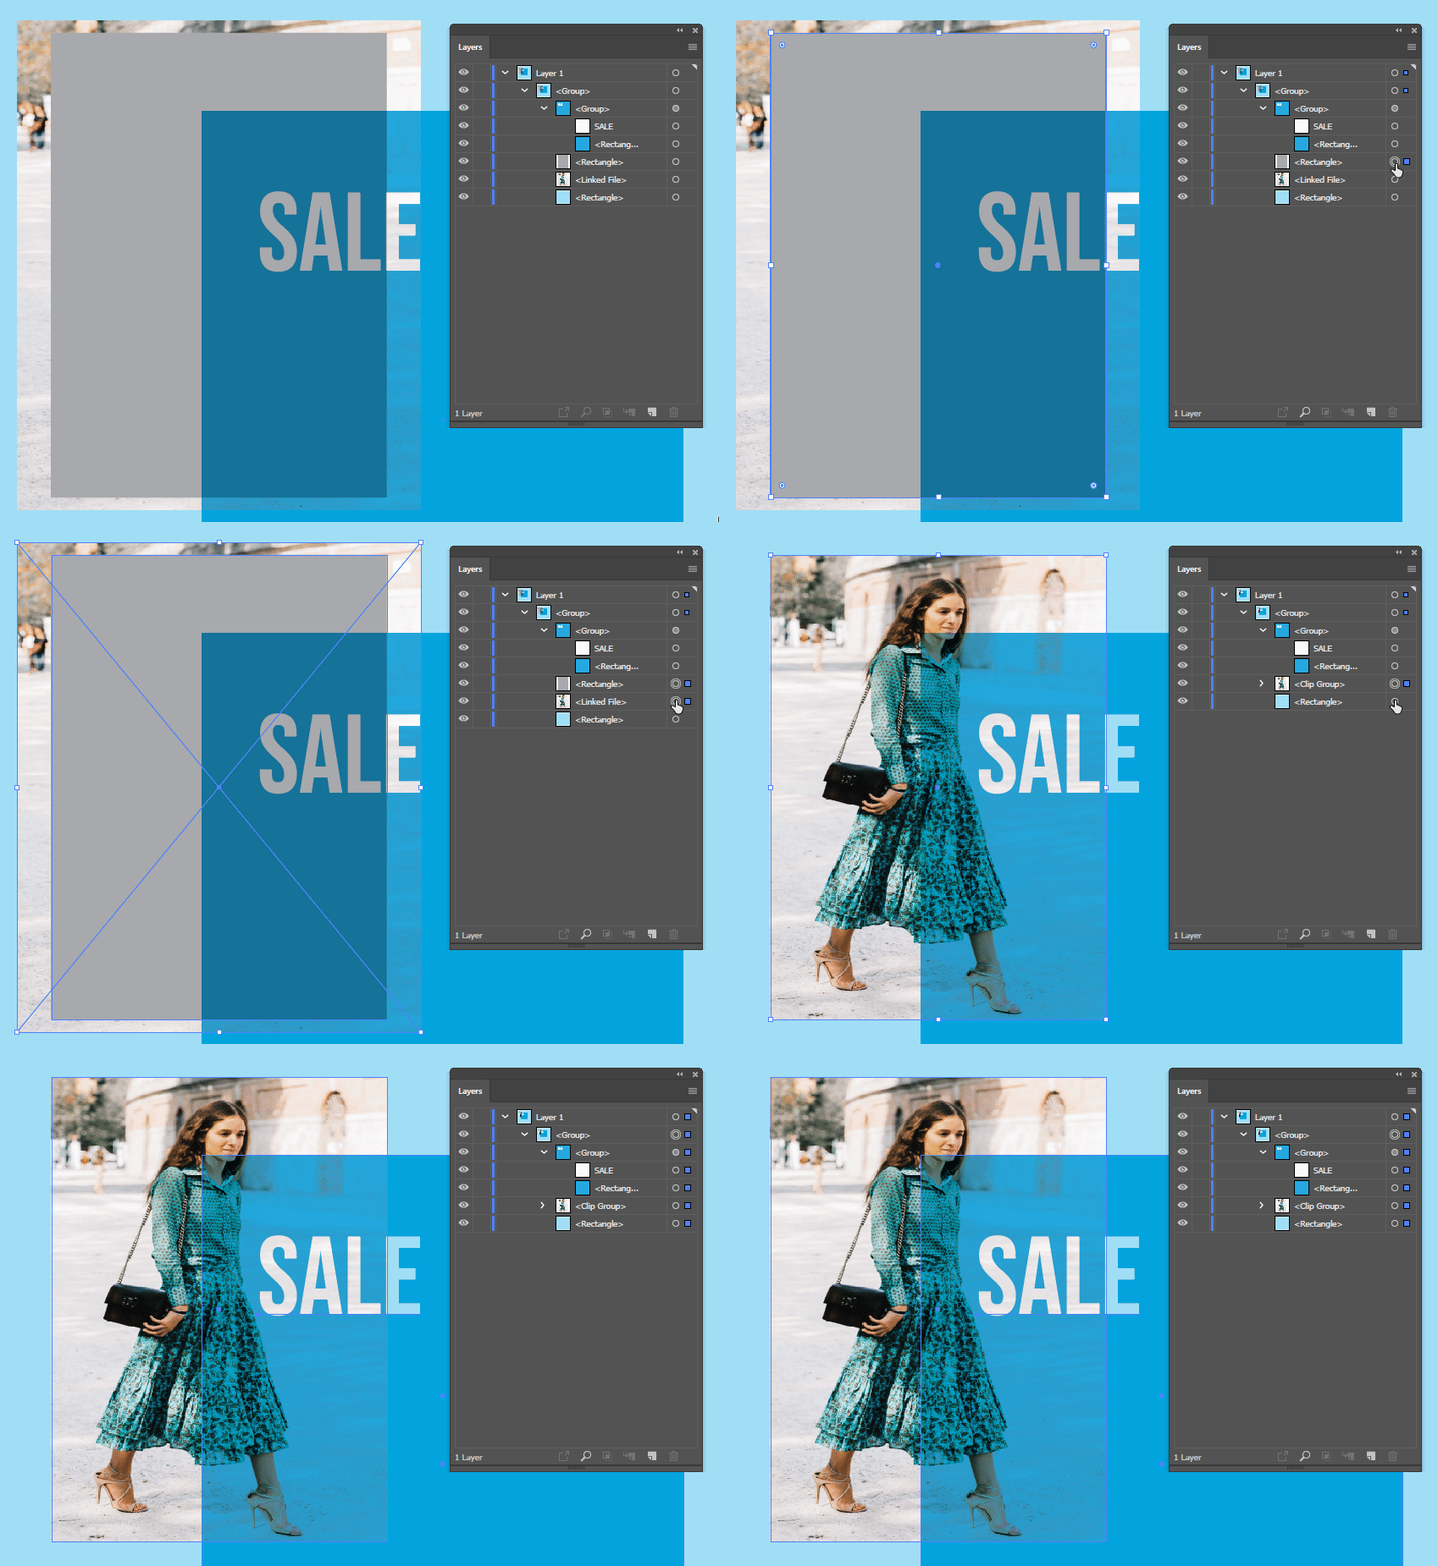
Note: If the image doesn't quite fit the rectangle, for example if it's not the same aspect ratio, you could also use the grey rectangle as a clipping mask to crop the image.

To do so, when the image is in the proper place, select both the grey rectangle and image. Holding down Shift as you target each object allows you to select both objects. Then click Object > Clipping Mask > Make or Ctrl+7 (Windows) or Cmd+7 (Mac)

Example:

enter image description hereenter image description here

  1. Click and drag an image file onto the page.

  2. Scale it to the correct size if necessary by clicking and dragging the corner handles. Holding down Shift as you click and drag maintains the aspect ratio, preventing distortion of the image.

  3. With the Direct Selection tool A, select the grey rectangle, and take a note of where it appears in the layers panel.

  4. Click and drag the image under the grey rectangle

  5. Move the image into position

  6. Hide the grey rectangle

Example showing steps 3 to 6:

enter image description here

Note: If the image doesn't quite fit the rectangle, for example if it's not the same aspect ratio, you could also use the grey rectangle as a clipping mask to crop the image.

To do so, when the image is in the proper place, select both the grey rectangle and image. Holding down Shift as you target each object allows you to select both objects. Then click Object > Clipping Mask > Make or Ctrl+7 (Windows) or Cmd+7 (Mac)

Example:
enter image description here

  1. Click and drag an image file onto the page.

  2. Scale it to the correct size if necessary by clicking and dragging the corner handles. Holding down Shift as you click and drag maintains the aspect ratio, preventing distortion of the image.

  3. With the Direct Selection tool A, select the grey rectangle, and take a note of where it appears in the layers panel.

  4. Click and drag the image under the grey rectangle

  5. Move the image into position

  6. Hide the grey rectangle

Example showing steps 3 to 6:

enter image description here

Note: If the image doesn't quite fit the rectangle, for example if it's not the same aspect ratio, you could also use the grey rectangle as a clipping mask to crop the image.

To do so, when the image is in the proper place, select both the grey rectangle and image. Holding down Shift as you target each object allows you to select both objects. Then click Object > Clipping Mask > Make or Ctrl+7 (Windows) or Cmd+7 (Mac)

Example:

enter image description here

added 274 characters in body
Source Link
Billy Kerr
  • 89.4k
  • 6
  • 82
  • 178
  1. Click and drag an image file onto the page.

  2. Scale it to the correct size if necessary by clicking and dragging the corner handles. Holding down Shift as you click and drag maintains the aspect ratio, preventing distortion of the image.

  3. With the Direct Selection tool A, select the grey rectangle, and take a note of where it appears in the layers panel.

  4. Click and drag the image under the grey rectangle

  5. Move the image into position

  6. Hide the grey rectangle

Example showing steps 3 to 6:

enter image description here

Note: If the image doesn't quite fit the rectangle, for example if it's not the same aspect ratio, you could also use the grey rectangle as a clipping mask to crop the image. 

To do so, when the images areimage is in the proper place, select both the grey rectangle and image and. Holding down Shift as you target each object allows you to select both objects. Then click Object > Clipping Mask > Make or Ctrl+7 (Windows) or Cmd+7 (Mac)

Example:
enter image description here

  1. Click and drag an image file onto the page

  2. With the Direct Selection tool A, select the grey rectangle, and take a note of where it appears in the layers panel.

  3. Click and drag the image under the grey rectangle

  4. Move the image into position

  5. Hide the grey rectangle

Example:

enter image description here

Note: If the image doesn't quite fit the rectangle, for example if it's not the same aspect ratio, you could also use the grey rectangle as a clipping mask to crop the image. To do so, when the images are in the proper place, select both the grey rectangle and image and click Object > Clipping Mask > Make

  1. Click and drag an image file onto the page.

  2. Scale it to the correct size if necessary by clicking and dragging the corner handles. Holding down Shift as you click and drag maintains the aspect ratio, preventing distortion of the image.

  3. With the Direct Selection tool A, select the grey rectangle, and take a note of where it appears in the layers panel.

  4. Click and drag the image under the grey rectangle

  5. Move the image into position

  6. Hide the grey rectangle

Example showing steps 3 to 6:

enter image description here

Note: If the image doesn't quite fit the rectangle, for example if it's not the same aspect ratio, you could also use the grey rectangle as a clipping mask to crop the image. 

To do so, when the image is in the proper place, select both the grey rectangle and image. Holding down Shift as you target each object allows you to select both objects. Then click Object > Clipping Mask > Make or Ctrl+7 (Windows) or Cmd+7 (Mac)

Example:

enter image description here

added 1 character in body
Source Link
Billy Kerr
  • 89.4k
  • 6
  • 82
  • 178
  1. Click and drag an image file onto the page

  2. With the Direct Selection tool A, select the grey rectangle, and take a note of where it appears in the layers panel.

  3. Click and drag the image under the grey rectangle

  4. Move the image into position

  5. Hide the grey rectangle

Example:

enter image description here

Note: If the image doesn't quite fit the rectangle, for example if it's not the same aspect ratio, you could also use the grey rectangle as a clipping mask to crop the image. To do so, when the images are in the proper place, select both the grey rectangle and image and click Object > Clipping Mask > Make

  1. Click and drag an image file onto the page

  2. With the Direct Selection tool A, select the grey rectangle, and take a note of where it appears in the layers panel.

  3. Click and drag the image under the grey rectangle

  4. Move the image into position

  5. Hide the grey rectangle

Example:

enter image description here

Note: If the image doesn't quite fit the rectangle for example if it's not the same aspect ratio, you could also use the grey rectangle as a clipping mask to crop the image. To do so select both grey rectangle and image and click Object > Clipping Mask > Make

  1. Click and drag an image file onto the page

  2. With the Direct Selection tool A, select the grey rectangle, and take a note of where it appears in the layers panel.

  3. Click and drag the image under the grey rectangle

  4. Move the image into position

  5. Hide the grey rectangle

Example:

enter image description here

Note: If the image doesn't quite fit the rectangle, for example if it's not the same aspect ratio, you could also use the grey rectangle as a clipping mask to crop the image. To do so, when the images are in the proper place, select both the grey rectangle and image and click Object > Clipping Mask > Make

Source Link
Billy Kerr
  • 89.4k
  • 6
  • 82
  • 178
Loading