added 250 characters in body
Source Link
Wolff
  • 21.3k
  • 2
  • 30
  • 68

Here is an idea for Photoshop. There are a few steps, so I'll just explain the general procedure without going into every detail. Feel free to ask for clarification.

I'll use this image with some random colored blobs as an example:

The red cross is the wanted center.

First we need to make sure that the wanted center is exactly in the center of the image. A way to do that is to first crop the image to the center pixel with Delete Cropped Pixels ticked off and then afterwards use Image > Canvas Size to expand the canvas again.

The image I'm using is 640 × 480 px, so I expand the canvas to the double of the original (to be sure not to crop anything) plus 1 px (to make sure the cross is exactly in the middle). So I end up with an image that is 1081 × 961 px:

You can of course manually crop it smaller if you want as long as you make sure to keep the cross in the center.

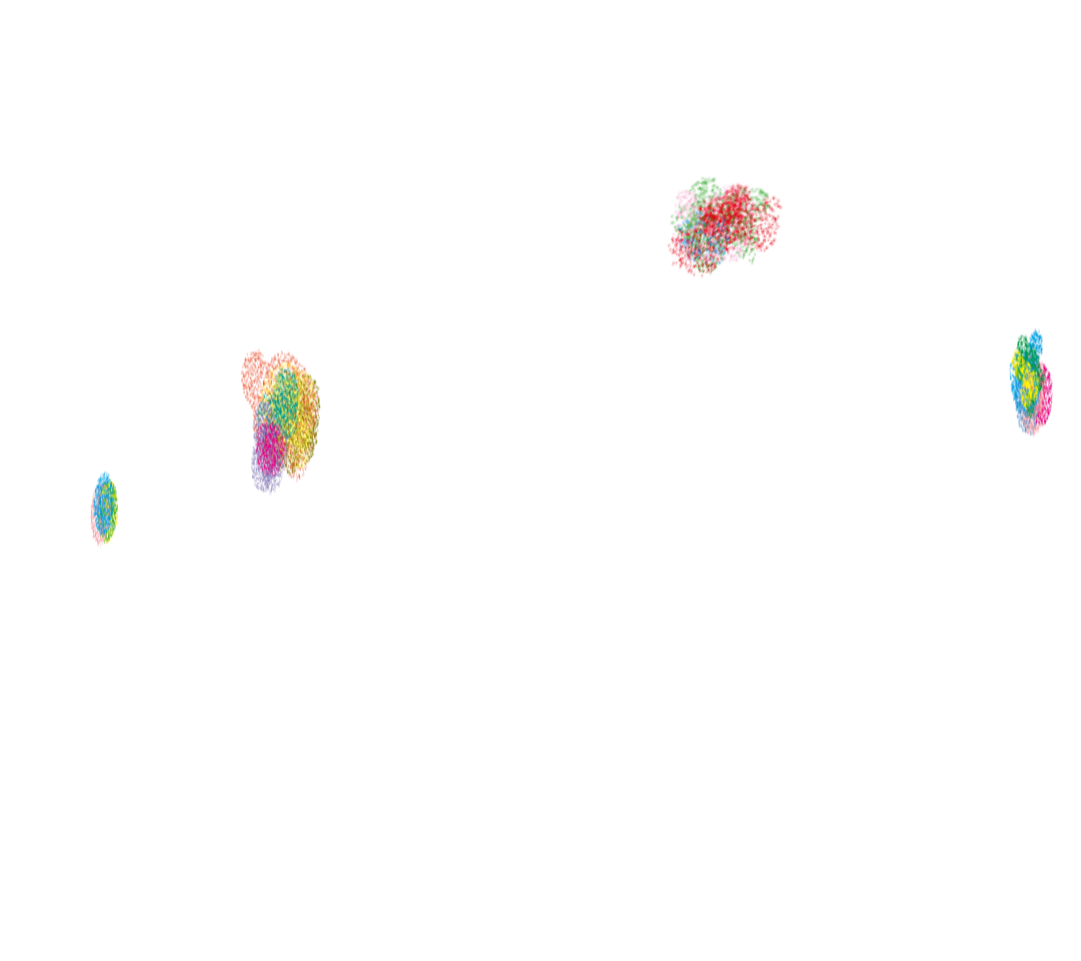
Delete the center cross and use Filter > Distort > Polar Coordinates set to Polar to Rectangular. This assumes that the image is a circular image which you then stretch out to fit a rectangle with the center in the top and the outer circumference in the bottom:

Now we need to make the color blobs continue downwards until they hit the lower boundary of the image. Sadly, as far as I know, Photoshop hasn't got an easy way to use a whole image as a brush. Clone Tool doesn't allow drawing lines and the different blur filters are too destructive. Furthermore, as you want the "exit pixels" to project outwards we need to make sure that we keep painting below the current image.

So for this I record an action:

  • Ctrl + A to Select All.

  • Ctrl + C to Copy the current image to clipboard.

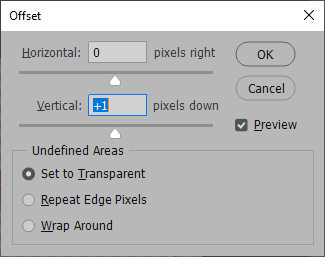
  • Filter > Other > Offset with the following settings to nudge the whole image 1 px down:

  • Shift + Ctrl + V to Paste in Place the previous image.

  • Shift + Ctrl + E to Merge Visible.

This just paints 1 px so I record another action where I repeat the previous action many times and assign that action to a function key. You can also just record one and afterwards copy that event in the Action panel.

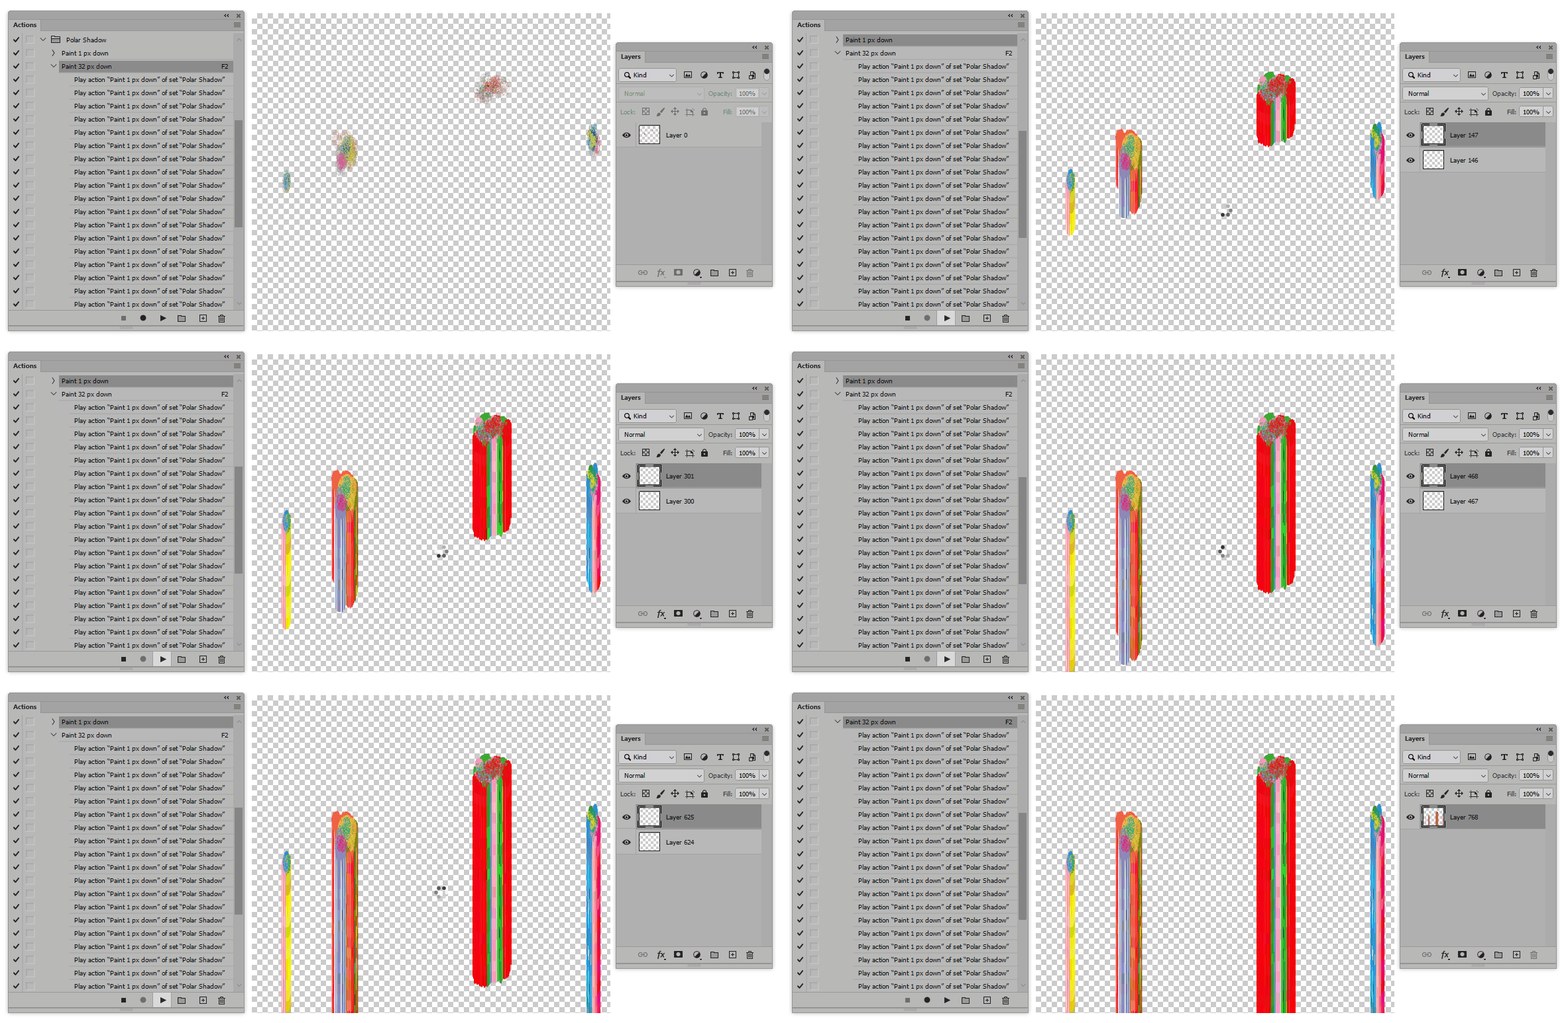
Now I can press the function key until the blobs continue to the edge of the image:

(The playback speed has been significantly increased. This is a very slow way to do it. There might be an easier way to achieve this.)

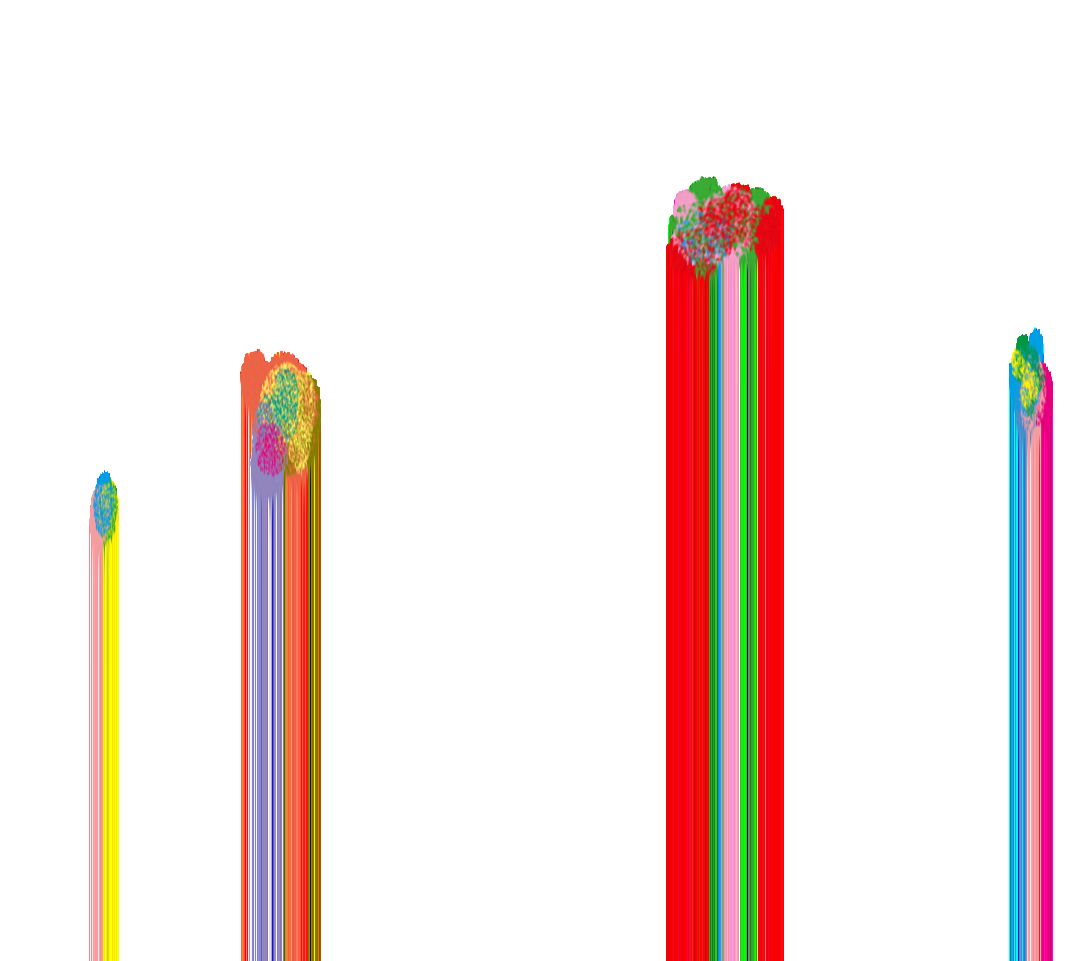
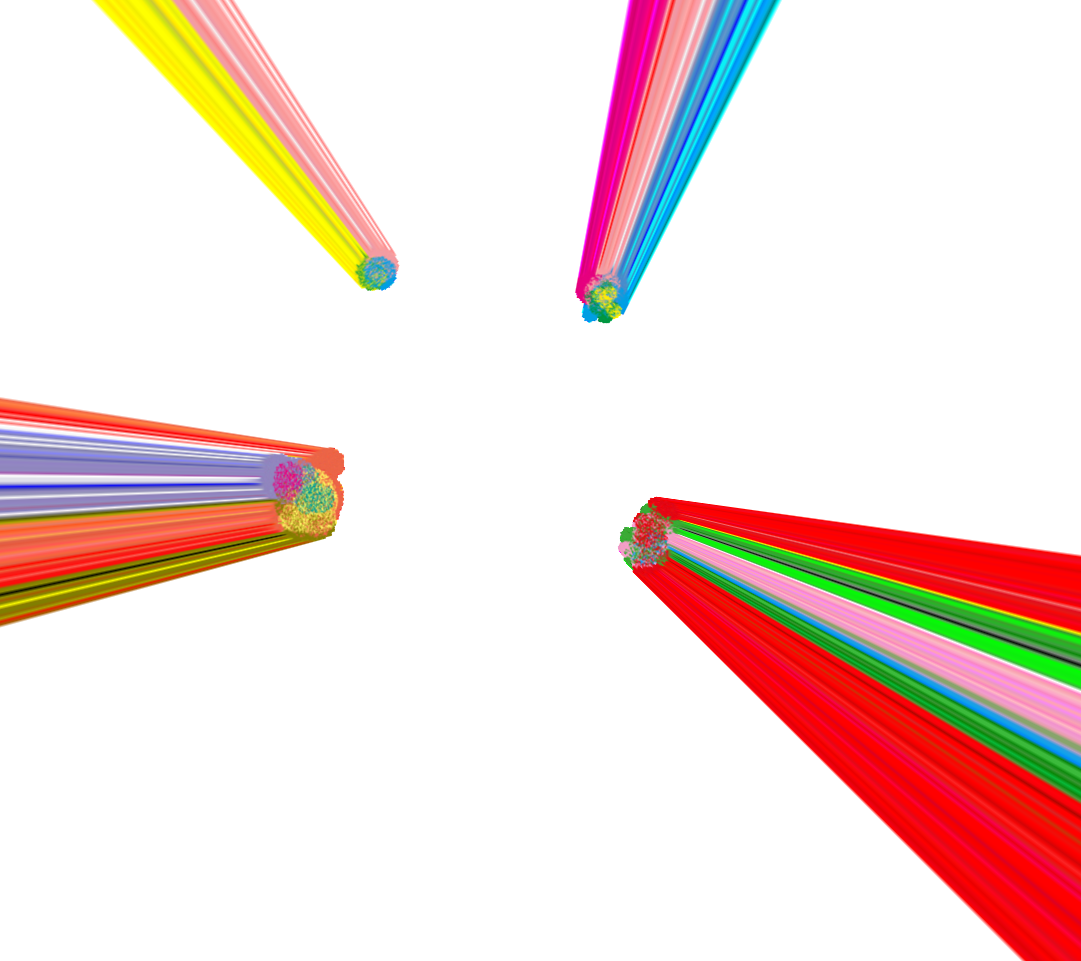
All that remains to be done now is to use Filter > Distort > Polar Coordinates set to Rectangular to Polar and we have a result:

As you might notice, the result is a little blurred from being distorted back and forth. Depending on what you want to use this for, it might look good if you paste in the original image on top to bring the objects back to their original sharpness.

Here is an idea for Photoshop. There are a few steps, so I'll just explain the general procedure without going into every detail. Feel free to ask for clarification.

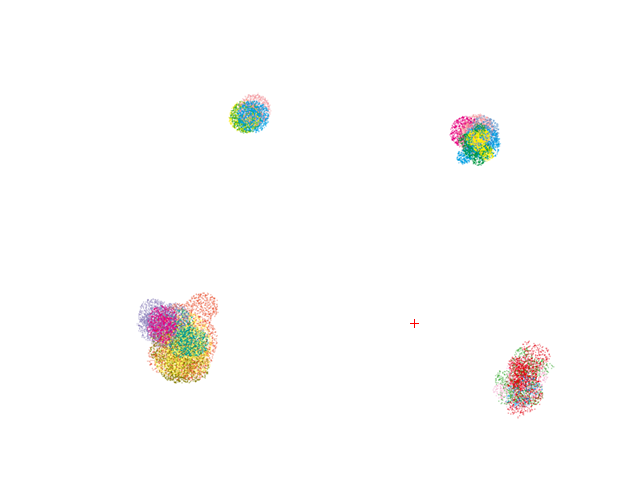
I'll use this image with some random colored blobs as an example:

The red cross is the wanted center.

First we need to make sure that the wanted center is exactly in the center of the image. A way to do that is to first crop the image to the center pixel with Delete Cropped Pixels ticked off and then afterwards use Image > Canvas Size to expand the canvas again.

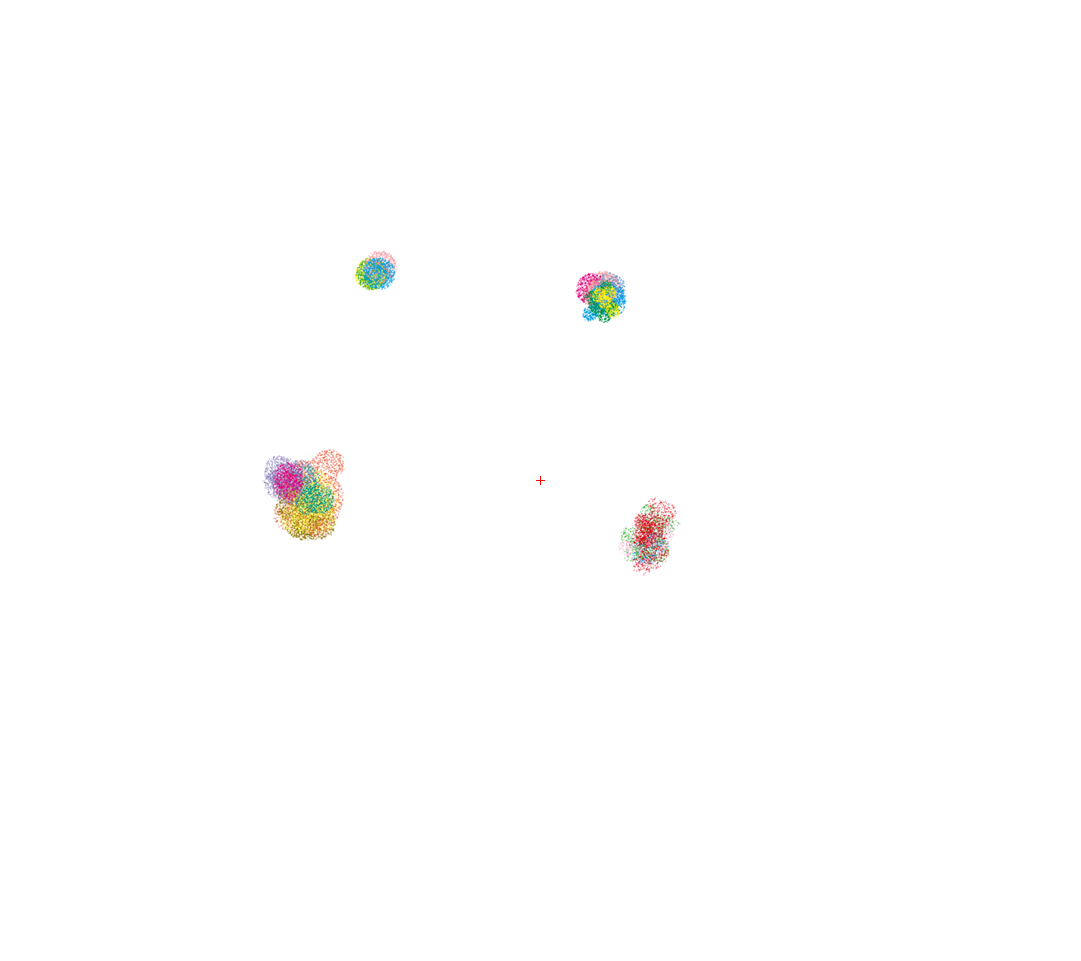
The image I'm using is 640 × 480 px, so I expand the canvas to the double of the original (to be sure not to crop anything) plus 1 px (to make sure the cross is exactly in the middle). So I end up with an image that is 1081 × 961 px:

You can of course manually crop it smaller if you want as long as you make sure to keep the cross in the center.

Delete the center cross and use Filter > Distort > Polar Coordinates set to Polar to Rectangular. This assumes that the image is a circular image which you then stretch out to fit a rectangle with the center in the top and the outer circumference in the bottom:

Now we need to make the color blobs continue downwards until they hit the lower boundary of the image. Sadly, as far as I know, Photoshop hasn't got an easy way to use a whole image as a brush. Clone Tool doesn't allow drawing lines and the different blur filters are too destructive. Furthermore, as you want the "exit pixels" to project outwards we need to make sure that we keep painting below the current image.

So for this I record an action:

  • Ctrl + A to Select All.

  • Ctrl + C to Copy the current image to clipboard.

  • Filter > Other > Offset with the following settings to nudge the whole image 1 px down:

  • Shift + Ctrl + V to Paste in Place the previous image.

  • Shift + Ctrl + E to Merge Visible.

This just paints 1 px so I record another action where I repeat the previous action many times and assign that action to a function key. You can also just record one and afterwards copy that event in the Action panel.

Now I can press the function key until the blobs continue to the edge of the image:

(The playback speed has been significantly increased. This is a very slow way to do it. There might be an easier way to achieve this.)

All that remains to be done now is to use Filter > Distort > Polar Coordinates set to Rectangular to Polar and we have a result:

As you might notice, the result is a little blurred from being distorted back and forth. Depending on what you want to use this for, it might look good if you paste in the original image on top to bring the objects back to their original sharpness.
added 157 characters in body
Source Link
Wolff
  • 21.3k
  • 2
  • 30
  • 68

Here is an idea for Photoshop. There are a few steps, so I'll just explain the general procedure without going into every detail. Feel free to ask for clarification.

I'll use this image with some random colored blobs as an example:

The red cross is the wanted center.

First we need to make sure that the wanted center is exactly in the center of the image. A way to do that is to first crop the image to the center pixel with Delete Cropped Pixels ticked off and then afterwards use Image > Canvas Size to expand the canvas again.

The image I'm using is 640 × 480 px, so I expand the canvas to the double of the original (to be sure not to crop anything) plus 1 px (to make sure the cross is exactly in the middle). So I end up with an image that is 1081 × 961 px:

You can of course manually crop it smaller if you want as long as you make sure to keep the cross in the center.

Delete the center cross and use Filter > Distort > Polar Coordinates set to Polar to Rectangular. This assumes that the image is a circular image which you then stretch out to fit a rectangle with the center in the top and the outer circumference in the bottom:

Now we need to make the color blobs continue downwards until they hit the lower boundary of the image. Sadly, as far as I know, Photoshop hasn't got an easy way to use a whole image as a brush. Clone Tool doesn't allow drawing lines and the different blur filters are too destructive. Furthermore, as you want the "exit pixels" to project outwards we need to make sure that we keep painting below the current image.

So for this I record an action:

  • Ctrl + A to Select All.

  • Ctrl + C to Copy the current image to clipboard.

  • Filter > Other > Offset with the following settings to nudge the whole image 1 px down:

  • Shift + Ctrl + V to Paste in Place the previous image.

  • Shift + Ctrl + E to Merge Visible.

This just paints 1 px so I record another action where I repeat the previous action many times and assign that action to a function key. You can also just record one and afterwards copy that event in the Action panel.

(There might be an easier way to achieve this. Perhaps using Filter > Other > Custom, but I can't figure it out right now.)

Now I can press the function key until the blobs continue to the edge of the image:

(The playback speed has been significantly increased. This is a very slow way to do it. There might be an easier way to achieve this.)

All that remains to be done now is to use Filter > Distort > Polar Coordinates set to Rectangular to Polar and we have a result:

Here is an idea for Photoshop. There are a few steps, so I'll just explain the general procedure without going into every detail. Feel free to ask for clarification.

I'll use this image with some random colored blobs as an example:

The red cross is the wanted center.

First we need to make sure that the wanted center is exactly in the center of the image. A way to do that is to first crop the image to the center pixel with Delete Cropped Pixels ticked off and then afterwards use Image > Canvas Size to expand the canvas again.

The image I'm using is 640 × 480 px, so I expand the canvas to the double of the original (to be sure not to crop anything) plus 1 px (to make sure the cross is exactly in the middle). So I end up with an image that is 1081 × 961 px:

You can of course manually crop it smaller if you want.

Delete the center cross and use Filter > Distort > Polar Coordinates set to Polar to Rectangular. This assumes that the image is a circular image which you then stretch out to fit a rectangle with the center in the top and the outer circumference in the bottom:

Now we need to make the color blobs continue downwards until they hit the lower boundary of the image. Sadly, as far as I know, Photoshop hasn't got an easy way to use a whole image as a brush. Clone Tool doesn't allow drawing lines and the different blur filters are too destructive.

So for this I record an action:

  • Ctrl + A to Select All.

  • Ctrl + C to Copy.

  • Filter > Other > Offset with the following settings to nudge the whole image 1 px down:

  • Shift + Ctrl + V to Paste in Place.

  • Shift + Ctrl + E to Merge Visible.

This just paints 1 px so I record another action where I repeat the previous action many times and assign that action to a function key. You can also just record one and afterwards copy that event in the Action panel.

(There might be an easier way to achieve this. Perhaps using Filter > Other > Custom, but I can't figure it out right now.)

Now I can press the function key until the blobs continue to the edge of the image:

(The playback speed has been significantly increased. This is a very slow way to do it.)

All that remains to be done now is to use Filter > Distort > Polar Coordinates set to Rectangular to Polar and we have a result:

Here is an idea for Photoshop. There are a few steps, so I'll just explain the general procedure without going into every detail. Feel free to ask for clarification.

I'll use this image with some random colored blobs as an example:

The red cross is the wanted center.

First we need to make sure that the wanted center is exactly in the center of the image. A way to do that is to first crop the image to the center pixel with Delete Cropped Pixels ticked off and then afterwards use Image > Canvas Size to expand the canvas again.

The image I'm using is 640 × 480 px, so I expand the canvas to the double of the original (to be sure not to crop anything) plus 1 px (to make sure the cross is exactly in the middle). So I end up with an image that is 1081 × 961 px:

You can of course manually crop it smaller if you want as long as you make sure to keep the cross in the center.

Delete the center cross and use Filter > Distort > Polar Coordinates set to Polar to Rectangular. This assumes that the image is a circular image which you then stretch out to fit a rectangle with the center in the top and the outer circumference in the bottom:

Now we need to make the color blobs continue downwards until they hit the lower boundary of the image. Sadly, as far as I know, Photoshop hasn't got an easy way to use a whole image as a brush. Clone Tool doesn't allow drawing lines and the different blur filters are too destructive. Furthermore, as you want the "exit pixels" to project outwards we need to make sure that we keep painting below the current image.

So for this I record an action:

  • Ctrl + A to Select All.

  • Ctrl + C to Copy the current image to clipboard.

  • Filter > Other > Offset with the following settings to nudge the whole image 1 px down:

  • Shift + Ctrl + V to Paste in Place the previous image.

  • Shift + Ctrl + E to Merge Visible.

This just paints 1 px so I record another action where I repeat the previous action many times and assign that action to a function key. You can also just record one and afterwards copy that event in the Action panel.

Now I can press the function key until the blobs continue to the edge of the image:

(The playback speed has been significantly increased. This is a very slow way to do it. There might be an easier way to achieve this.)

All that remains to be done now is to use Filter > Distort > Polar Coordinates set to Rectangular to Polar and we have a result:

Source Link
Wolff
  • 21.3k
  • 2
  • 30
  • 68

Here is an idea for Photoshop. There are a few steps, so I'll just explain the general procedure without going into every detail. Feel free to ask for clarification.

I'll use this image with some random colored blobs as an example:

The red cross is the wanted center.

First we need to make sure that the wanted center is exactly in the center of the image. A way to do that is to first crop the image to the center pixel with Delete Cropped Pixels ticked off and then afterwards use Image > Canvas Size to expand the canvas again.

The image I'm using is 640 × 480 px, so I expand the canvas to the double of the original (to be sure not to crop anything) plus 1 px (to make sure the cross is exactly in the middle). So I end up with an image that is 1081 × 961 px:

You can of course manually crop it smaller if you want.

Delete the center cross and use Filter > Distort > Polar Coordinates set to Polar to Rectangular. This assumes that the image is a circular image which you then stretch out to fit a rectangle with the center in the top and the outer circumference in the bottom:

Now we need to make the color blobs continue downwards until they hit the lower boundary of the image. Sadly, as far as I know, Photoshop hasn't got an easy way to use a whole image as a brush. Clone Tool doesn't allow drawing lines and the different blur filters are too destructive.

So for this I record an action:

  • Ctrl + A to Select All.

  • Ctrl + C to Copy.

  • Filter > Other > Offset with the following settings to nudge the whole image 1 px down:

  • Shift + Ctrl + V to Paste in Place.

  • Shift + Ctrl + E to Merge Visible.

This just paints 1 px so I record another action where I repeat the previous action many times and assign that action to a function key. You can also just record one and afterwards copy that event in the Action panel.

(There might be an easier way to achieve this. Perhaps using Filter > Other > Custom, but I can't figure it out right now.)

Now I can press the function key until the blobs continue to the edge of the image:

(The playback speed has been significantly increased. This is a very slow way to do it.)

All that remains to be done now is to use Filter > Distort > Polar Coordinates set to Rectangular to Polar and we have a result: