added suggestions after seeing script procedure
Source Link
Scott
  • 211.5k
  • 21
  • 297
  • 575

As for fitting text boxes to text.. see the script in your first question link. That's the only method I'm aware of.

The fill issue is MUCH easier to solve.

  • select the area text with the Selection Tool (black arrow)
  • Add a new fill via the Appearance Panel
  • set fill color and drag the fill below the Characters item in the Appearance Panel
  • With the fill highlighted in the Appearance Panel, choose Effect > Convert to Shape > Rectangle and enter values you want. Then click OK
  • Click the Opacity indicator under the fill in the Appearance Panel and enter the Opacity you wish the fill to have. This will not alter the text.
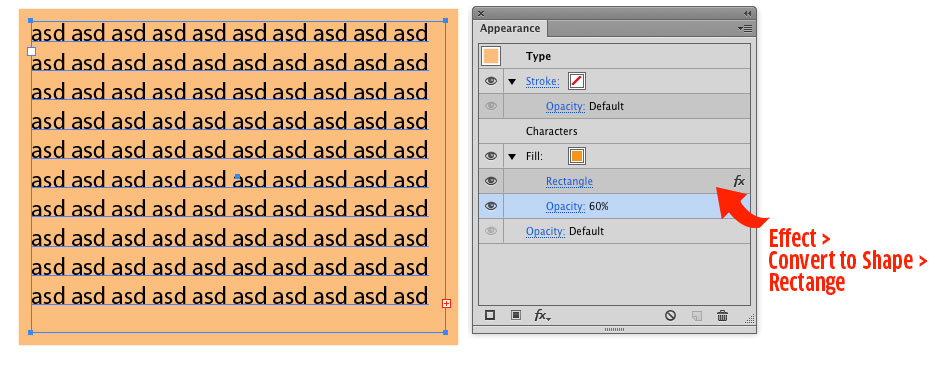
fill

Set this up once, then drag the whole thing to the Graphic Styles Panel. When you need to apply this same appearance, simply select the Area Text box and then click the style in the Graphic Style Panel.

Note, the background is relative to the Area Text box... if the box changes size, the background will as well.

Added after seeing what the script does to the appearance.

The script does kill the appearance. So here's what I would do...

Set up the Graphic Style and save it.
Have an Area text box set up and ready for the script.

Now create a new Action and start recording...

  • Run the script
  • click the Graphic Style
    Stop recording.
    Assign an F key to the action.

Now all you need do is select an Area Text Box and hit the assigned F key. If the text box needs resizing while working, just tap the F key.

Caveat....

Illustrator has, and has had, a bug where scripts in actions are concerned. The action will not retain the script step if you quit Illustrator. So each time you launch Illustrator you would need to set up the action again. It's annoying, time consuming and a pain. However, recreating the action each time it's needed may be much faster than manually manipulating text boxes and appearances.

As for fitting text boxes to text.. see the script in your first question link. That's the only method I'm aware of.

The fill issue is MUCH easier to solve.

  • select the area text with the Selection Tool (black arrow)
  • Add a new fill via the Appearance Panel
  • set fill color and drag the fill below the Characters item in the Appearance Panel
  • With the fill highlighted in the Appearance Panel, choose Effect > Convert to Shape > Rectangle and enter values you want. Then click OK
  • Click the Opacity indicator under the fill in the Appearance Panel and enter the Opacity you wish the fill to have. This will not alter the text.

fill

Set this up once, then drag the whole thing to the Graphic Styles Panel. When you need to apply this same appearance, simply select the Area Text box and then click the style in the Graphic Style Panel.

Note, the background is relative to the Area Text box... if the box changes size, the background will as well.

Added after seeing what the script does to the appearance.

The script does kill the appearance. So here's what I would do...

Set up the Graphic Style and save it.
Have an Area text box set up and ready for the script.

Now create a new Action and start recording...

  • Run the script
  • click the Graphic Style
    Stop recording.
    Assign an F key to the action.

Now all you need do is select an Area Text Box and hit the assigned F key. If the text box needs resizing while working, just tap the F key.

Caveat....

Illustrator has, and has had, a bug where scripts in actions are concerned. The action will not retain the script step if you quit Illustrator. So each time you launch Illustrator you would need to set up the action again. It's annoying, time consuming and a pain. However, recreating the action each time it's needed may be much faster than manually manipulating text boxes and appearances.

added 30 characters in body
Source Link
Scott
  • 211.5k
  • 21
  • 297
  • 575

As for fitting text boxes to text.. see the script in your first question link. That's the only method I'm aware of.

The fill issue is MUCH easier to solve.

  • select the area text with the Selection Tool (black arrow)
  • Add a new fill via the Appearance Panel
  • set fill color and drag the fill below the Characters item in the Appearance Panel
  • With the fill highlighted in the Appearance Panel, choose Effect > Convert to Shape > Rectangle and enderenter values you want. Then click OK
  • Click the Opacity indicator under the fill in the Appearance Panel and enter the Opacity you wish the fill to have. This will not alter the text.

fill

Set this up once, then drag the whole thing to the Graphic Styles Panel. When you need to apply this same appearance, simply select the Area Text box and then click the style in the Graphic Style Panel.

Note, the background is relative to the Area Text box... if the box changes size, the background will as well.

As for fitting text boxes to text.. see the script in your first question link. That's the only method I'm aware of.

The fill issue is MUCH easier to solve.

  • select the area text with the Selection Tool (black arrow)
  • Add a new fill via the Appearance Panel
  • set fill color and drag the fill below the Characters item in the Appearance Panel
  • With the fill highlighted in the Appearance Panel, choose Effect > Convert to Shape > Rectangle and ender values you want. Then click OK
  • Click the Opacity indicator under the fill in the Appearance Panel and enter the Opacity you wish the fill to have.

fill

Set this up once, then drag the whole thing to the Graphic Styles Panel. When you need to apply this same appearance, simply select the Area Text box and then click the style in the Graphic Style Panel.

Note, the background is relative to the Area Text box... if the box changes size, the background will as well.

As for fitting text boxes to text.. see the script in your first question link. That's the only method I'm aware of.

The fill issue is MUCH easier to solve.

  • select the area text with the Selection Tool (black arrow)
  • Add a new fill via the Appearance Panel
  • set fill color and drag the fill below the Characters item in the Appearance Panel
  • With the fill highlighted in the Appearance Panel, choose Effect > Convert to Shape > Rectangle and enter values you want. Then click OK
  • Click the Opacity indicator under the fill in the Appearance Panel and enter the Opacity you wish the fill to have. This will not alter the text.

fill

Set this up once, then drag the whole thing to the Graphic Styles Panel. When you need to apply this same appearance, simply select the Area Text box and then click the style in the Graphic Style Panel.

Note, the background is relative to the Area Text box... if the box changes size, the background will as well.

Source Link
Scott
  • 211.5k
  • 21
  • 297
  • 575

As for fitting text boxes to text.. see the script in your first question link. That's the only method I'm aware of.

The fill issue is MUCH easier to solve.

  • select the area text with the Selection Tool (black arrow)
  • Add a new fill via the Appearance Panel
  • set fill color and drag the fill below the Characters item in the Appearance Panel
  • With the fill highlighted in the Appearance Panel, choose Effect > Convert to Shape > Rectangle and ender values you want. Then click OK
  • Click the Opacity indicator under the fill in the Appearance Panel and enter the Opacity you wish the fill to have.

fill

Set this up once, then drag the whole thing to the Graphic Styles Panel. When you need to apply this same appearance, simply select the Area Text box and then click the style in the Graphic Style Panel.

Note, the background is relative to the Area Text box... if the box changes size, the background will as well.