added 2 characters in body
Source Link
cockypup
  • 8.2k
  • 32
  • 53

I agree I would do this in Illustrator, but since you ask for Photoshop, here it goes. There are probably endless other ways of doing it, but this is what I did, using colour layers to be able to easily change the colours.

  1. Start with a white canvas.
  2. Add a solid fill colour layer of the colour of your choice (Layer->New Fill Layer->Solid Colour)
  3. Click on the mask thumbnail of the solid colour.
  4. Fill it with black. The colour disappears, since everything is masked.
  5. Draw a white hexagon on the mask. With the mask still selected, use the Shape tool (U) to draw an hexagon. Make sure that you select Pixels (as opposed to Shape or Path) on the top menu. If you don't select pixels, it will add an hexagon layer instead of drawing on the mask.

enter image description here

  1. To create the hexagon gradient (there are probably other 10K ways of doing this, with the mask still selected Ctrl-Click on the mask thumbnail. This creates a selection with the shape of the hexagon.

  2. Select the gradient tool and select a black-to-white gradient. Select 90% opacity at the top menu.

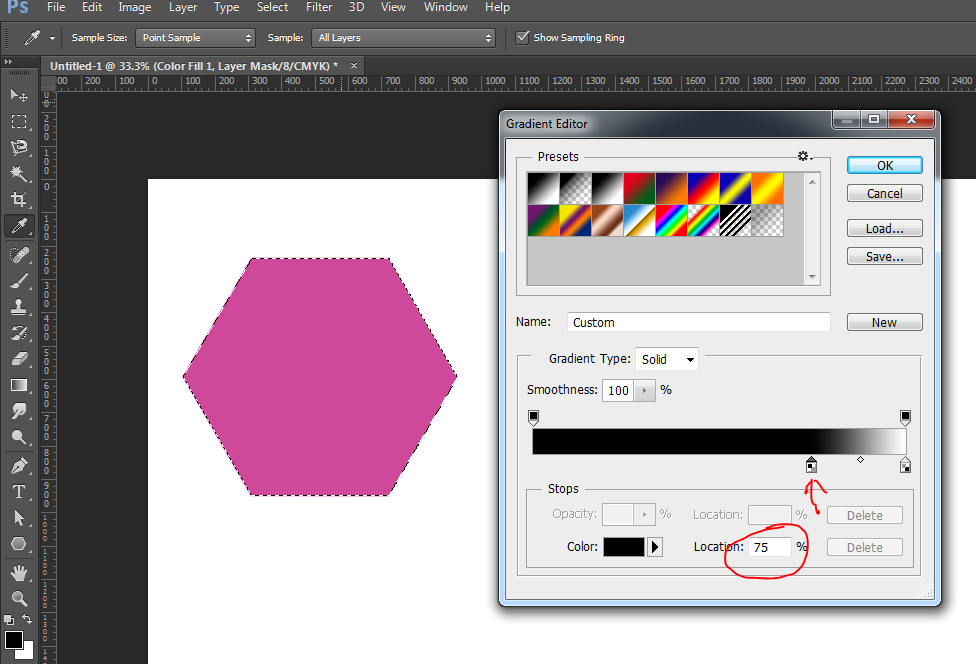
  3. Click on the gradient thumbnail to enter the gradient editor. Move the black handle to 75% more or less (you can play with this values to obtain the desired smoothness, will make sense later) enter image description here enter image description here

  4. Draw a gradient that goes from the bottom right edge to the top left edge. enter image description here

  5. Select Screen on the Gradient Mode enter image description here

    To create the hexagon gradient (there are probably other 10K ways of doing this, with the mask still selected Ctrl-Click on the mask thumbnail. This creates a selection with the shape of the hexagon.
  6. Draw another gradient from top right to bottom left enter image description here

    Select the gradient tool and select a black-to-white gradient. Select 90% opacity at the top menu.
  7. Press Ctr-D to get rid of the marquee selection

    Click on the gradient thumbnail to enter the gradient editor. Move the black handle to 75% more or less (you can play with this values to obtain the desired smoothness, will make sense later)

enter image description here enter image description here

  1. Draw a gradient that goes from the bottom right edge to the top left edge. enter image description here

  2. Select Screen on the Gradient Mode enter image description here

  3. Draw another gradient from top right to bottom left enter image description here

  4. Press Ctr-D to get rid of the marquee selection

Now you have your hexagon with the hexagon gradient. To create the rest of them, just

  1. Duplicate this layer (right click, duplicate)

  2. Make sure that Black is selected as the background colour enter image description here

  3. With the mask selected (not the colour, very important. click on the mask thumbnail it to select the masl, do not double click it), draw a marquee around the hexagon

  4. Press V to select the move tool and move the hexagon to the right. enter image description here

To create the opposite hexagons, draw a marquee around the hexagon (again, with the mask selected), press Ctr-T to transform the selection and rotate it.

enter image description here

To create other colours, just double click on the colour thumbnail (now it is on the colour, not on the mask) and select the colour you want.

enter image description here

I agree I would do this in Illustrator, but since you ask for Photoshop, here it goes. There are probably endless other ways of doing it, but this is what I did, using colour layers to be able to easily change the colours.

  1. Start with a white canvas.
  2. Add a solid fill colour layer of the colour of your choice (Layer->New Fill Layer->Solid Colour)
  3. Click on the mask thumbnail of the solid colour.
  4. Fill it with black. The colour disappears, since everything is masked.
  5. Draw a white hexagon on the mask. With the mask still selected, use the Shape tool (U) to draw an hexagon. Make sure that you select Pixels (as opposed to Shape or Path) on the top menu. If you don't select pixels, it will add an hexagon layer instead of drawing on the mask.

enter image description here

  1. To create the hexagon gradient (there are probably other 10K ways of doing this, with the mask still selected Ctrl-Click on the mask thumbnail. This creates a selection with the shape of the hexagon.

  2. Select the gradient tool and select a black-to-white gradient. Select 90% opacity at the top menu.

  3. Click on the gradient thumbnail to enter the gradient editor. Move the black handle to 75% more or less (you can play with this values to obtain the desired smoothness, will make sense later) enter image description here enter image description here

  4. Draw a gradient that goes from the bottom right edge to the top left edge. enter image description here

  5. Select Screen on the Gradient Mode enter image description here

  6. Draw another gradient from top right to bottom left enter image description here

  7. Press Ctr-D to get rid of the marquee selection

Now you have your hexagon with the hexagon gradient. To create the rest of them, just

  1. Duplicate this layer (right click, duplicate)

  2. Make sure that Black is selected as the background colour enter image description here

  3. With the mask selected (not the colour, very important. click on the mask thumbnail it to select the masl, do not double click it), draw a marquee around the hexagon

  4. Press V to select the move tool and move the hexagon to the right. enter image description here

To create the opposite hexagons, draw a marquee around the hexagon (again, with the mask selected), press Ctr-T to transform the selection and rotate it.

enter image description here

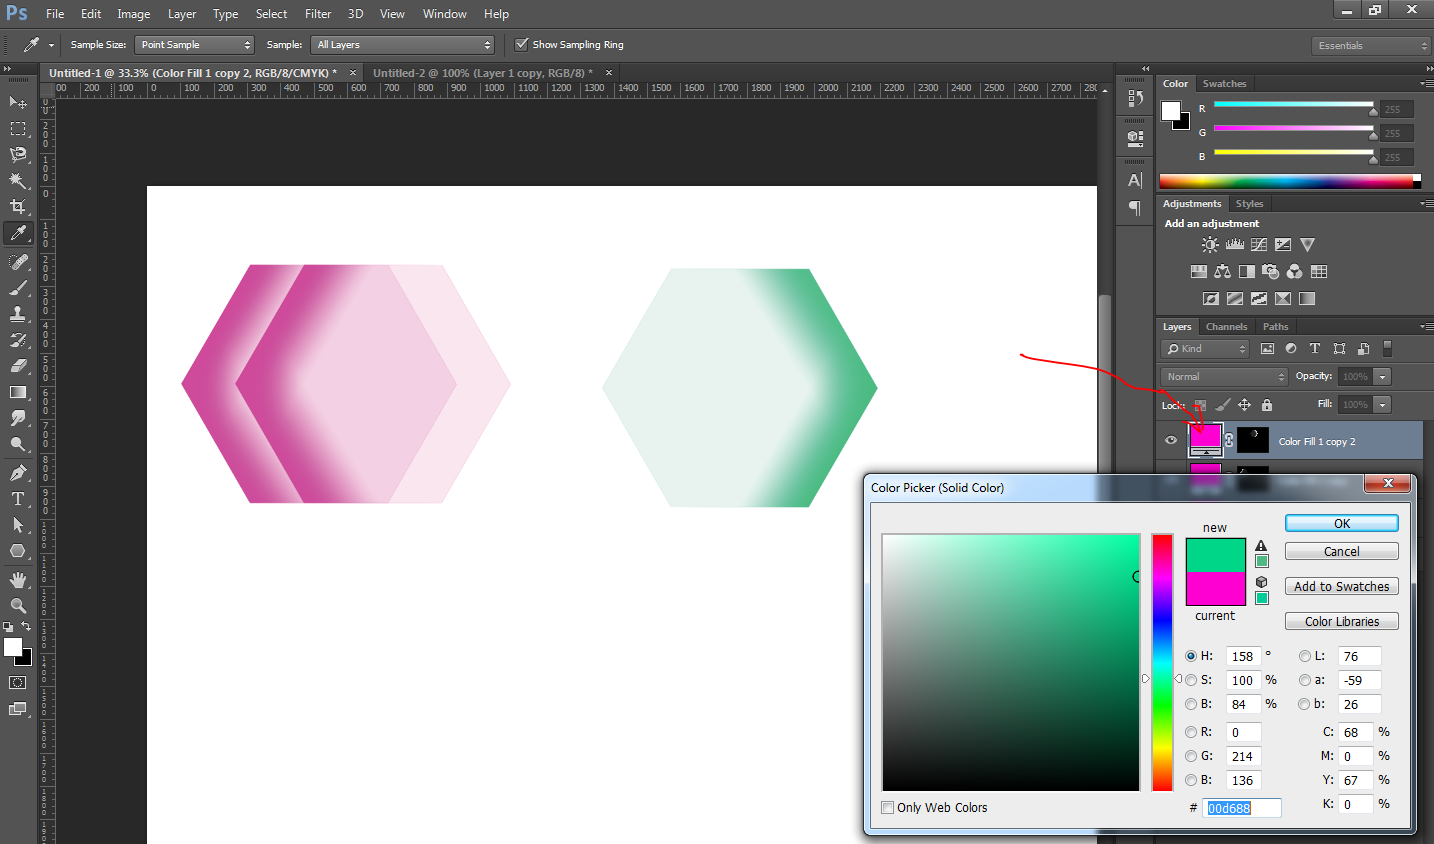
To create other colours, just double click on the colour thumbnail (now it is on the colour, not on the mask) and select the colour you want.

enter image description here

I agree I would do this in Illustrator, but since you ask for Photoshop, here it goes. There are probably endless other ways of doing it, but this is what I did, using colour layers to be able to easily change the colours.

  1. Start with a white canvas.
  2. Add a solid fill colour layer of the colour of your choice (Layer->New Fill Layer->Solid Colour)
  3. Click on the mask thumbnail of the solid colour.
  4. Fill it with black. The colour disappears, since everything is masked.
  5. Draw a white hexagon on the mask. With the mask still selected, use the Shape tool (U) to draw an hexagon. Make sure that you select Pixels (as opposed to Shape or Path) on the top menu. If you don't select pixels, it will add an hexagon layer instead of drawing on the mask.

enter image description here

  1. To create the hexagon gradient (there are probably other 10K ways of doing this, with the mask still selected Ctrl-Click on the mask thumbnail. This creates a selection with the shape of the hexagon.
  2. Select the gradient tool and select a black-to-white gradient. Select 90% opacity at the top menu.
  3. Click on the gradient thumbnail to enter the gradient editor. Move the black handle to 75% more or less (you can play with this values to obtain the desired smoothness, will make sense later)

enter image description here enter image description here

  1. Draw a gradient that goes from the bottom right edge to the top left edge. enter image description here

  2. Select Screen on the Gradient Mode enter image description here

  3. Draw another gradient from top right to bottom left enter image description here

  4. Press Ctr-D to get rid of the marquee selection

Now you have your hexagon with the hexagon gradient. To create the rest of them, just

  1. Duplicate this layer (right click, duplicate)

  2. Make sure that Black is selected as the background colour enter image description here

  3. With the mask selected (not the colour, very important. click on the mask thumbnail it to select the masl, do not double click it), draw a marquee around the hexagon

  4. Press V to select the move tool and move the hexagon to the right. enter image description here

To create the opposite hexagons, draw a marquee around the hexagon (again, with the mask selected), press Ctr-T to transform the selection and rotate it.

enter image description here

To create other colours, just double click on the colour thumbnail (now it is on the colour, not on the mask) and select the colour you want.
enter image description here

typos
Source Link
cockypup
  • 8.2k
  • 32
  • 53

I agree I would do this in Illustrator, but since you ask for Photoshop, here it goes. There are probably endless other ways of doing it, but this is what I did, using colour layers to be able to change them easily change the colours.

  1. Start with a white canvas.
  2. Add a solid fill colour layer of the colour of your choice (Layer->New Fill Layer->Solid Colour)
  3. Click on the mask thumbnail of the solid colour.
  4. Fill it with black. The colour disappears, since everything is masked.
  5. Draw a white hexagon on the mask. With the mask still selected, use the Shape tool (U) to draw an hexagon. Make sure that you select Pixels (as opposed to Shape or Path) on the top menu. If you don't select pixels, it will add an hexagon layer instead of drawing on the mask.

enter image description here

  1. To create the hexagon gradient (there are probably other 10K ways of doing this, with the mask still selected Ctrl-Click on the mask thumbnail. This creates a selection with the shape of the hexagon.

  2. Select the gradient tool and select a black to white-to-white gradient. Select 90% opacity at the top menu.

  3. Click on the gradient thumbnail to enter the gradient editor. Move the black handle to 75% more or less (you can play with this values to obtain the desired smoothness, will make sense later) enter image description here enter image description here

  4. Draw a gradient that goes from the bottom right edge to the top left edge. enter image description here

  5. Select Screen on the Gradient Mode enter image description here

  6. Draw another gradient from top right to bottom left enter image description here

  7. Press Ctr-D to get rid of the marquee selection

Now you have your hexagon with the hexagon gradient. To create the rest of them, just

  1. Duplicate this layer (right click, duplicate)

  2. Make sure that Black is selected as the background colour enter image description here

  3. With the mask selected (not the colour, very important,. click on the mask thumbnail it to select itthe masl, do not double click it), draw a marquee around the hexagon

  4. Press V to select the move tool and move the hexagon to the right. enter image description here

To create the opposite hexagons, draw a marquee around the hexagon (again, with the mask selected), press Ctr-T to transform the selection and rotate it.

enter image description here

To create other colours, just double click on the colour thumbnail (nonow it is on the colour, not on the mask) and select the colour you want.

enter image description here

I agree I would do this in Illustrator, but since you ask for Photoshop, here it goes. There are probably endless other ways of doing it, but this is what I did, using colour layers to be able to change them easily.

  1. Start with a white canvas.
  2. Add a solid fill colour layer of the colour of your choice (Layer->New Fill Layer->Solid Colour)
  3. Click on the mask thumbnail of the solid colour.
  4. Fill it with black. The colour disappears, since everything is masked.
  5. Draw a white hexagon on the mask. With the mask still selected, use the Shape tool (U) to draw an hexagon. Make sure that you select Pixels (as opposed to Shape or Path) on the top menu. If you don't select pixels, it will add an hexagon layer instead of drawing on the mask.

enter image description here

  1. To create the hexagon gradient (there are probably other 10K ways of doing this, with the mask still selected Ctrl-Click on the mask thumbnail. This creates a selection with the shape of the hexagon.

  2. Select the gradient tool and select a black to white gradient. Select 90% opacity at the top menu.

  3. Click on the gradient thumbnail to enter the gradient editor. Move the black handle to 75% more or less (you can play with this values to obtain the desired smoothness, will make sense later) enter image description here enter image description here

  4. Draw a gradient that goes from the bottom right edge to the top left edge. enter image description here

  5. Select Screen on the Gradient Mode enter image description here

  6. Draw another gradient from top right to bottom left enter image description here

  7. Press Ctr-D to get rid of the marquee selection

Now you have your hexagon with the hexagon gradient. To create the rest of them, just

  1. Duplicate this layer (right click, duplicate)

  2. Make sure that Black is selected as the background colour enter image description here

  3. With the mask selected (not the colour, very important, click on it to select it, not double click), draw a marquee around the hexagon

  4. Press V to select the move tool and move the hexagon to the right. enter image description here

To create the opposite hexagons, draw a marquee around the hexagon (again, with the mask selected), press Ctr-T to transform the selection and rotate it.

enter image description here

To create other colours, just double click on the colour thumbnail (no it is on the colour, not the mask) and select the colour you want.

enter image description here

I agree I would do this in Illustrator, but since you ask for Photoshop, here it goes. There are probably endless other ways of doing it, but this is what I did, using colour layers to be able to easily change the colours.

  1. Start with a white canvas.
  2. Add a solid fill colour layer of the colour of your choice (Layer->New Fill Layer->Solid Colour)
  3. Click on the mask thumbnail of the solid colour.
  4. Fill it with black. The colour disappears, since everything is masked.
  5. Draw a white hexagon on the mask. With the mask still selected, use the Shape tool (U) to draw an hexagon. Make sure that you select Pixels (as opposed to Shape or Path) on the top menu. If you don't select pixels, it will add an hexagon layer instead of drawing on the mask.

enter image description here

  1. To create the hexagon gradient (there are probably other 10K ways of doing this, with the mask still selected Ctrl-Click on the mask thumbnail. This creates a selection with the shape of the hexagon.

  2. Select the gradient tool and select a black-to-white gradient. Select 90% opacity at the top menu.

  3. Click on the gradient thumbnail to enter the gradient editor. Move the black handle to 75% more or less (you can play with this values to obtain the desired smoothness, will make sense later) enter image description here enter image description here

  4. Draw a gradient that goes from the bottom right edge to the top left edge. enter image description here

  5. Select Screen on the Gradient Mode enter image description here

  6. Draw another gradient from top right to bottom left enter image description here

  7. Press Ctr-D to get rid of the marquee selection

Now you have your hexagon with the hexagon gradient. To create the rest of them, just

  1. Duplicate this layer (right click, duplicate)

  2. Make sure that Black is selected as the background colour enter image description here

  3. With the mask selected (not the colour, very important. click on the mask thumbnail it to select the masl, do not double click it), draw a marquee around the hexagon

  4. Press V to select the move tool and move the hexagon to the right. enter image description here

To create the opposite hexagons, draw a marquee around the hexagon (again, with the mask selected), press Ctr-T to transform the selection and rotate it.

enter image description here

To create other colours, just double click on the colour thumbnail (now it is on the colour, not on the mask) and select the colour you want.

enter image description here

added 275 characters in body
Source Link
cockypup
  • 8.2k
  • 32
  • 53

This is a way of doing the hexagonsI agree I would do this in Illustrator, but since you ask for Photoshop, here it goes. There are probably endless other ways of doing it, but this is what I did, using colour layers to be able to change them easily.

  1. Start with a white canvas.
  2. Add a solid fill colour layer of the colour of your choice (Layer->New Fill Layer->Solid Colour)
  3. Click on the mask thumbnail of the solid colour.
  4. Fill it with black. The colour disappears, since everything is masked.
  5. Draw a white hexagon on the mask. With the mask still selected, use the Shape tool (U) to draw an hexagon. Make sure that you select Pixels (as opposed to Shape or Path) on the top menu. If you don't select pixels, it will add an hexagon layer instead of drawing on the mask.

enter image description here

  1. To create the hexagon gradient (there are probably other 10K ways of doing this, with the mask still selected Ctrl-Click on the mask thumbnail. This creates a selection with the shape of the hexagon.

  2. Select the gradient tool and select a black to white gradient. Select 90% opacity at the top menu.

  3. Click on the gradient thumbnail to enter the gradient editor. Move the black handle to 75% more or less (you can play with this values to obtain the desired smoothness, will make sense later) enter image description here enter image description here

  4. Draw a gradient that goes from the bottom right edge to the top left edge. enter image description here

  5. Select Screen on the Gradient Mode enter image description here

  6. Draw another gradient from top right to bottom left enter image description here

  7. Press Ctr-D to get rid of the marquee selection

Now you have your hexagon with the hexagon gradient. To create the rest of them, just

  1. Duplicate this layer (right click, duplicate)

  2. Make sure that Black is selected as the background colour enter image description here

  3. With the mask selected (not the colour, very important, click on it to select it, not double click), draw a marquee around the hexagon

  4. Press V to select the move tool and move the hexagon to the right. enter image description here

To create the opposite hexagons, draw a marquee around the hexagon (again, with the mask selected), press ctr TCtr-T to transform the selection and rotate it.

enter image description here

To create other colours, just double click on the colour thumbnail (no it is on the colour, not the mask) and select the colour you want.

enter image description here

This is a way of doing the hexagons. There are probably endless other ways of doing it.

  1. Start with a white canvas.
  2. Add a solid fill colour layer of the colour of your choice (Layer->New Fill Layer->Solid Colour)
  3. Click on the mask thumbnail of the solid colour.
  4. Fill it with black. The colour disappears, since everything is masked.
  5. Draw a white hexagon on the mask. With the mask still selected, use the Shape tool (U) to draw an hexagon. Make sure that you select Pixels (as opposed to Shape or Path) on the top menu. If you don't select pixels, it will add an hexagon layer instead of drawing on the mask.

enter image description here

  1. To create the hexagon gradient (there are probably other 10K ways of doing this, with the mask still selected Ctrl-Click on the mask thumbnail. This creates a selection with the shape of the hexagon.

  2. Select the gradient tool and select a black to white gradient. Select 90% opacity at the top menu.

  3. Click on the gradient thumbnail to enter the gradient editor. Move the black handle to 75% more or less (you can play with this values to obtain the desired smoothness, will make sense later) enter image description here enter image description here

  4. Draw a gradient that goes from the bottom right edge to the top left edge. enter image description here

  5. Select Screen on the Gradient Mode enter image description here

  6. Draw another gradient from top right to bottom left enter image description here

  7. Press Ctr-D to get rid of the marquee selection

Now you have your hexagon with the hexagon gradient. To create the rest of them, just

  1. Duplicate this layer (right click, duplicate)

  2. Make sure that Black is selected as the background colour enter image description here

  3. With the mask selected, draw a marquee around the hexagon

  4. Press V to select the move tool and move the hexagon to the right. enter image description here

To create the opposite hexagons, draw a marquee around the hexagon, press ctr T to transform the selection and rotate it.

enter image description here

To create other colours, just double click on the colour thumbnail and select the colour you want.

enter image description here

I agree I would do this in Illustrator, but since you ask for Photoshop, here it goes. There are probably endless other ways of doing it, but this is what I did, using colour layers to be able to change them easily.

  1. Start with a white canvas.
  2. Add a solid fill colour layer of the colour of your choice (Layer->New Fill Layer->Solid Colour)
  3. Click on the mask thumbnail of the solid colour.
  4. Fill it with black. The colour disappears, since everything is masked.
  5. Draw a white hexagon on the mask. With the mask still selected, use the Shape tool (U) to draw an hexagon. Make sure that you select Pixels (as opposed to Shape or Path) on the top menu. If you don't select pixels, it will add an hexagon layer instead of drawing on the mask.

enter image description here

  1. To create the hexagon gradient (there are probably other 10K ways of doing this, with the mask still selected Ctrl-Click on the mask thumbnail. This creates a selection with the shape of the hexagon.

  2. Select the gradient tool and select a black to white gradient. Select 90% opacity at the top menu.

  3. Click on the gradient thumbnail to enter the gradient editor. Move the black handle to 75% more or less (you can play with this values to obtain the desired smoothness, will make sense later) enter image description here enter image description here

  4. Draw a gradient that goes from the bottom right edge to the top left edge. enter image description here

  5. Select Screen on the Gradient Mode enter image description here

  6. Draw another gradient from top right to bottom left enter image description here

  7. Press Ctr-D to get rid of the marquee selection

Now you have your hexagon with the hexagon gradient. To create the rest of them, just

  1. Duplicate this layer (right click, duplicate)

  2. Make sure that Black is selected as the background colour enter image description here

  3. With the mask selected (not the colour, very important, click on it to select it, not double click), draw a marquee around the hexagon

  4. Press V to select the move tool and move the hexagon to the right. enter image description here

To create the opposite hexagons, draw a marquee around the hexagon (again, with the mask selected), press Ctr-T to transform the selection and rotate it.

enter image description here

To create other colours, just double click on the colour thumbnail (no it is on the colour, not the mask) and select the colour you want.

enter image description here

Source Link
cockypup
  • 8.2k
  • 32
  • 53
Loading