deleted 27 characters in body
Source Link
Joonas
  • 15.5k
  • 2
  • 36
  • 56

It is however possible to do itthis by creating an Action in the Window > Actions panel.

Or...or it could be done with a script. Script would give you more freedom to do exactly what you need it to do and more automatically as well.

Before you start reading the rest of the post, I made an action that places image into the selection.

Here'shere's the action in use:

SinceI highly suggest you create the action yourself, as it can be very educating.

However, since the action is super long, I figured I'd share the action file as well.

: Paste Into Selection.atn In hindsight, I should have called it "Place into selection"

Download at your own risk.

...or createInstructions for creating the action yourself:

When you run theThe action and the image is placedstops at some point to the new document,wait for you will have to resizepress enter to apply a transformation. What you need to do is upsize the image a bit to fill the whole document, which is the exact size of (as shown in the selection. This way you fillgif), so that the wholeimage ends up filling the selection.

For example, after step 10, you might wanna run Image > Canvas size..., and with the Relative option checked, add some padding by making and make the document bigger.

This way you would have more slack, when the image is pasted in towould end up slightly bigger than the main document.

You can record new functionsselection, giving you some room to the action withmove it inside the record buttonLayer mask.

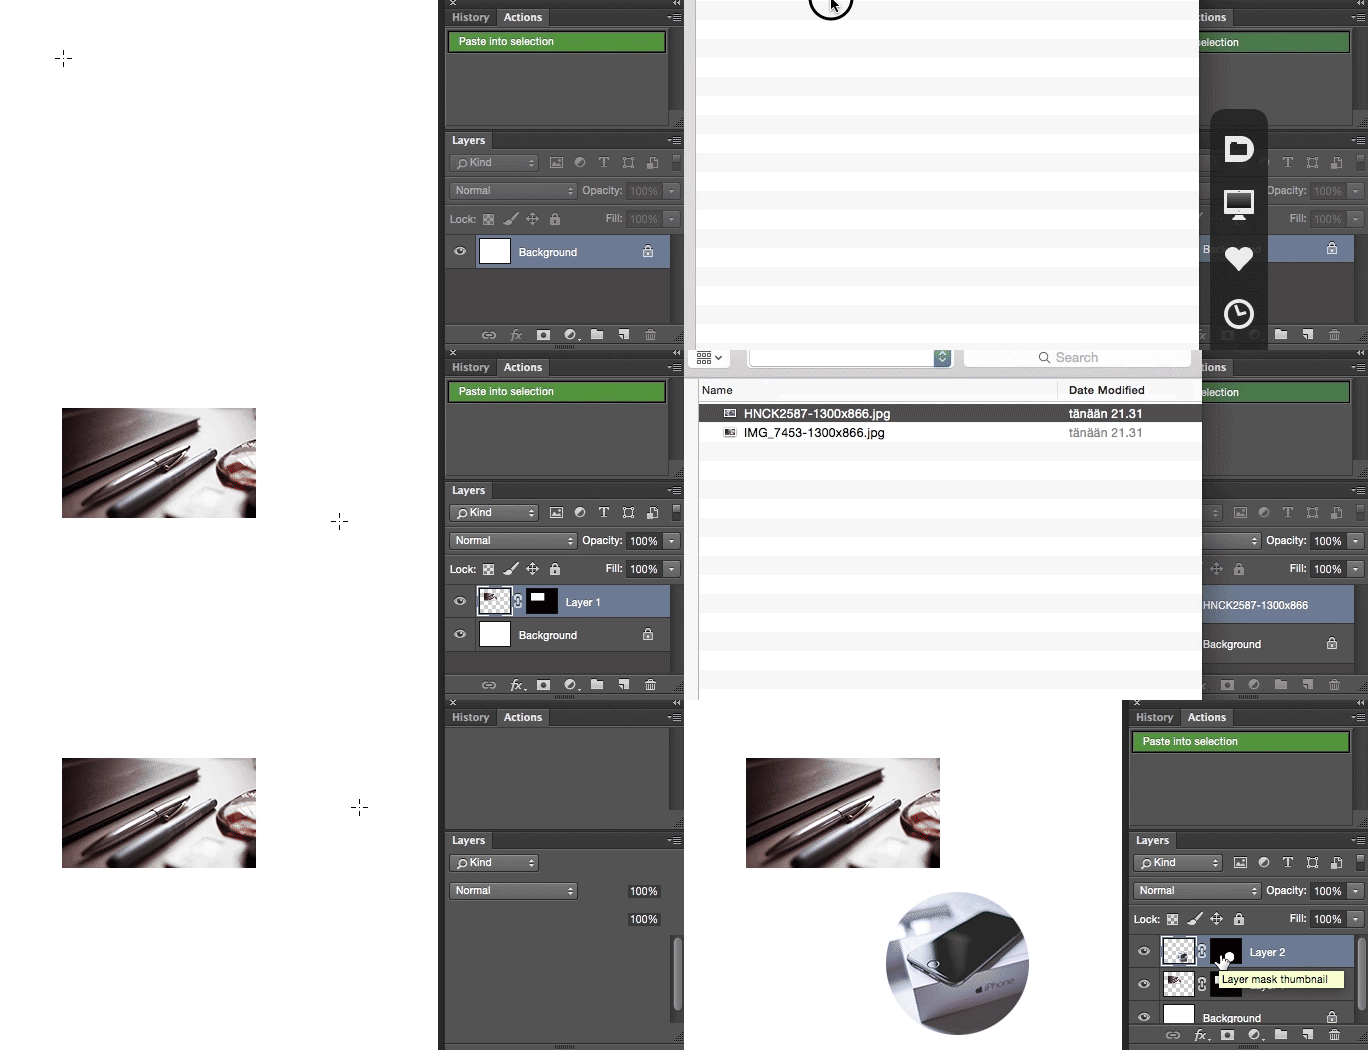
It is however possible to do it by creating an Action in the Window > Actions panel.

Or it could be done with a script. Script would give you more freedom to do exactly what you need it to do.

Before you start reading the rest of the post, I made an action that places image into the selection.

Here's the action in use:

Since the action is super long, I figured I'd share the action file as well.

Paste Into Selection.atn In hindsight, I should have called it "Place into selection"

Download at your own risk.

...or create the action yourself:

When you run the action and the image is placed to the new document, you will have to resize the image a bit to fill the document, which is the exact size of the selection. This way you fill the whole selection.

For example, after step 10, you might wanna run Image > Canvas size..., and with the Relative checked, add some padding by making the document bigger.

This way you would have more slack, when the image is pasted in to the main document.

You can record new functions to the action with the record button.

It is possible to do this by creating an Action in the Window > Actions panel.

...or it could be done with a script. Script would give you more freedom to do exactly what you need it to do and more automatically as well.

Before you start reading the rest of the post, here's the action in use:

I highly suggest you create the action yourself, as it can be very educating.

However, since the action is super long, I figured I'd share the action file as well: Paste Into Selection.atn Download at your own risk.

...Instructions for creating the action yourself:

The action stops at some point to wait for you to press enter to apply a transformation. What you need to do is upsize the image to fill the whole document (as shown in the .gif), so that the image ends up filling the selection.

For example, after step 10, you might wanna run Image > Canvas size... with the Relative option checked and make the document bigger.

This way the image would end up slightly bigger than the selection, giving you some room to move it inside the Layer mask.

added 447 characters in body
Source Link
Joonas
  • 15.5k
  • 2
  • 36
  • 56

Or it could be done with a script. Script would give you more freedom to do exactly what you need it to do.

Before you start reading the rest of the post, here'sI made an action that places image into the selection.

Here's the action in use:

...or create the action yourself yourself:

  • This makes sure that PS stops to wait until you select the image you want to place. Otherwise it'll just place the image you placed during the recording.

When you run the action and the image is placed to the new document, you might wantwill have to resize the image a bit to fill the whole document, as the documentwhich is the exact size of the selection. This way you fill the whole selection.

WhenIf you applyjust want to fit the transformationimage to the selection, then you can just press (Enter ),to apply the transformation and the action will continue.

For example, after step 10, you might wanna run Image > Canvas size..., and with the Relative checked, add some padding by making the document bigger.

This way you would have more slack, when the image is pasted in to the main document.

You can record new functions to the action with the record button.

After installing'installing' the script to the PS scripts folder and restarting photoshop, you can find it in the: Edit > Keyboard shortcuts.... Just expand "File" and scroll way down to find the script and give it a hotkey. For example, I set mine to: Cmd+Alt+Ctrl+V

Before you start reading the rest of the post, here's the action in use:

...or create the action yourself:

  • This makes sure that PS stops to wait until you select the image you want to place.

When you run the action and the image is placed to the new document, you might want to resize the image to fill the whole document, as the document is the exact size of the selection.

When you apply the transformation (Enter ), the action will continue.

For example, after step 10, you might wanna run Image > Canvas size... and with the Relative checked, add some padding by making the document bigger.

This way you would have more slack, when the image is pasted in to the main document.

After installing the script and restarting photoshop, you can find it in the: Edit > Keyboard shortcuts.... Just expand "File" and scroll way down to find the script and give it a hotkey. For example, I set mine to: Cmd+Alt+Ctrl+V

Or it could be done with a script. Script would give you more freedom to do exactly what you need it to do.

Before you start reading the rest of the post, I made an action that places image into the selection.

Here's the action in use:

...or create the action yourself:

  • This makes sure that PS stops to wait until you select the image you want to place. Otherwise it'll just place the image you placed during the recording.

When you run the action and the image is placed to the new document, you will have to resize the image a bit to fill the document, which is the exact size of the selection. This way you fill the whole selection.

If you just want to fit the image to the selection, then you can just press Enter to apply the transformation and the action will continue.

For example, after step 10, you might wanna run Image > Canvas size..., and with the Relative checked, add some padding by making the document bigger.

This way you would have more slack, when the image is pasted in to the main document.

You can record new functions to the action with the record button.

After 'installing' the script to the PS scripts folder and restarting photoshop, you can find it in the: Edit > Keyboard shortcuts.... Just expand "File" and scroll way down to find the script and give it a hotkey. For example, I set mine to: Cmd+Alt+Ctrl+V

Source Link
Joonas
  • 15.5k
  • 2
  • 36
  • 56

Photoshop does have Edit > Paste special > Paste into, but this doesn't resize the image to the selection.

It is however possible to do it by creating an Action in the Window > Actions panel.


Before you start reading the rest of the post, here's the action in use:

enter image description here


Since the action is super long, I figured I'd share the action file as well.

Paste Into Selection.atn In hindsight, I should have called it "Place into selection"

Download at your own risk.

...or create the action yourself:

  1. Make your selection. ( It doesn't have to be a rectangular selection. )
  2. Start recording the action...
  3. Make a new layer.
    • Layer > New > Layer...
    • Don't name it.
  4. Fill it with black
    • Edit > Fill...
    • Contents: Black
    • Mode: Normal
    • Opacity: 100%
  5. Make a Layer mask
    • Layer > Layer mask > Reveal selection
  6. Select RGB channel
    • Click the layer thumbnail
  7. Select the whole document
    • Select > All
  8. Copy
    • Edit > Copy
  9. Delete layer contents
    • Mac: Backspace Windows: Del
  10. Make a new document
  • File > New... - Don't change the width and height.
  1. Place the image
  • Place embedded... In older PS versions this is called Place... - Then just place in any image.
  1. Select the whole document again
  • Select > All
  1. Copy the image.
  • Edit > Copy
  1. Close the document.
  • File > Close
  1. Unlink the layer mask.
  • Layer > Layer Mask > Unlink
  1. Create selection from the Layer mask.
  • Right-click the Layer mask thumbnail and select Add mask to selection
  1. Paste in the image
  • Edit > Paste
  1. Re-link the Layer mask to the layer,
  • Layer > Layer mask > Link
  1. Stop recording the action.
  2. In the Actions panel, click the empty box on the left side of the place command. enter image description here
  • This makes sure that PS stops to wait until you select the image you want to place.

When you run the action and the image is placed to the new document, you might want to resize the image to fill the whole document, as the document is the exact size of the selection.

When you apply the transformation (Enter ), the action will continue.


You may want to edit the action to fit your needs more specifically.

For example, after step 10, you might wanna run Image > Canvas size... and with the Relative checked, add some padding by making the document bigger.

This way you would have more slack, when the image is pasted in to the main document.


If you are planning to use this often, you can set a hotkey to launch the action. Sadly the hotkey options for Actions are very limited.

You can however get around it by making a script that launches the action. You can give scripts way more versatile hotkeys and you can even override PS hotkeys.

Just make an exmpty file called Paste In Place.jsx and put in this:

doAction ('Paste into selection', 'My Actions');

This code assumes that the action name is Paste into selection and that the action is in a folder called My Actions.

After installing the script and restarting photoshop, you can find it in the: Edit > Keyboard shortcuts.... Just expand "File" and scroll way down to find the script and give it a hotkey. For example, I set mine to: Cmd+Alt+Ctrl+V