added 4 characters in body
Source Link
user82991
user82991

There already exists an useful answer. Just to add something I write only about color.

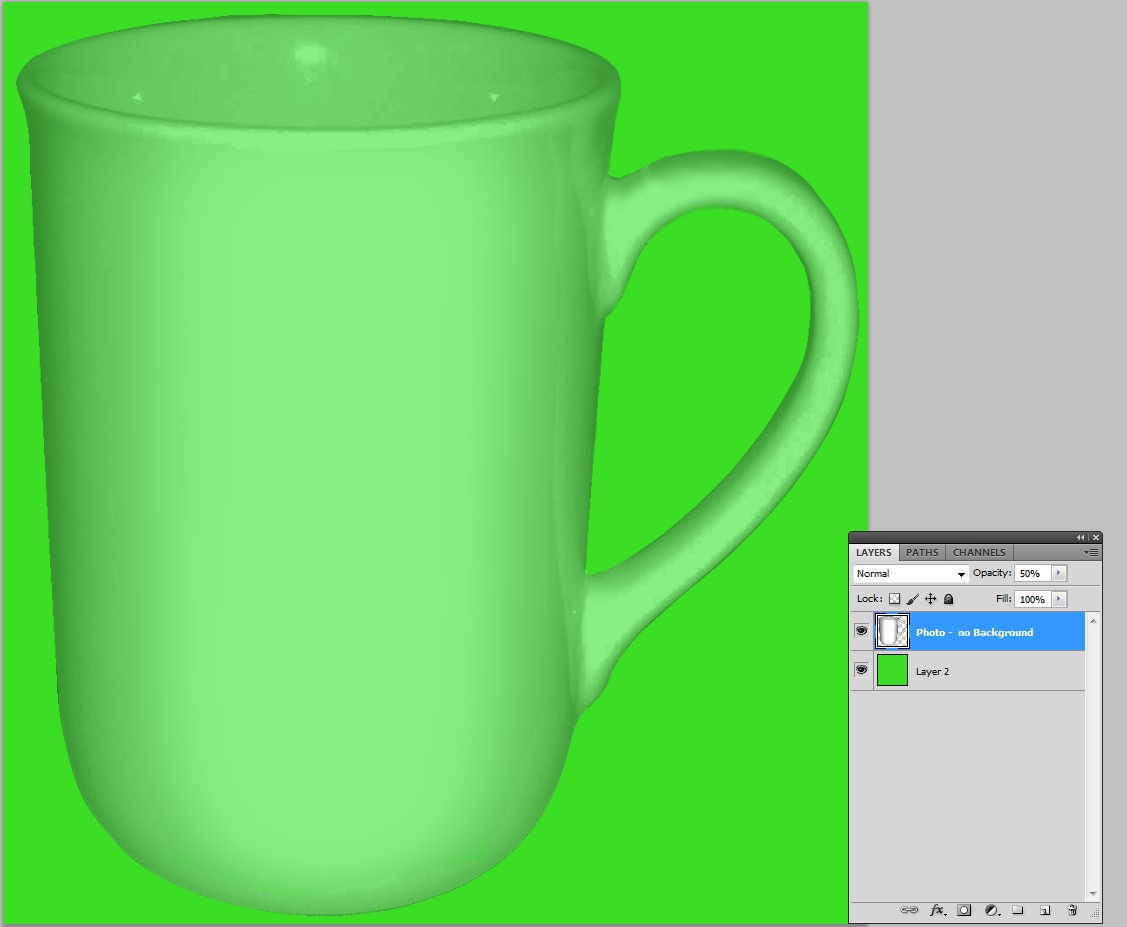
If you make a grey shape partially transparent and place it as a normal layer over a colored layer, you cant get especially bright or saturated appearance. That's not bad if you accept flat color. CMYK Printing on paper even is not possible with bright or highly saturated colors. See the following example that shows how much a grey shape flattens the color:

enter image description here

(sorry for using the magic wand when selecting and erasing the white background of your photo. Good border accuracy needs a clipping path or other complex masking methods)

For strong color you must use different blending mode when you finally use it. The photo must be adjusted for the final coloring principle. Here's a screenshot, how a bright color is possible to achieve and how the photo is adjusted:

enter image description here

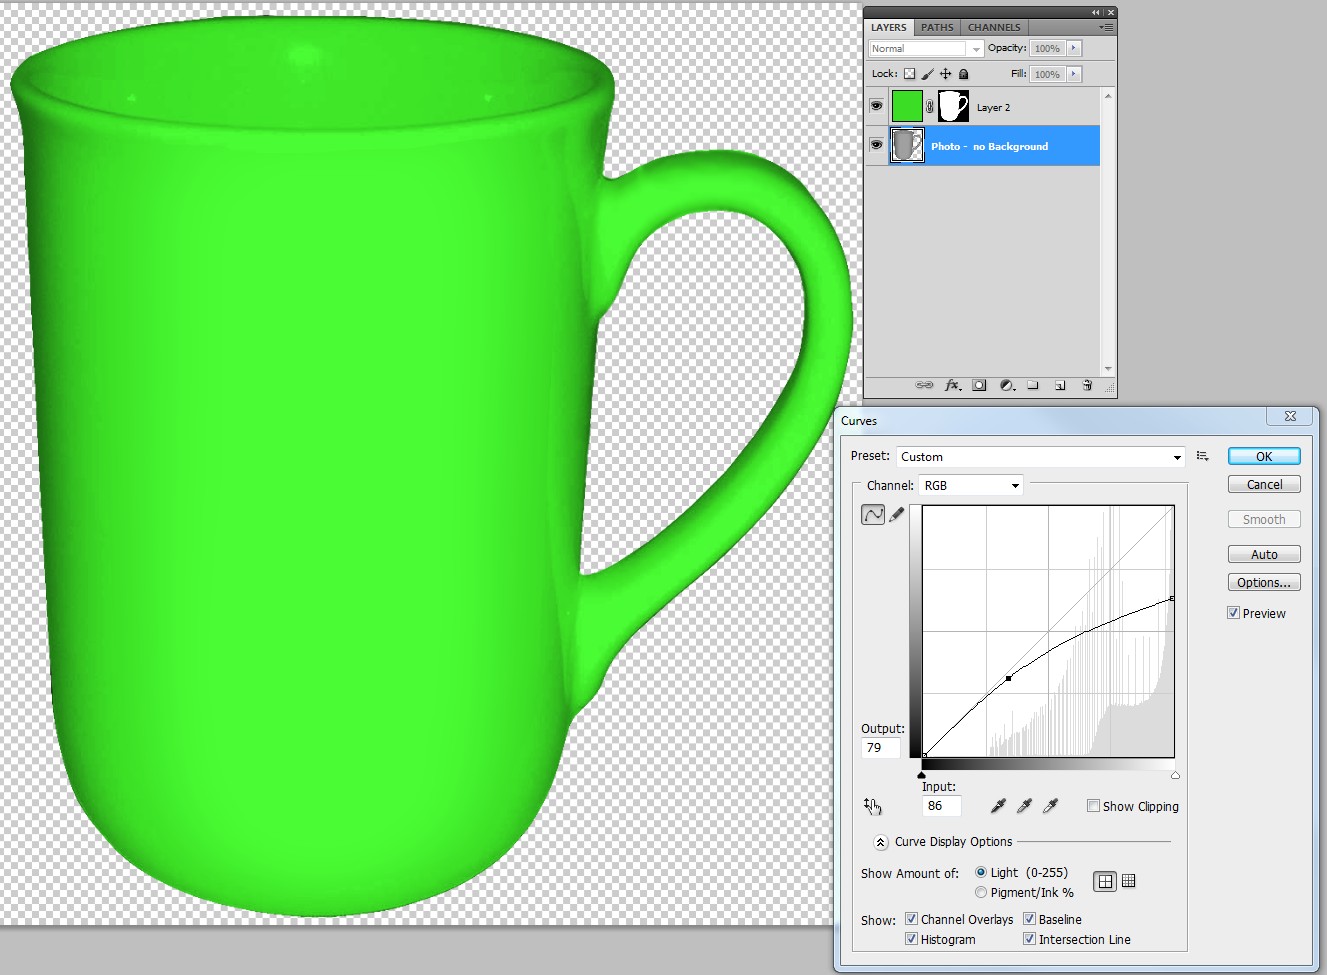
A bright colored layer is added over the photo. That layer has Blending mode = Color. There's a layer mask to color only the cup.

How to create the mask:

  • goto the photo layer (background is already removed)
  • select the cup by the macic wand (Tolerance = 255) or select the transparent background (tolerance = 0) and invert the selection
  • goto the color layer and create a layer mask; it covers only the cup.

The Curves tool is used to make the photo have a proper dreyscale for this purpose. This, of course is possible to be done when the photo finally is used.

The result is quite the same, if the photo layer is placed over the colored layer and has Blending mode = Hard Light.

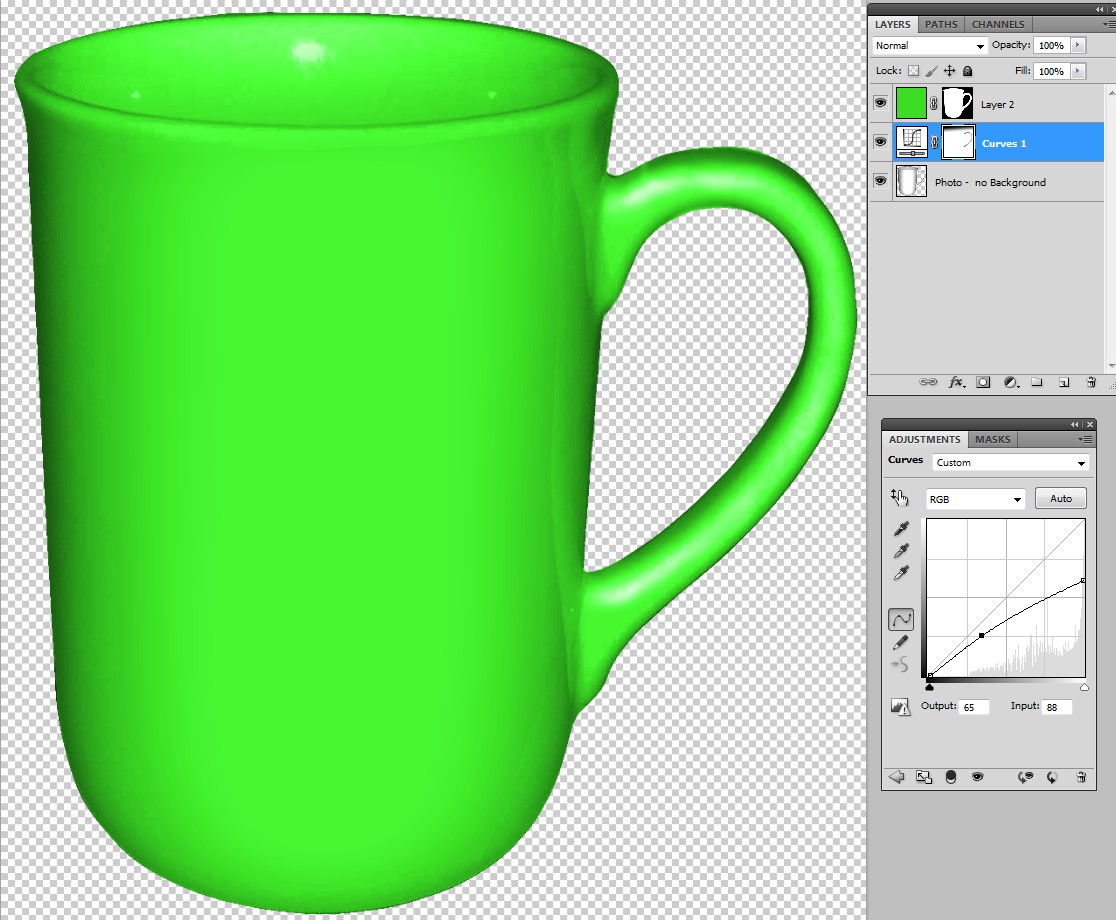
The curves can also be an adjustment layer for nondestructive fiddling. As an adjustment layer the curves can also have a layer mask. In the following example the highlights are made visible pyby spraying black into the layer mask of the curves.

enter image description here

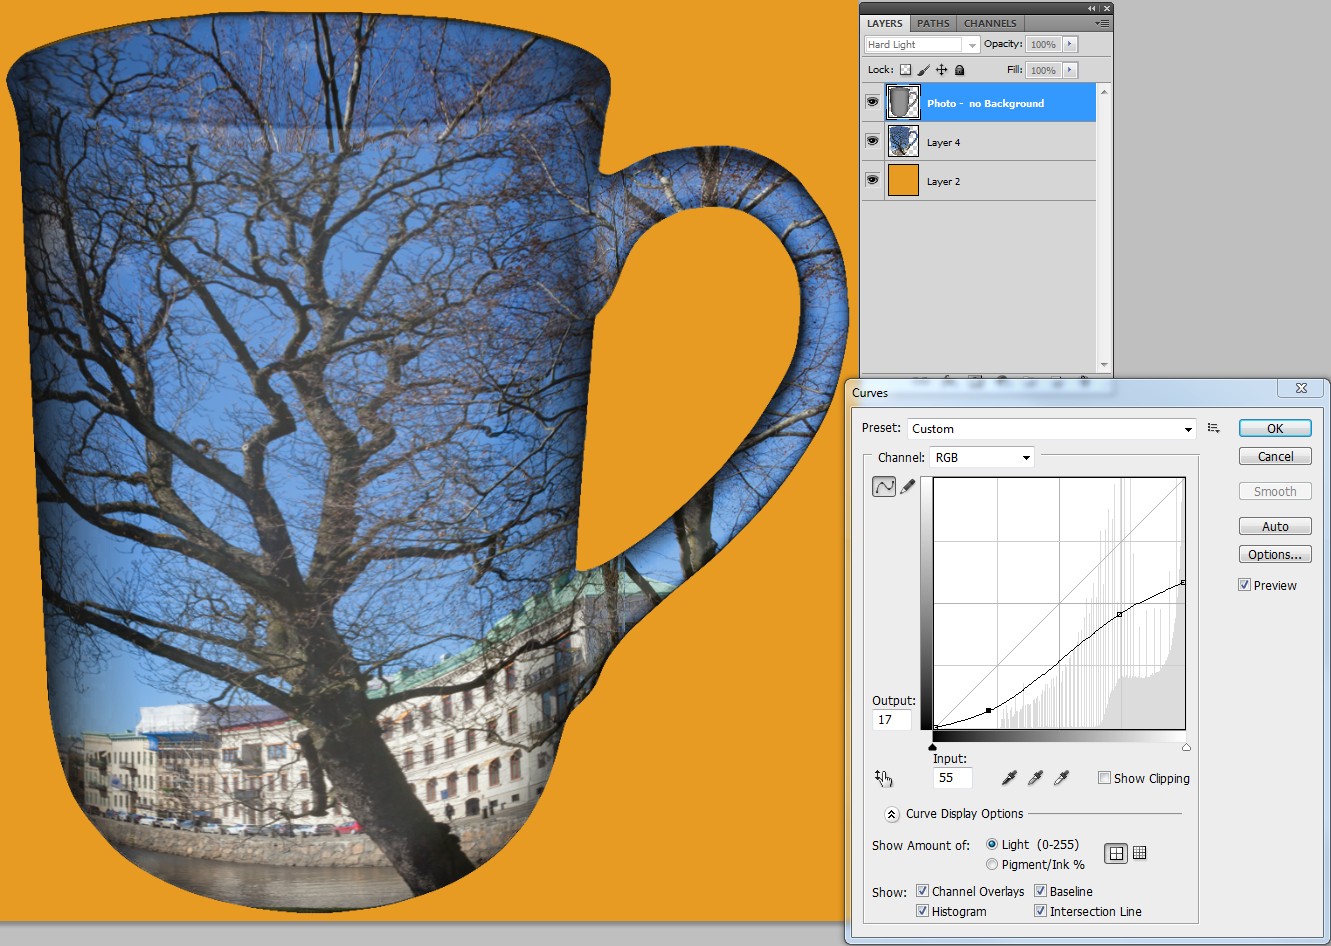
The strong color capable blending modes actually do not need solid color, photos also are ok. This scene from Goethenburg is warped before clipping to cup area. the warping is needed for the illusion of curvature. Again the grayscale is adjusted by the Curves tool. Note: Your photo inis on the top and has Blendingthe blending mode = Hard Light.

enter image description here

There already exists an useful answer. Just to add something I write only about color.

If you make a grey shape partially transparent and place it as a normal layer over a colored layer, you cant get especially bright or saturated appearance. That's not bad if you accept flat color. CMYK Printing on paper even is not possible with bright or highly saturated colors. See the following example that shows how much a grey shape flattens the color:

enter image description here

(sorry for using the magic wand when selecting and erasing the white background of your photo. Good border accuracy needs a clipping path or other complex masking methods)

For strong color you must use different blending mode when you finally use it. The photo must be adjusted for the final coloring principle. Here's a screenshot, how a bright color is possible to achieve and how the photo is adjusted:

enter image description here

A bright colored layer is added over the photo. That layer has Blending mode = Color. There's a layer mask to color only the cup.

How to create the mask:

  • goto the photo layer (background is already removed)
  • select the cup by the macic wand (Tolerance = 255) or select the transparent background (tolerance = 0) and invert the selection
  • goto the color layer and create a layer mask; it covers only the cup.

The Curves tool is used to make the photo have a proper dreyscale for this purpose. This, of course is possible to be done when the photo finally is used.

The result is quite the same, if the photo layer is placed over the colored layer and has Blending mode = Hard Light.

The curves can also be an adjustment layer for nondestructive fiddling. As an adjustment layer the curves can also have a layer mask. In the following example the highlights are made visible py spraying black into the layer mask of the curves.

enter image description here

The strong color capable blending modes actually do not need solid color, photos also are ok. This scene from Goethenburg is warped before clipping to cup area. the warping is needed for the illusion of curvature. Again the grayscale is adjusted by the Curves tool. Note: Your photo in on the top and has Blending mode = Hard Light.

enter image description here

There already exists an useful answer. Just to add something I write only about color.

If you make a grey shape partially transparent and place it as a normal layer over a colored layer, you cant get especially bright or saturated appearance. That's not bad if you accept flat color. CMYK Printing on paper even is not possible with bright or highly saturated colors. See the following example that shows how much a grey shape flattens the color:

enter image description here

(sorry for using the magic wand when selecting and erasing the white background of your photo. Good border accuracy needs a clipping path or other complex masking methods)

For strong color you must use different blending mode when you finally use it. The photo must be adjusted for the final coloring principle. Here's a screenshot, how a bright color is possible to achieve and how the photo is adjusted:

enter image description here

A bright colored layer is added over the photo. That layer has Blending mode = Color. There's a layer mask to color only the cup.

How to create the mask:

  • goto the photo layer (background is already removed)
  • select the cup by the macic wand (Tolerance = 255) or select the transparent background (tolerance = 0) and invert the selection
  • goto the color layer and create a layer mask; it covers only the cup.

The Curves tool is used to make the photo have a proper dreyscale for this purpose. This, of course is possible to be done when the photo finally is used.

The result is quite the same, if the photo layer is placed over the colored layer and has Blending mode = Hard Light.

The curves can also be an adjustment layer for nondestructive fiddling. As an adjustment layer the curves can also have a layer mask. In the following example the highlights are made visible by spraying black into the layer mask of the curves.

enter image description here

The strong color capable blending modes actually do not need solid color, photos also are ok. This scene from Goethenburg is warped before clipping to cup area. the warping is needed for the illusion of curvature. Again the grayscale is adjusted by the Curves tool. Note: Your photo is on the top and has the blending mode = Hard Light.

enter image description here

deleted 5 characters in body
Source Link
user82991
user82991

There already exists an useful answer. Just to add something I write only about color.

If you make a grey shape partially transparent and place it as a normal layer over a colored layer, you cant get especially bright or saturated appearance. That's not bad if you accept flat color. CMYK Printing on paper even is not possible with bright or highly saturated colors. See the following example that shows how much a grey shape flattens the color:

enter image description here

(sorry for using the magic wand qualitywhen selecting and erasing the white background of your photo. Good border accuracy needs a clipping path or other complex masking methods)

For strong color you must use different blending mode when you finally use it. The photo must be adjusted for the final coloring principle. Here's a screenshot, how a bright color is possible to achieve and how the photo is adjusted:

enter image description here

A bright colored layer is added over the photo. That layer has Blending mode = Color. There's a layer mask to color only the cup.

How to create the mask:

  • goto the photo layer (background is already removed)
  • select the cup by the macic wand (Tolerance = 255) or select the transparent background (tolerance = 0) and invert the selection
  • goto the color layer and create a layer mask; it covers only the cup.

The Curves tool is used to make the photo have a proper dreyscale for this purpose. This, of course is possible to be done when the photo finally is used.

The result is quite the same, if the photo layer is placed over the colored layer and has Blending mode = Hard Light.

The curves can also be an adjustment layer for nondestructive fiddling. As an adjustment layer the curves can also have a layer mask. In the following example the highlights are made visible py spraying black into the layer mask of the curves.

enter image description here

The strong color capable blending modes actually do not need solid color, photos also are ok. This scene from Goethenburg is warped before clipping to cup area. the warping is needed for the illusion of curvature. Again the grayscale is adjusted by the Curves tool. Note: Your photo in on the top and has Blending mode = Hard Light.

enter image description here

There already exists an useful answer. Just to add something I write only about color.

If you make a grey shape partially transparent and place it as a normal layer over a colored layer, you cant get especially bright or saturated appearance. That's not bad if you accept flat color. CMYK Printing on paper even is not possible with bright or highly saturated colors. See the following example that shows how much a grey shape flattens the color:

enter image description here

(sorry for the magic wand quality selecting and erasing the white background of your photo)

For strong color you must use different blending mode when you finally use it. The photo must be adjusted for the final coloring principle. Here's a screenshot, how a bright color is possible to achieve and how the photo is adjusted:

enter image description here

A bright colored layer is added over the photo. That layer has Blending mode = Color. There's a layer mask to color only the cup.

How to create the mask:

  • goto the photo layer (background is already removed)
  • select the cup by the macic wand (Tolerance = 255) or select the transparent background (tolerance = 0) and invert the selection
  • goto the color layer and create a layer mask; it covers only the cup.

The Curves tool is used to make the photo have a proper dreyscale for this purpose. This, of course is possible to be done when the photo finally is used.

The result is quite the same, if the photo layer is placed over the colored layer and has Blending mode = Hard Light.

The curves can also be an adjustment layer for nondestructive fiddling. As an adjustment layer the curves can also have a layer mask. In the following example the highlights are made visible py spraying black into the layer mask of the curves.

enter image description here

The strong color capable blending modes actually do not need solid color, photos also are ok. This scene from Goethenburg is warped before clipping to cup area. the warping is needed for the illusion of curvature. Again the grayscale is adjusted by the Curves tool. Note: Your photo in on the top and has Blending mode = Hard Light.

enter image description here

There already exists an useful answer. Just to add something I write only about color.

If you make a grey shape partially transparent and place it as a normal layer over a colored layer, you cant get especially bright or saturated appearance. That's not bad if you accept flat color. CMYK Printing on paper even is not possible with bright or highly saturated colors. See the following example that shows how much a grey shape flattens the color:

enter image description here

(sorry for using the magic wand when selecting and erasing the white background of your photo. Good border accuracy needs a clipping path or other complex masking methods)

For strong color you must use different blending mode when you finally use it. The photo must be adjusted for the final coloring principle. Here's a screenshot, how a bright color is possible to achieve and how the photo is adjusted:

enter image description here

A bright colored layer is added over the photo. That layer has Blending mode = Color. There's a layer mask to color only the cup.

How to create the mask:

  • goto the photo layer (background is already removed)
  • select the cup by the macic wand (Tolerance = 255) or select the transparent background (tolerance = 0) and invert the selection
  • goto the color layer and create a layer mask; it covers only the cup.

The Curves tool is used to make the photo have a proper dreyscale for this purpose. This, of course is possible to be done when the photo finally is used.

The result is quite the same, if the photo layer is placed over the colored layer and has Blending mode = Hard Light.

The curves can also be an adjustment layer for nondestructive fiddling. As an adjustment layer the curves can also have a layer mask. In the following example the highlights are made visible py spraying black into the layer mask of the curves.

enter image description here

The strong color capable blending modes actually do not need solid color, photos also are ok. This scene from Goethenburg is warped before clipping to cup area. the warping is needed for the illusion of curvature. Again the grayscale is adjusted by the Curves tool. Note: Your photo in on the top and has Blending mode = Hard Light.

enter image description here

deleted 5 characters in body
Source Link
user82991
user82991

There already exists an useful answer. Just to add something I write only about color.

If you make a grey shape partially transparent and place it as a normal layer over a colored layer, you cant get especially bright or saturated appearance. That's not bad if you accept flat color. CMYK Printing on paper even is not possible with bright or highly saturated colors. See the following example that shows how much a grey shape flattens the color:

enter image description here

(sorry for the magic wand quality selecting and erasing the white background of your photo)

For strong color you must use different blending mode when you finally use it. The photo must be adjusted for the final coloring principle. Here's a screenshot, how a bright color is possible to achieve and how the photo is adjusted:

enter image description here

A bright colored layer is added over the photo. That layer has Blending mode = Color. There's a layer mask to color only the cup.

How to create the mask:

  • goto the photo layer (background is already removed)
  • select the cup by the macic wand (Tolerance = 255) or select the transparent background (tolerane =0tolerance = 0) and invert the selection
  • goto the color layer and create a layer mask; it covers only the cup.

The Curves tool is used to make the photo have a proper dreyscale for this purpose. This, of course is possible to be done when the photo finally is used.

The result is quite the same, if the photo layer is palaced on a normalplaced over the colored layer and the photo has has Blending mode = Hard Light.

The curves can also be an adjustment layer for nondestructive fiddling. As an adjustment layer the curves can also have a layer mask. In the following example the highlights are made visible py spraying black into the layer mask of the curves.

enter image description here

The strong color capable blending modes actually do not need solid color, photos also are ok. This scene from Goethenburg is warped before clipping to cup area. the warping is needed for the illusion of curvature. Again the grayscale is adjusted by the Curves tool. Note: Your photo in on the top and has Blending mode = Hard Light.

enter image description here

There already exists an useful answer. Just to add something I write only about color.

If you make a grey shape partially transparent and place it as a normal layer over a colored layer, you cant get especially bright or saturated appearance. That's not bad if you accept flat color. CMYK Printing on paper even is not possible with bright or highly saturated colors. See the following example that shows how much a grey shape flattens the color:

enter image description here

(sorry for the magic wand quality selecting and erasing the white background of your photo)

For strong color you must use different blending mode when you finally use it. The photo must be adjusted for the final coloring principle. Here's a screenshot, how a bright color is possible to achieve and how the photo is adjusted:

enter image description here

A bright colored layer is added over the photo. That layer has Blending mode = Color. There's a layer mask to color only the cup.

How to create the mask:

  • goto the photo layer (background is already removed)
  • select the cup by the macic wand (Tolerance = 255) or select the transparent background (tolerane =0) and invert the selection
  • goto the color layer and create a layer mask; it covers only the cup.

The Curves tool is used to make the photo have a proper dreyscale for this purpose. This, of course is possible to be done when the photo finally is used.

The result is quite the same, if the photo is palaced on a normal colored layer and the photo has Blending mode = Hard Light.

The curves can also be an adjustment layer for nondestructive fiddling. As an adjustment layer the curves can also have a layer mask. In the following example the highlights are made visible py spraying black into the layer mask of the curves.

enter image description here

The strong color capable blending modes actually do not need solid color, photos also are ok. This scene from Goethenburg is warped before clipping to cup area. the warping is needed for the illusion of curvature. Again the grayscale is adjusted by the Curves tool. Note: Your photo in on the top and has Blending mode = Hard Light.

enter image description here

There already exists an useful answer. Just to add something I write only about color.

If you make a grey shape partially transparent and place it as a normal layer over a colored layer, you cant get especially bright or saturated appearance. That's not bad if you accept flat color. CMYK Printing on paper even is not possible with bright or highly saturated colors. See the following example that shows how much a grey shape flattens the color:

enter image description here

(sorry for the magic wand quality selecting and erasing the white background of your photo)

For strong color you must use different blending mode when you finally use it. The photo must be adjusted for the final coloring principle. Here's a screenshot, how a bright color is possible to achieve and how the photo is adjusted:

enter image description here

A bright colored layer is added over the photo. That layer has Blending mode = Color. There's a layer mask to color only the cup.

How to create the mask:

  • goto the photo layer (background is already removed)
  • select the cup by the macic wand (Tolerance = 255) or select the transparent background (tolerance = 0) and invert the selection
  • goto the color layer and create a layer mask; it covers only the cup.

The Curves tool is used to make the photo have a proper dreyscale for this purpose. This, of course is possible to be done when the photo finally is used.

The result is quite the same, if the photo layer is placed over the colored layer and has Blending mode = Hard Light.

The curves can also be an adjustment layer for nondestructive fiddling. As an adjustment layer the curves can also have a layer mask. In the following example the highlights are made visible py spraying black into the layer mask of the curves.

enter image description here

The strong color capable blending modes actually do not need solid color, photos also are ok. This scene from Goethenburg is warped before clipping to cup area. the warping is needed for the illusion of curvature. Again the grayscale is adjusted by the Curves tool. Note: Your photo in on the top and has Blending mode = Hard Light.

enter image description here

added 423 characters in body
Source Link
user82991
user82991
Loading
Post Undeleted by user82991
added 1937 characters in body
Source Link
user82991
user82991
Loading
Post Deleted by user82991
Source Link
user82991
user82991
Loading