Added Disclaimer
Source Link

Here is a quick illustration of an example of a Business Card (Back) with a logo, embossed, with foil stamp, and letter press, on a textured paper using Photoshop CS6s' 3D tools. Info after the image: Example of Embossment/Letterpress/Foil with Photoshop CS 6 3D Tools
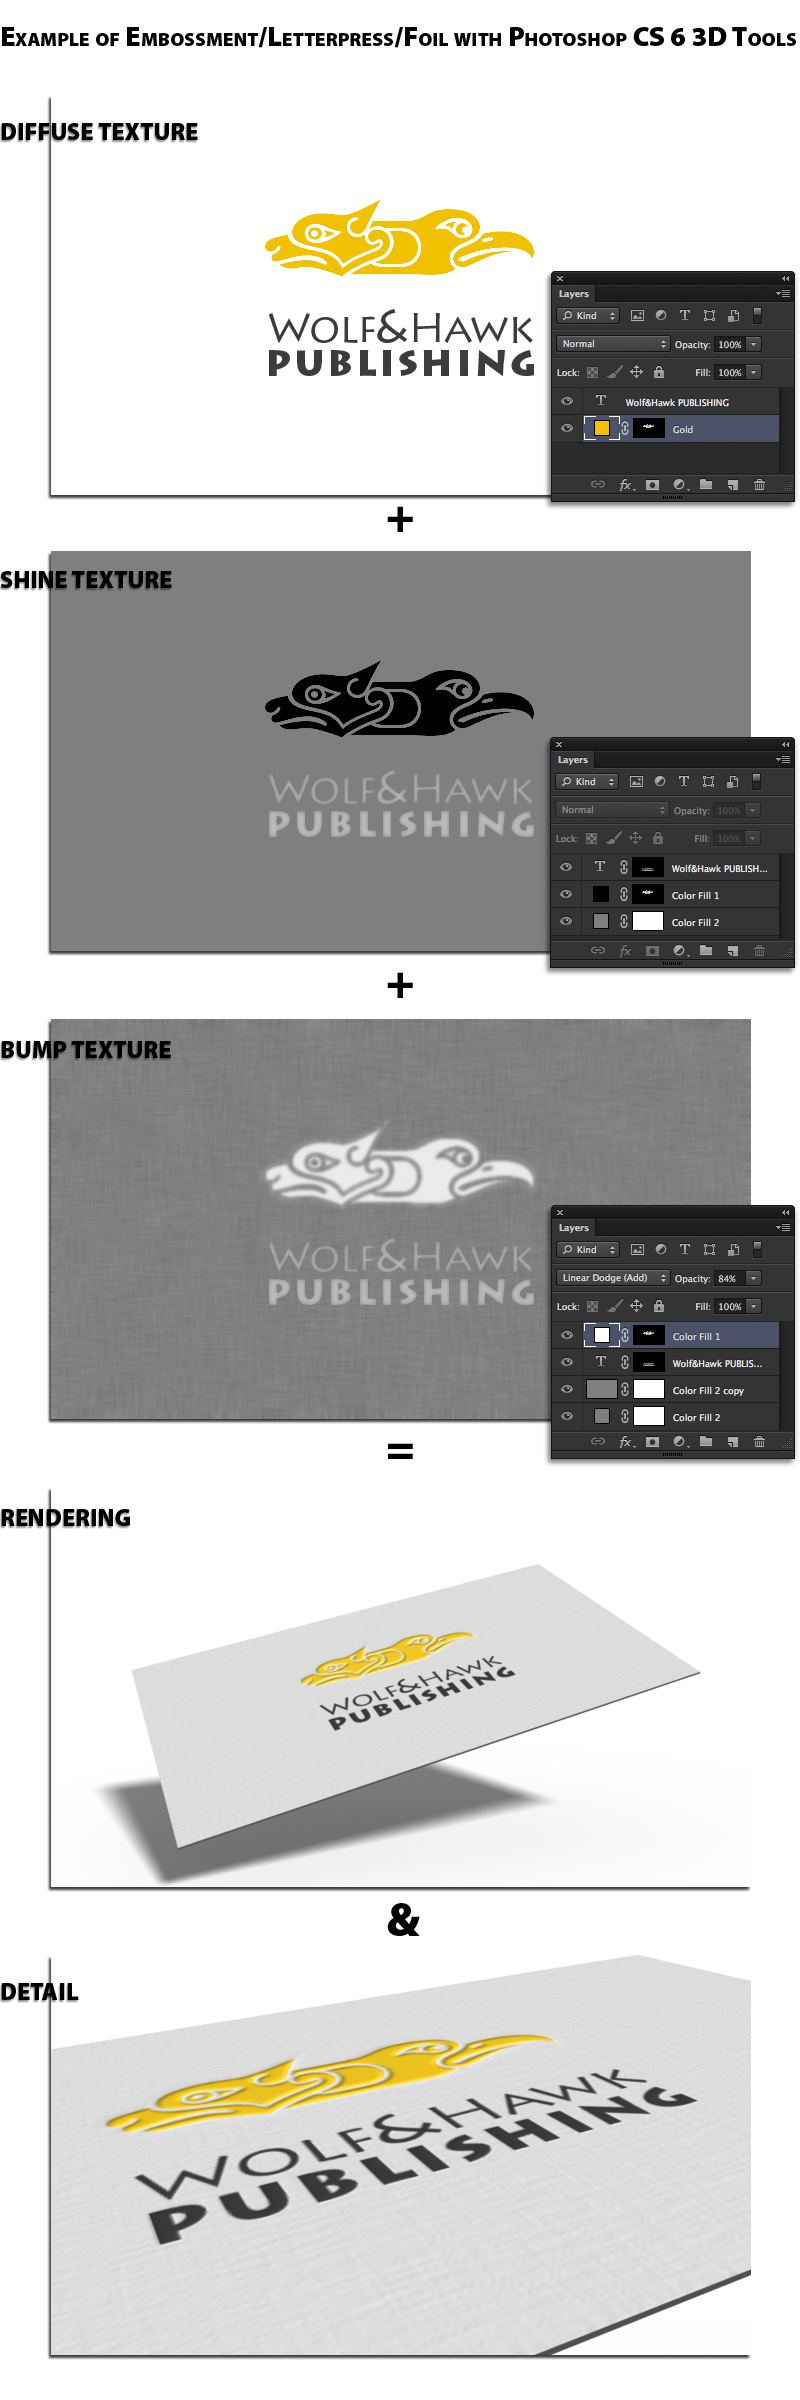
I made a document at a 3.5:2 ratio (standard US business card size) with a white background. Next I selected 3D Extrusion from the 3D panel, then made the 3D object Extrusion Depth 10. Next I selected all the materials (3D panel) and set them all to the No Texture preset. Then I clicked on the Diffuse Texture and made a new texture, same as my original image dimensions (you could increase the resolution factor for better results if necessary).

I opened the Diffuse texture (which is where your "color" goes) and laid out the card. I then repeated the process for Shine and Bump, (shift-)dragging the layers from one document to the other to retain position, etc. Then I created a layer mask and adjust the masks' Edge properties in the Properties panel (Layer Mask selected) until I had the desired results.

Last, I rendered out a comp, then a detail comp for you... and then screenshot the textures and associated Layer panels, assembled the comp, group the assets, added a Drop Shadow (Layer Effect) to the group/folder saved and here we are... (^_^)

I hope this helps. You can find out more about Photoshops' 3D features at Photoshop.com. Cheers!

Disclaimer: I am the editor-in-chief of Photoshop Dimensions.

Here is a quick illustration of an example of a Business Card (Back) with a logo, embossed, with foil stamp, and letter press, on a textured paper using Photoshop CS6s' 3D tools. Info after the image: Example of Embossment/Letterpress/Foil with Photoshop CS 6 3D Tools

I made a document at a 3.5:2 ratio (standard US business card size) with a white background. Next I selected 3D Extrusion from the 3D panel, then made the 3D object Extrusion Depth 10. Next I selected all the materials (3D panel) and set them all to the No Texture preset. Then I clicked on the Diffuse Texture and made a new texture, same as my original image dimensions (you could increase the resolution factor for better results if necessary).

I opened the Diffuse texture (which is where your "color" goes) and laid out the card. I then repeated the process for Shine and Bump, (shift-)dragging the layers from one document to the other to retain position, etc. Then I created a layer mask and adjust the masks' Edge properties in the Properties panel (Layer Mask selected) until I had the desired results.

Last, I rendered out a comp, then a detail comp for you... and then screenshot the textures and associated Layer panels, assembled the comp, group the assets, added a Drop Shadow (Layer Effect) to the group/folder saved and here we are... (^_^)

I hope this helps. You can find out more about Photoshops' 3D features at Photoshop.com. Cheers!

Disclaimer: I am the editor-in-chief of Photoshop Dimensions.

Source Link

Here is a quick illustration of an example of a Business Card (Back) with a logo, embossed, with foil stamp, and letter press, on a textured paper using Photoshop CS6s' 3D tools. Info after the image: Example of Embossment/Letterpress/Foil with Photoshop CS 6 3D Tools

I made a document at a 3.5:2 ratio (standard US business card size) with a white background. Next I selected 3D Extrusion from the 3D panel, then made the 3D object Extrusion Depth 10. Next I selected all the materials (3D panel) and set them all to the No Texture preset. Then I clicked on the Diffuse Texture and made a new texture, same as my original image dimensions (you could increase the resolution factor for better results if necessary).

I opened the Diffuse texture (which is where your "color" goes) and laid out the card. I then repeated the process for Shine and Bump, (shift-)dragging the layers from one document to the other to retain position, etc. Then I created a layer mask and adjust the masks' Edge properties in the Properties panel (Layer Mask selected) until I had the desired results.

Last, I rendered out a comp, then a detail comp for you... and then screenshot the textures and associated Layer panels, assembled the comp, group the assets, added a Drop Shadow (Layer Effect) to the group/folder saved and here we are... (^_^)

I hope this helps. You can find out more about Photoshops' 3D features at Photoshop.com. Cheers!