2

In InDesign, how can I have the same vertical spacing between certain elements throughout the document?

I have several pages with heading + table beneth. Some pages have several heading + tables and then I want to have X amount of space until the next headline + table. The space should be the same on all pages, so I don't want to just distribute evenly.

I could just use a box that takes up my space, and move that around...but I'm sure there is a smarter solution?

2
  • Not sure I understand your request. Are your elements in separate text frames? In this case Distribution is what you need. Or are they in a single text frame? In this case Space before is what you need. Maybe a screenshot would help?
    – Vinny
    Commented Oct 19, 2017 at 9:15
  • You may like to set up a baseline grid, make it visible and then its easy to snap objects or even text to equal increments. Commented Oct 23, 2017 at 13:50

2 Answers 2

1

I'm not sure why this old thread was resurrected, but this may be a new feature since it was originally asked.

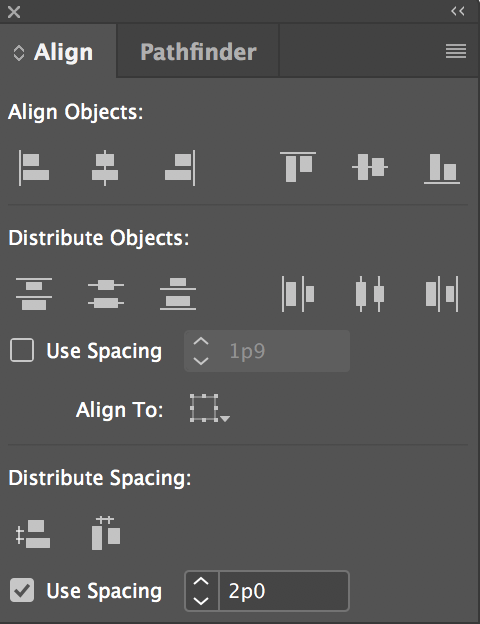
In the Align panel, there is now a feature called Distribute Spacing. If you select 2 items, check off "Use Spacing" and enter an amount there, then click the distribute icon above for either horizontal or vertical, it will space those 2 elements exactly that far apart. No need for a drawn box, guides or baseline grid.

I have been using this to space a graph 2p below a header, then to space out multiple graphs a specific 0p4.8 apart below the first one.

enter image description here

1
  • 1
    I'm pretty sure that this option has existed for a while.
    – Welz
    Commented Nov 23, 2018 at 12:47
0
  1. Start by making sure all your headers are similarly formatted. Select the textbox containing the headers or alternatively the lowermost text box if the headers are in several boxes. When it is selected it has the bounding box with a control handle in the lower center. (The one you would use to adjust the height of the box from the bottom side of the box.) Double-click this handle and the box will automatically resize to it's minimum height from the bottom upwards while still displaying the text inside.

  2. Now, create or move your tables so that the top of the tables snap directly to the bottom of the header boxes.

  3. Select your table box and in the Control panel, go to the 'Y' field. Click it so that the cursor is behind the current value without selecting or deleting it and type in your desired space. F.ex. '+50'. Hit enter. The table will move down 50 of the current units you're using in InDesign.

You can also use minus(-) multiply(*) and divide(/) in the properties boxes in the control panel. hope this helps.

Your Answer

By clicking “Post Your Answer”, you agree to our terms of service and acknowledge you have read our privacy policy.

Not the answer you're looking for? Browse other questions tagged or ask your own question.