I'm trying to get a grasp on bleeds in Scribus. I've created an A4 document (W:210mm x H:297mm); all margins are 14mm, and the bleeds are set to 5mm.
The first thing I find confusing is that with this setup, the measurement tool says that the bleed-to-bleed length is 210mm, meaning that's the whole A4 width. If an image is supposed to extend past the bleeds, that means I would have to print my document on a larger paper size, and trim it down to A4, right?
But, let's say I scale down the document size from 210x297 to 200x287 (keeping the same margin and bleed settings). According to the measurement tool, the bleed-to-bleed length is now 200, which is, again, the specified width of the document.
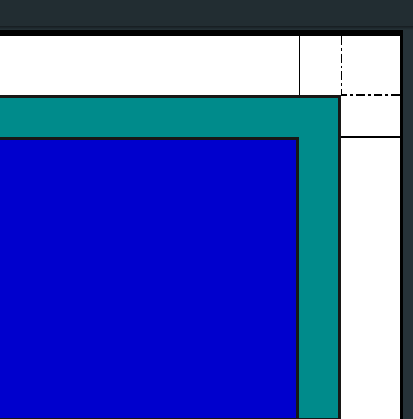
However, let's draw a teal rectangle extending into the bleed area, and a blue rectangle extending up until the bleed area. If I export the document to PDF, and ask Scribus to put bleed and crop marks, I get this:
Now, the marks aligned with the blue rectangle are the crop marks. The dotted marks are the bleed marks. Again, since the whole document size is 210mm - this means from one end of the teal area to the other - there's again additional whitespace, extending beyond the A4 dimensions (the white area).
I'm really having trouble understanding how to properly set the bleeds, the document size, and how to know where I'm supposed to cut the document to get the desired effective document size.

