12

I want to create a piece of wood. Think of a 2x4 with some pseudo-depth.

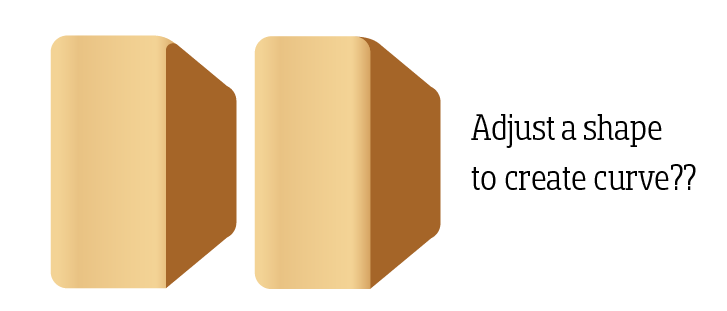
Using Illustrator I create the simple appearance of depth using two objects — a light and dark object. The dark object is adjusted so the sides are at opposing angles creating a pseudo-3d appearance. Simple enough. A basic box viewed from the front with fake depth.

I then want to visually convey that corners of this box are rounded. This is easy for exterior corners. But not for the interior corner between the shapes. I want to convey that this corner is also rounded. I want to try and keep object complexity relatively low.. standard gradient fills are okay overall, but I'm purposefully avoiding things like Gradient Meshes.

enter image description here

I'm seeking any methods, practices, tricks or tips for how to accomplish this appearance.

Simply rounding the corners creates an undesired gap, which is fully expected.

enter image description here

So what options are feasible to better create this rounded interior (?) corner?

I could create an additional object behind these 2 shapes and use a mid-tone color.. This seems like it will work but I can never determine what the fill should be... lighter? darker? mid-tone? And I'm not entirely certain it conveys the rounding to others as it does to me.

enter image description here

Or I could adjust one of the shapes to compensate for the gap...

enter image description here

The last two options seem workable as well. But neither of these "feels" correct to me - and never has. This method always "feels" like an actual joint between two separate pieces of wood.

I'm missing something.

So.. how does one convey that this interior corner is rounded using simple fills without a bunch of gradients or meshes?

0

4 Answers 4

12

How about just rouding the corners of the front face and aligning the angled top and bottom of the rear shape to the tangents of the front shape's corners?

suggested image shape

This is how I'd expect a piece of timber to be shaped (that is, I don't thing the corners of the front face would curve back along the piece).

I also curved the back corners (by replicating the front face and scaling down, then joining the two faces with tangents to their outer corners) as this would be correct if the whole peice shared the same profile.

2
  • I like this, it's nice and simple, yet effective. +1
    – Billy Kerr
    Commented Sep 15, 2022 at 17:18
  • 1
    Yup. I think this nails it. I was apparently over-thinking it. The dark shape shouldn't be rounded at the intersection. Thanks for contributing!
    – Scott
    Commented Sep 15, 2022 at 17:30
9
+50

First of all, if you do not want unnecessary gradients, let me ditch the gradient you already have (A). This gradient adds unnecessary complexity. I'll comment on this later.

enter image description here

Let me approach this using two concepts.

I. Shape defines Shape

So we are assuming the block has some bevels. In this first case, the shape will define the boundaries of this bevel, the shape.

I am adding a simple shape (C), that can be put behind the other two (D). But one important thing is to reflect that these corners of the block are actually rounded, so we need to make the curve congruent with the other two shapes, so the vectors should align with them (E). Now we have the result (F).

enter image description here

But this solution only implies the corners are rounded, not the edges. So we need to actually define another color or zone between the two flat faces, so we make this gap (G). One problem I will not address is the possibility that the diagram would need to reflect that we have a bevel on the other sides (H).

enter image description here

II. Shading defines shape

A flat design could be a stylistic choice. But if it needs to describe a more realistic object, we need shading.

Shading for this case necessarily uses gradients.

We can add one gradient (I) and we have a rounded edge (J).

enter image description here

But again, depending on the simplification level we need, this could be enough or not.

If we need to only imply that the vertices are also rounded, we could add a stylistic element like a glossy reflection (K)(L).

or we need to start using... a bunch of gradients or meshes. Yea. A more detailed illustration needs them. But it all depends on the style we need.

enter image description here


A simple method

But actually, if we use the concept of "bevel for all (H)" it is easier.

Let's start with the simple elements (D)

Separate them, duplicate the faces and make them smaller.
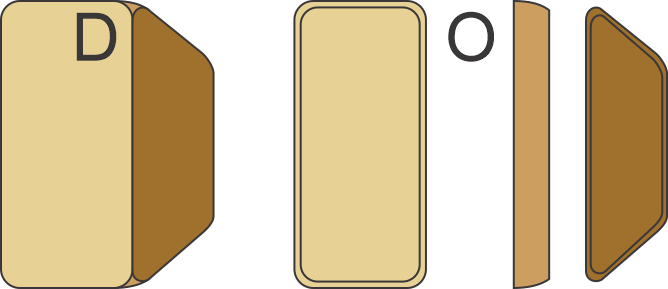
enter image description here

Change the color of the big one to the color used on the center piece. Use the blend tool and voilá.
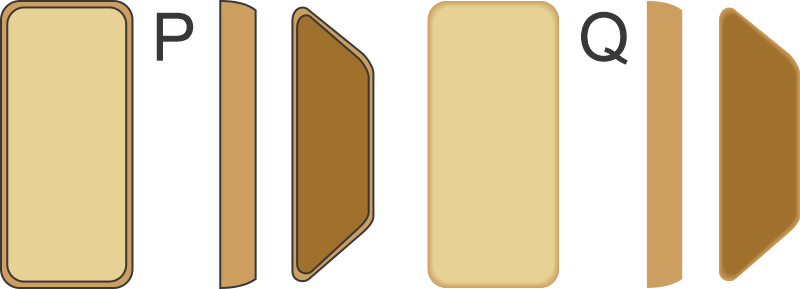
enter image description here

enter image description here

Yes, it can be furder detailed... using gradients and more meshes. :)


*About the gradient (A), it is not a stylistic gradient, it implies a light-shadow shaping, saying that the front face is not actually a flat face, but a curved one.


Edition like one hundred

Ok, you want the hard way... :)

First. Making a gradient look like a continuous shape is really hard, and we need to blame your brain...

Here are two gradients (T), and some curves representing a simplification of what the gradients should look like.

The Upper gradient is a continuous one, and the bottom is a gradient coming to a halt on a color for a moment, and then continuing the gradient.

(U) Represents the upper gradient and (V) the bottom. But our eyes start compensating shades, and see (W)

enter image description here

That means, if you do not do that perfectly you will notice that.


A Not that simple method

So. Rounded bevels on a cube or cuboid can be interpreted as sections of a sphere connected. That is how you could do that in a 3D modeling software.

Then, take a sphere (1) that is easily shaded to look like one. And divide it in 4 (2) (for nos as an example I am using a square grid) Now you have your vertices rounded (3). Now connect them with a rectangle using the exact same color values as the sections of the sphere. I used a mesh there so I have different nodes with specific colors.

I am lazy and only did 1 section as proof of concept.
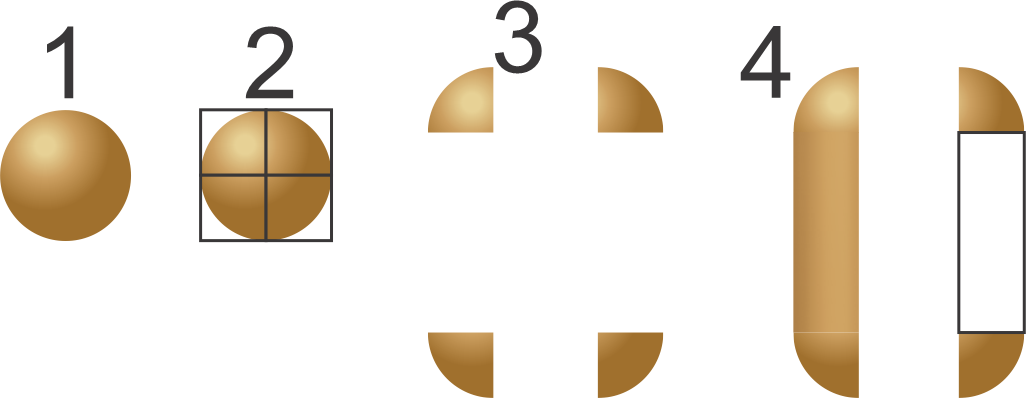
enter image description here

But as you have perspective... you need to apply that to the vertices.

enter image description here

Now you have a perfect gradient for the corners... now you have to connect them. There is not an easy way to make those transitions.

This method at least answer very precisely your questions

I can never determine what the fill should be... lighter? darker? mid-tone?

Use a color picker on the zone that mimics the angle you want. That will give you more consistent colors on light and shade.


Or use 3D software and make a stylized render...

4
  • Thanks for contributing, and the clear effort. :) I did post "standard gradients are okay" in the question :) I just didn't want to get into meshes, 3d shading etc. The problem with the edge gradient in I-R is that it makes the side appear rounded, not the corner. And if that side is rounded, so should the other sides be, meaning I'd need minimally gradients on the other 3 sides to indicate a drop off. I want hard edges, just round corners. I think D may address that best in this answer.
    – Scott
    Commented Sep 15, 2022 at 18:48
  • The problem I have visually with D-H, and R is that this method always makes that right corner appear concave to me. i.e. R in this answer appears to have convex rounding on the left edge but concave rounding on the right edge. And if right corners are concave, then the left corners should also be concave (unless a purposeful opposition is desired) Perhaps this is my issue and why I struggle with this.. hence the question.
    – Scott
    Commented Sep 15, 2022 at 19:24
  • I added some more letters and numbers because I ran out of letters.
    – Rafael
    Commented Sep 15, 2022 at 23:11
  • More than what was necessary :) I wasn't expecting you to explain further. :) .. The thing is.. I am not seeking bevels. I don't mention "bevels" because I know what they are and they are not wanted. A rounded corner isn't a bevel. I think this is partially my fault due to a couple images in the question. They somewhat lead viewers down a "bevel" path - wasn't my intention. I know if I wanted a rounded cuboid I need to alter all sides to reflect that. I don't though.. frankly... I was overthinking things and mistakenly lead others to overthink in the same manner. Sorry.
    – Scott
    Commented Sep 15, 2022 at 23:26
8

What about something like this? There's an extra shape behind, filled a colour which is kind of half way between the light and dark shapes, and a gap between the light and dark shapes to form a kind of bevel all the way down.

enter image description here

Maybe even more of a gap and some slight rounding to fix the corner at the bottom

enter image description here

7
  • +1 Good stuff... that gap may be the key I've been overlooking. The bottom inner corner would actually be rounded as well. I just didn't bother with that for the question.
    – Scott
    Commented Sep 15, 2022 at 0:01
  • In stead of a flat color you could use a gradient to make it look more round and less beveled (not sure if that is the right word). Commented Sep 15, 2022 at 7:28
  • @JensSchauder - but the OP doesn't want to use gradients. The question specifically says "using simple fills without a bunch of gradients"
    – Billy Kerr
    Commented Sep 15, 2022 at 10:10
  • Simple gradients are fine. I just don't want to get into meshes or multi-object layering, etc. in an effort to keep overall construction quick and easy to edit. I am using gradients for the front face already.
    – Scott
    Commented Sep 15, 2022 at 17:32
  • well having gradients in place wouldn't improve the answer anyway. As the construction is a prerequisite to the gradients and thus not needed to address the question. its better that they aren't there for understanding. After all this is not hey i can make this cool image site.
    – joojaa
    Commented Sep 15, 2022 at 17:50
0

Much text and images has already been sown. The accepted answer presents a piece of planed plank with rounded edges, which is a common timber material. Probably just that was actually hovered in OP's thoughts, but the original (unedited) question asks how to draw a box which has otherwise sharp edges, only the corners are rounded.

If the corners are rounded to spherical they cannot be tangential with the planar surfaces. The rounded area has still sharp edges and one can draw them by inserting curved pieces to the corners. OP has already presented one such corner as an example. https://i.sstatic.net/IxkCd.png The idea seemingly wasn't fully satisfactory, so the question was written.

If the rounded area meets the planar surfaces tangentially, the case becomes interesting. The limitation "only simple fills, no complex gradients" makes an exact image impossible. A rendered 3D model (grey) in the next image shows such box:

enter image description here

Tracing the rendered greyscale version manually (to keep it simple) is easy, but the corner implants should have complex gradient fills or equivalent blurs or blends to fade the seams. Otherwise there's a non-tangential bevel.

In the right the corner implants are divided to 2 parts which have solid colors. They resemble a little more tangential roundings than single color implants, but essentially this is the roughest possible approximation of using gradient fills. Only the context where the image is used can create an impression of no-bevel tangency. If the image alone should do the job the problem is unsolvable without proper (complex) gradients.

1
  • Thanks for the answer. As stated on other answers I'm not seeking to create a "cuboid". Several other answers already detail how a cuboid can be constructed. The actual issue, which may not have been adequately described in the question, was I wanted a flat plane with rounded corners, then some pseudo depth, like you, along with others - when I was trying to create this, all I kept getting was a cuboid - which is not what was wanted. This is why the selected answer is actually the correct solution.
    – Scott
    Commented Oct 27, 2022 at 21:33

Your Answer

By clicking “Post Your Answer”, you agree to our terms of service and acknowledge you have read our privacy policy.

Not the answer you're looking for? Browse other questions tagged or ask your own question.