0

I want to make a basic square pattern background in Photoshop. However, I'm a real newbie at it.

My plans are to make a 70x70 pixel square and divide it into 4 squares - each one with 35 pixels. Then paint 2 of one color, and 2 of the same but lighter color.

How do I split it in half, vertically and horizontally? And when painting how to I block the other squares to not affect them?

4 Answers 4

1

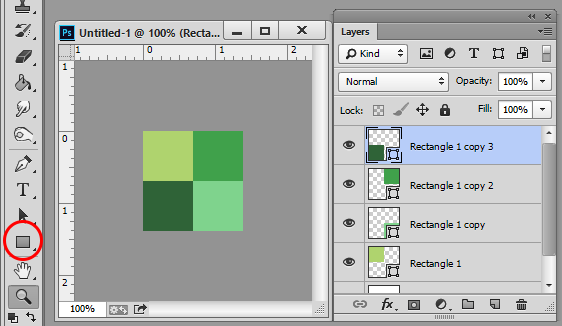
So if I'm right you want to create a basic pattern that looks something like this? (I used other colors so it's easier to see):

enter image description here

The steps (for any program, not just Photoshop), would be:

  1. Create a new file measuring 70 x 70 pixels
  2. Using the Rectangle tool, draw a square that is 35 x 35 pixels and place it in the top left position
  3. Duplicate the square, change the color and move it to the top right position
  4. Do the same for two more squares.

enter image description here

1
  • Thanks, this is abundantly clear by comparison to my sloppy edit. Been on the road so didn't have time to tidy it up. I think I also confused the answer with too many only slightly relevant options!
    – Jenna
    Commented Feb 8, 2014 at 17:47
1

welcome to GDSE. Here is a quick sample of how to achieve a pattern but just to let you know, in future it is much better to show some effort in our question and what exactly you are struggling with so that people can help you. It's also good practice to have a quick google to see if there are tutorials readily available for you and also check the questions here to see if your question has already been answered in the past.

So using patterns you want to create your layer and choose FX as in 1 below. You then select your pattern as in 2 (you can see that there are many options of patterns) and apply it to get your result as in 3 below. Alternatively you could make a custom pattern.

Also as per division of a page, given that you already know your dimensions you could use guides.

As for blocking the other squares, using separate layers each with a layer mask that blocks off the other 3/4s of the piece should work nicely.

enter image description here

Good luck with your work, again welcome to GDSE and don't forget to show what you have tried in your question in future :)

edit per comment

Ok.in that case patterns are not what you need. You open a 70 by 70px photoshop file. Insert a new guide at 35px horizontal and another one at 35px vertically. These guides show the division that you want. You then make a new layer and using the marquee selection tool (M) you click and drag the selection to match your guides. Repeat this with a new layer for each colour. Don't worry if your selections are a little off as you can transform the layers later (ctrl t) or alternatively apply a layer mask to each layer that blocks out the unwanted zones. I'll edit this into my answer with images later. You could also save this as a pattern if you wished.

1
  • Although so far didn't spend too much time on it, the tutorials I have watched weren't so helpful ^^" I opened that menu in step 2 but I don't want any square pattern, all I want is to divide in 4 equal parts a 35x35pixel square so I can paint the top-left corner and the bottom-right of the same color, and the other two of some other.
    – Harlequin
    Commented Feb 7, 2014 at 13:04
1

I would say that Yisela nailed it, but for future knowledge you can make almost any square patterns / images tileable by using the offset filter in Photoshop.

Example: Say you have a picture of rocks. Extract a square chunk of the image. Say 100px x 100px. Then paste it into a new doc.

Then click Filter > Other > Offset and divide the dimensions of the entire image by 2.

So in this case Horizontal and Vertical would be 50px. Might need to touch it up with the clone tool, but that's it.

Now you have a tileabe background image.

Also works well for Horizontal repeat-x patterns.

Just a tip.

-1
  1. Menu > File > New . Set width and height to each 50px. Click OK button
  2. Double click on layer to unlock it
  3. Ctrl + j to create new layer
  4. Click on Selection tool from toolbox
  5. Make the size of selection to 25 x 25 px and fixed, from selection properties box below menu bar.
  6. It will show a selection area box, adjust it to top left.
  7. Fill color using Alt + Backspace
  8. Now we have to create 3 more, Create new layer using ctrl + j
  9. It will create new layer, using move tool, move new layer to another 25 x 25px area, of square box. and fill another color with opacity according to you.
  10. Now pattern is ready, we have to save it. Menu > Edit > Define Pattern . Give a name to pattern, "square pattern"

I found this video helpful. https://www.youtube.com/watch?v=kc-FE8ji5ow

Your Answer

By clicking “Post Your Answer”, you agree to our terms of service and acknowledge you have read our privacy policy.

Not the answer you're looking for? Browse other questions tagged or ask your own question.