32

Calling all Web Designers :)

I am starting to make a website for a small business in my hometown and it will be my first proper project. I have made sites in the past, which I have done for leisure. I am fluent in HTML and CSS. I have got the clients requirements and what he wants on the website etc. I am stuck on what steps I should follow after finalising the requirements. I have searched the web and could not find anything relevant to my questions because the info is outdated.

My questions are:

What is a web designers workflow in 2014? (Because everything is changing so fast) Do I create wireframes of the site and then design them in photoshop and then code the designs?

I just want to know how the "design" processes works, like what steps I need to take in order to make the website.

Thanks in advance.

4
  • 2
    It depends entirely on the project, the team, and the client. There is no stock answer for this.
    – DA01
    Commented Aug 5, 2014 at 2:19
  • sketch sketch SKETCH!
    – SaturnsEye
    Commented Aug 5, 2014 at 7:55
  • 2
  • For anyone coming in later: @Darth_Vader mentioned using InDesign rather than PhotoShop. I know PS sounds so inviting right now especially if you are a PS guru, as I was, but I was "Forced" to learn InDesign a couple of years ago, and B!+©#ed and moaned about it until it clicked in my head and I got it. It is definitely worth the effort to learn, and the extra $$ you can charge for making your proposal and design doc using InDesign is worth the few days it takes to learn it. So go learn it!!
    – BillyNair
    Commented May 30, 2015 at 23:31

5 Answers 5

37

Discovery and Scope

Sit down with the client to determine, goals, purpose, and needs. You should have drafted a quote of the purposed site and also discuss turn-around time. Make sure to have written in anything needed that you cannot provide. You need to figure out how the site will be structured. Such as responsive, tablet and phone only, desktop only, desktop and tablet only. You need to figure out if the design is a multi-phase design target, such as the client will want to release a desktop version and want a full mobile app later on.

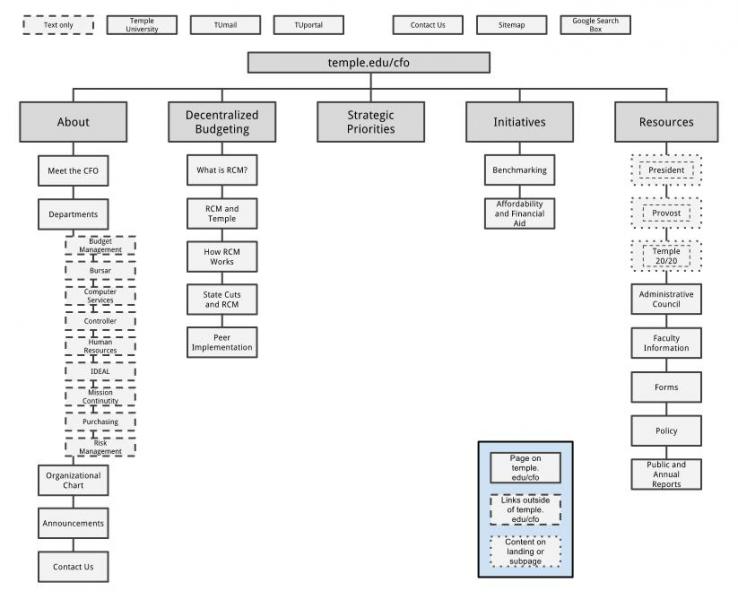
Content Mapping

Hopefully you have been given all the content that is desired for the site. You should map out the site and its functionality. Decide how the scalability is for future modifications, decide how the code may be structured if it's for a CMS or app.

Example: enter image description here

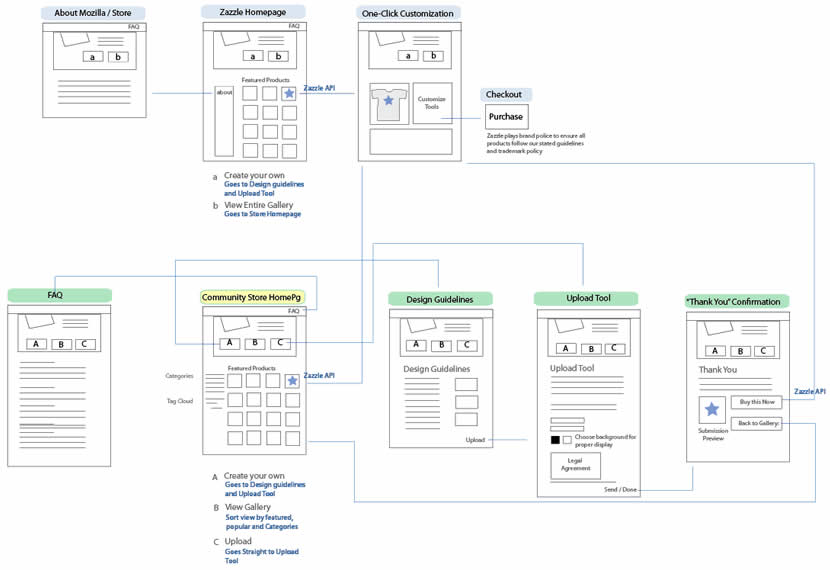
Mockup

After you have your "tree" or "map" completed with the approval of the client I would work on a hand sketch or mockup tool. There are a large amount of questions on this topic if you do a search in the top right

Example: enter image description here

Style Tile

Designing in Photoshop for web design defeats the purpose of today's age. I don't know many people that still use Photoshop because the amount of time it takes you to make a fancy button you could have spent that same amount of time and coded in the browser. If I have to use an application per a special request I will deploy it in Illustrator or InDesign. I would advise migrating to design a style tile such as:

enter image description here

With the purpose of the tile you are not handing a client a design and putting yourself in the corner of "this doesn't look like the design you gave me". Also, if you are planning a site there is no reason to spend the time laying it out in Photoshop for responsiveness because you will spend a lot of time designing for certain devices, etc. etc. If you HAVE TO design the full site I would consider Illustrator, as stated, for its SVG and ability to export elements for your site compared to Photoshop. In some degree you could even use InDesign for formatting the content but I would only use Photoshop for image manipulation and if I'm going to do that I would probably roll with ImageMagick. I take the Style Tile a level further than others and code it into a single page so I have knocked out a preliminary task of my master .css file.

Wireframe

I prefer to deploy designing in the browser if you haven't noticed. Now these days I may use Illustrator for a sketch of the site or mockup of the site but I usually deploy a default template .css file with no more than 6 colors in a grey scale and I code everything for the structure of the site since most people cant get a design understanding and want something to play with. I sometimes go ahead and do this in PHP since it's easier to deploy for a CMS. I then will develop a simple sub-domain with the client's PROVIDED fonts in a black and white manner so the entire site's functionality is present and they can go through it. Since I haven't spent the time adding all the content or colors (because I use dummy text reference: "Alternative to Lorem Ipsum (dummy text) for websites") I can easily modify any changes that are present if they don't like a certain element based on a device.

Colorize and content

Once the client has signed off on the structure of the site and functionality I will write up the rest of the CSS and add the requested animations or JavaScript specifics. Since I have the style tile approved and if I developed it correctly I can simply copy the CSS over and be set.

Debug, Debug, Debug

The final step before client sign-off is debug and make sure my code is solid with no errors. If everything is correct I should have a smooth release. This step also includes serving testing and load testing, if that is what you have priced and offered. Personally, I'm a firm believer that any designer should be aware of what they are developing for just like you would, hopefully, be doing when it comes to a print design. If the client can't afford a true hosting provider it could limit the performance of the site and all they will say it is your fault and you did something wrong.

Training

I typically bid in my brief/quote training on CMS sites. Some users have no clue what they are doing so I will bid for an afternoon with an hour over padding for after questions to make sure to go over anything or make sure they are using my design to the upmost capabilities.

Some other topics that may help since you're asking a basic question:

0
4

I am also a web designer who has just started in the field. I have done a few projects now, though. For me, my workflow goes like this:

  1. Initial Design & Development Meeting
    This is when I gather all relevant information, including expected completion date, make a list of items needed from my client, etc.
  2. PhotoShop Mockups
    At this time, I find a design or two or three that are fitting for my client and make mockups in Photoshop using their branding, colors, styles, etc. I send these over and discuss what should be changed/kept on each one, then let the client decide which design they like best.
    NOTE: If you're using WordPress to build on, you can go to http://themeforest.com and check out tons of themes. From there, you can take screenshots and do your mockups, then you can also provide a live demo (without the client's customizations, obviously). If your client likes one of these mockups, you then purchase the theme and can alter however you need to. This is what I tend to do. I never use a theme (or anything else for that matter) without giving proper credit/payment/etc. to the original creator. :)
  3. Development
    Then I finally start actually developing the site in a development environment (NOT the client's live website, but a subdomain if possible - IE dev.clienturl.com) I send over updates to my client every time I feel like a page is getting close to complete, that way if there are issues, we can fix them right away.
  4. ALWAYS FOLLOW UP
    Even after your client's website has gone live and they seem satisfied and have not asked for further alterations, be sure to follow-up. Just make sure everything is functioning as it should, per their expectations. I also recommend writing up a little survey for each client to finish once the website has gone live for about a week. You can use comments from here as testimonials on your website.

If you need any help with anything, contact me through my website. I have tons of resources I can share with you for things like contracts, post-production surveys, initial questionnaires, etc. http://anchorsawaydesigns.com/

1
  • This is common, but I really encourage people to avoid PhotoShop designs.
    – DA01
    Commented Aug 5, 2014 at 2:20
3

try and get as much info as possible from the outset, then follow a staged approach something similar to below. Try and keep your client informed as much as possible, as you won't want to be developing something in isolation only to find out later that it doesn't meet their expectations. If you invest in a good wireframing tool (I use balsamiq) then half the job is done for you.

  1. Requirements gathering
  2. Wireframing
  3. Design mockups
  4. Design finalised
  5. Development
  6. Hosting

Good luck.

1
  • @user3830113 there is no hard-and-fast rule as to what makes a wireframe a wireframe vs. a mockup. In general mock-ups tend to be a higher fidelity, and tend to focus on visuals rather than flows or functions. But in a lot of situations, wireframes and mockups may be one and the same. It all depends on the particularities of your project and team.
    – DA01
    Commented Sep 15, 2014 at 22:42
0

Hi dude its nice you are starting new project.

Steps for your Need:

  1. first you Decide what technology u want to use for your project i mean single page scrolling,multiple page etc.

  2. Then accordingly prepare sketch for your layout and workflow.

  3. Now start designing your layout in the tool you like i do with photoshop but you can use your liking.

  4. After that its good that you show ur layout to client for any changes ie. colour, fonts etc. so that you can it doesn't make headache at time of html.

  5. Now, After confirmation of clients. Its time to start coding with Html and Css.

  6. After it it time to pass it over to Developer for Further Language base coding ie. PHP,.Net etc.

Enjoy............

1
  • Step 1 can be tricky. It's good, but there should be several steps before that--where you determine the best technology based on the needs of the project and client. Also, I'd argue that Step 4 can MAKE a headache out of HTML. Best to get into HTML sooner than later, IMHO.
    – DA01
    Commented Sep 15, 2014 at 22:44
-1

In Web industry, to streamline your development process, Designing is done, and before final design is presented to be further developed or be tested, some other intermediate steps are involved :


Step 1: Getting Inspiration :

If you continually observe what other designers or sites are doing for their wireframes, you will slowly get a picture in your mind of how a wireframe helps to organize information for the screen.

and for that you can use "Wirify" Wireframing tool, just add the big link to your bookmark and got on any desired website, click the bookmark, you'll see the website turning into wireframe.


Step 2: Designing Your Process :

Different designers approach wireframing and its translation to visuals or code in different ways,

Here it's not just designer to choose the path to be followed, sometimes clients prefers to directly make mockups, and some prefer more systematic,

Sketch => Wireframe => Mockup => Code

Step 3: Sketching :

Now when you're inspired have some rough ideas and a planning of approach, its always good to start with sketching, no mater how good you're at controlling your mouse / stylus or whatever you use, they can not beat paper, pencil at simplicity.

Hand sketching on paper is always a good starting point for any designer. It provides a quick and easy way to focus and organize. If you’re very precise with sketching, you could even use this as your final wireframe.


Step 4: Wireframing :

Creating a wireframe is one of the first steps you should take before designing.

A wireframe helps you organize and simplify the elements and content within a website and is an essential tool in the development process.

A wireframe is basically a visual representation of content layout in a design.

Like the foundation of a building, it has to be fundamentally strong before you decide whether to give it an expensive coat of paint.

Things to consider while creating a wireframe are:


Pick Your Tools

Here is Mashable's list of 10 Free Wireframing tools for Designers

Setting a Grid

Grids are very necessary to achieve a symmetric and parallel design.

whenever you look at a good designed website you'll find that it's content start from a specific point in body and ends at one, those are managed by use of grids.

Determine Layout With Boxes

Define Information Hierarchy With Typography

What to Avoid While Wireframing :

  • Too much happening on the page.
  • Emphasis on color and design
  • Too much detail
Benefits of wireframing :

Creating a wireframe gives the client, developer, and designer an opportunity to take a critical look at the structure of the website and allows them to make revisions easily early on in the process.

Wireframing brings the following key benefits:

  • It gives the client an early, close-up view of the site design (or re-design).
  • It can inspire the designer, resulting in a more fluid creative process.
  • It gives the developer a clear picture of the elements that they will need to code.
  • It makes the call to action on each page clear.
  • It is easy to adapt and can show the layout of many sections of the website.


  • Step 5: Mockups / Visual :

    Now final Wireframe can be converted to final Mockups or Visual:

    Some common tools for Mockuos are Adobe photoshop, Corel Draw and very new but already populare Sketch, etc.

    Things to consider while converting to a Mockup are:

    Information Hierarchy

    You may need to consider what to be highlighted and what to be side information, and color scheme, re-positioning and typography are so decided.

    Typography

    Choose visually appealing and readable typography for website with right combination of alternatives. Font-size, weight and colors play a crucial role in readability.

    Color Schemes

    A Color scheme representing Brand Identity and psychological colors as Red for danger, green for Success, etc.


    Step 6: Prototypes :

    A prototype is an early sample, model, or release of a product built to test a concept or process or to act as a thing to be replicated or learned from.

    Wireframes handle structure, mockups handle visuals, and prototypes handle usability (in web / app products).

    A prototype product is made and then this is tested and POC (Prof of concept) is done, Now we can head to Real product (obviously if there’s no change needed)

    Link to original article with images and other links

    1
    • 1
      Please don't just copy and paste a full HTML page. It is poorly formatted, some links don't work, and it's obvious that some images are missing. Please take the time to format it properly in our format. Commented May 15, 2015 at 13:02

    Your Answer

    By clicking “Post Your Answer”, you agree to our terms of service and acknowledge you have read our privacy policy.

    Not the answer you're looking for? Browse other questions tagged or ask your own question.