0

I have this image in Photoshop where the background is one layer and the phone and hand is the 2nd layer. So there are two layers:

enter image description here

Right now the hand and phone look kinda of like separate from the background, I want it to be more smooth around the edges, I tried using feather but this didn't work. Any tips or a way to make it look more smooth would be great.

8
  • The top image (hand with phone) has a transparent background (you can see the layer behind it). How was this done? Was the top image already transparent? Did you use the pen tool, magic wand, lasso tool to select the hand with phone image?
    – AndrewH
    Commented Mar 4, 2015 at 22:38
  • @AndrewH I used quick section tool, if I need to do it a different way, or get one that already has no background I can do that too Commented Mar 4, 2015 at 22:39
  • 1
    I would suggest using the pen tool. If not, there are plenty of youtube videos and written tutorials on this subject. One example: youtube.com/watch?v=xclF2VDDnnI. Another factor that will help with blending images is making your front image have the same color and lighting as your background image. You will need to use adjustment layers to do this. Let me know if you need a more detailed answer.
    – AndrewH
    Commented Mar 4, 2015 at 22:45
  • @AndrewH I have one where there is no background so that part is perfect, but how could I blend more, so it doesn't look on top of it, could you provide some more detail with regards to that. Thanks Commented Mar 4, 2015 at 22:50
  • 1
    I was unaware of that. You will need to use adjustment layers. I would suggest using a warm photo filter (you will find the adjustment layers on the layers window, its a small circle icon at the bottom). clip the adjustment layer (ctrl + alt between the 2 layers) to only effect the hand layer. You can use other adjustments like levels, saturation, curves to make the lighting & color similar. You can refine the adjustment layers by using a layer mask on the adjustment layers to depict where the adjustment layers show and are hidden.
    – AndrewH
    Commented Mar 4, 2015 at 23:21

6 Answers 6

2

The phone has blue and black reflections on it's face. If this was a genuine photo those reflections would continue over the top of the app screen. They may be less obvious, as the brightness of the display would counteract them a little, but they would certainly be there.

My approach would be to create a new layer above the screen shot and using a soft paint brush and a light blue colour I would try to roughly continue the shapes that can be seen in the black area on the phone. I would mask this layer to the screenshot (Alt-click on the line between the layers in the layers panel), then use the layer opacity control (top right of the layers panel) to adjust the reflections until they look natural.

As Andrew H mentioned above, you could also look at the colour balance between the background, hand and phone, and screenshot layers to give a more natural feel to your composition.

1
  • Hi Wardamercy, welcome to GDSE and thanks for your answer. If you have any questions, please see the help center or ping one of us in chat once your reputation is sufficient (20). Keep contributing and enjoy the site!
    – Vincent
    Commented Mar 5, 2015 at 13:14
2

The edges aren't the main problem. The color balance between the foreground and the background images are off. The hand and phone are more "cool" or "blue" compared to the background image, which is very warm (yellow).

Play with the colors in the foreground to more closely match the background colors.

Then there may be an issue with the lighting in the foreground not matching the background, but it's hard for me to tell.

2

This is my take on it.

I will not comment on colour, because that has been commented already. I will focus on the edges.

  1. Some edges of the fore layer are cut out extremely well.
  2. Some edges have a rim around them.
  3. Some edges are sloppy

The human eye is quite good at finding perfect things, connecting dots, completing lines. The human eye even finds shapes where they don't exist. It does know, though, that these perfect shapes are uncommon. Images with a lot of "perfect shapes" such as hard edges, sharp corners or perfect circles start looking fake because in the real world or photographs they very rarely occur. Part of the illusion to create realistic effects is to remove perfection so the eye thinks its looking at the same old world it is used to.

In this particular case the eye has decided that the fore layer is a thing by itself because it can see its edges perfectly well due to the hardness, rims and ragged edges. It has decided it is a flat cutout on top of a background.
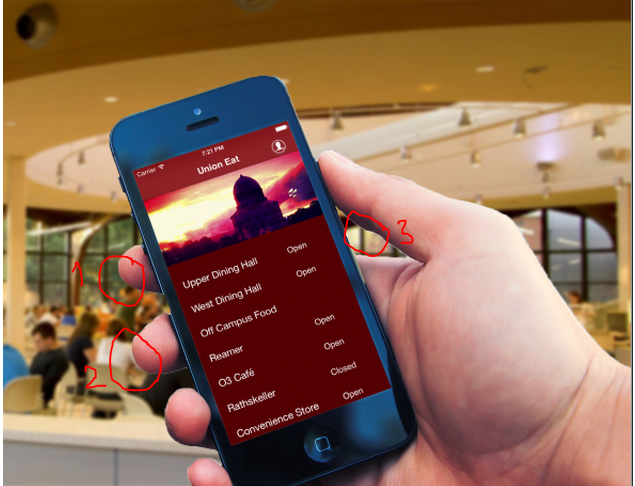
enter image description here

What I would do (and there are many ways of doing this) is to add a mask to the layer, if it does not have one already, zoom in and start caressing all those borders with a soft black brush.

Why soft? Photographs are never 100% sharp. There is always a bit of colour contamination between adjacent objects. If this would be a photograph, then there would be a bit of green (just the tiniest amount) around the finger labelled as 1, for example. Contaminating the edges will make the eye go smoothly over them without noticing them so much. Don't overdue it, though, or the eye will go "wait a second, that hand is semi transparent, so it is fake or very interesting, let me pay more attention to it!"

Why do this manually? Again, photographs are not perfect. The borders need to be less perfect so the eye stops being so smart and lets the hand blend with the background. I would vary the hardness and size of the brush while I am doing this. Some edges might need to be harder and more geometric, like the edges of the phone, while some edges should probably be smoother and a bit more irregular like the edges of the hand.

Why not feathering the whole layer at once? One reason is because the image is not consistently cut. The fringe areas like the one around 2 will feather as a white halo while the hard cut areas like the one around 1 will feather probably fine. The sloppy areas around 3 will be very weird. The result will be inconsistent. Automatic tools are great, but again, the eye is great at finding regularities, so is easy to spot when they have been used.

Why a mask? It might be just a personal preference, but I find this method it keeps my workflow flexible. PS has features to refine a selection. It lets you harden, soften the edges and even edit them (add or remove sections to it). You can even save selections and reload them. So you could, instead of using a mask, select the whole layer, refine the edges of the selection and then feather the whole thing at once, which would be equivalent to adding a mask and go around the whole image with a soft brush. I personally prefer to do it with a the mask, though because I can work at my own pace. I can go back and forth and harden/soften edges by using a white or black brush on the mask. I can pinpoint problems and fix them on the spot, even after I have done a thousand more things on the image. I can also change my mind selectively and change a specific spot of the feathering. If I do this by feather/refining edge instead of using a mask and I change my mind, I have to undo the whole feathering, refine the edge and redo it again.

0

Several people have mentioned the colour difference; while matching the dominant hues can make it easier to fool people, to say that it looks wrong because of the disparity between foreground and background tint, brightness, etc. is wrong. It's perfectly possible to take a photo that looks like this. Foreground will never have a lighter black point than the background. It might never even get to black depending on lighting, but if it does, the part that are black need to match the background, and the gamma needs to look right. Foreground and background can be under completely different lighting, but having the same exposure will lead to the levels in front and back matching in a real photo. So you wanted to do levels on the foreground image, adjusting the gamma so that the histogram is more like the background's.

(I'm guessing you're not still working on this after five years, but just for future reference and for others, I'm sharing this trick that's been used by pros.)

For those edges, there's a really old trick that works in every version of Photoshop from at least Photoshop 4 all the way up to the 2022 that just installed itself a few days ago as of this writing, and in about every other interactive graphics program that does layers and opacity masks, from Krita to Gimp to PSP to even Substance Painter (though the latter is probably overkill):

Duplicate your pasted in hand/phone layer, fill it with white, and move it one layer behind the hand/phone layer, then set the hand/phone layer mix mode to Darken or Multiply (on white they work the same, but which looks better when you're done is the important part, and this can vary, so feel free to switch it until it looks best). Next, select the opacity of the white layer (ctrl-click the layer thumbnail), feather the selection 1 pixel, and make the selection into a layer mask. You can now adjust the levels on the layer mask itself until the overlay looks tight, and mask out your bits that show a halo or mask back in anything where you accidentally go too far. This trick also works well for when you have hair in the pasted over image (you don't, but if you did), because you can often mask out the white "underlay" around the edges of the hairs or other fiddly details completely, and just touch back in a few highlights where and if needed.

0

6 years old case, still up.

As others have pointed there's not so perfect edge in the hand+phone layer. The hard way background removal by drawing a clipping path would work better than easy methods based on color and contrast.

But the jaggy and a little off placed edge is not the major problem. I guess you do not want a hand which pops off the background. The hand should be a part of it. The phone screen content is the wanted foreground.

Fixing: Brush over the edges of the top layer with the blur tool which has in this case width about 50px, 0% hardness and strength about 75%.

enter image description here

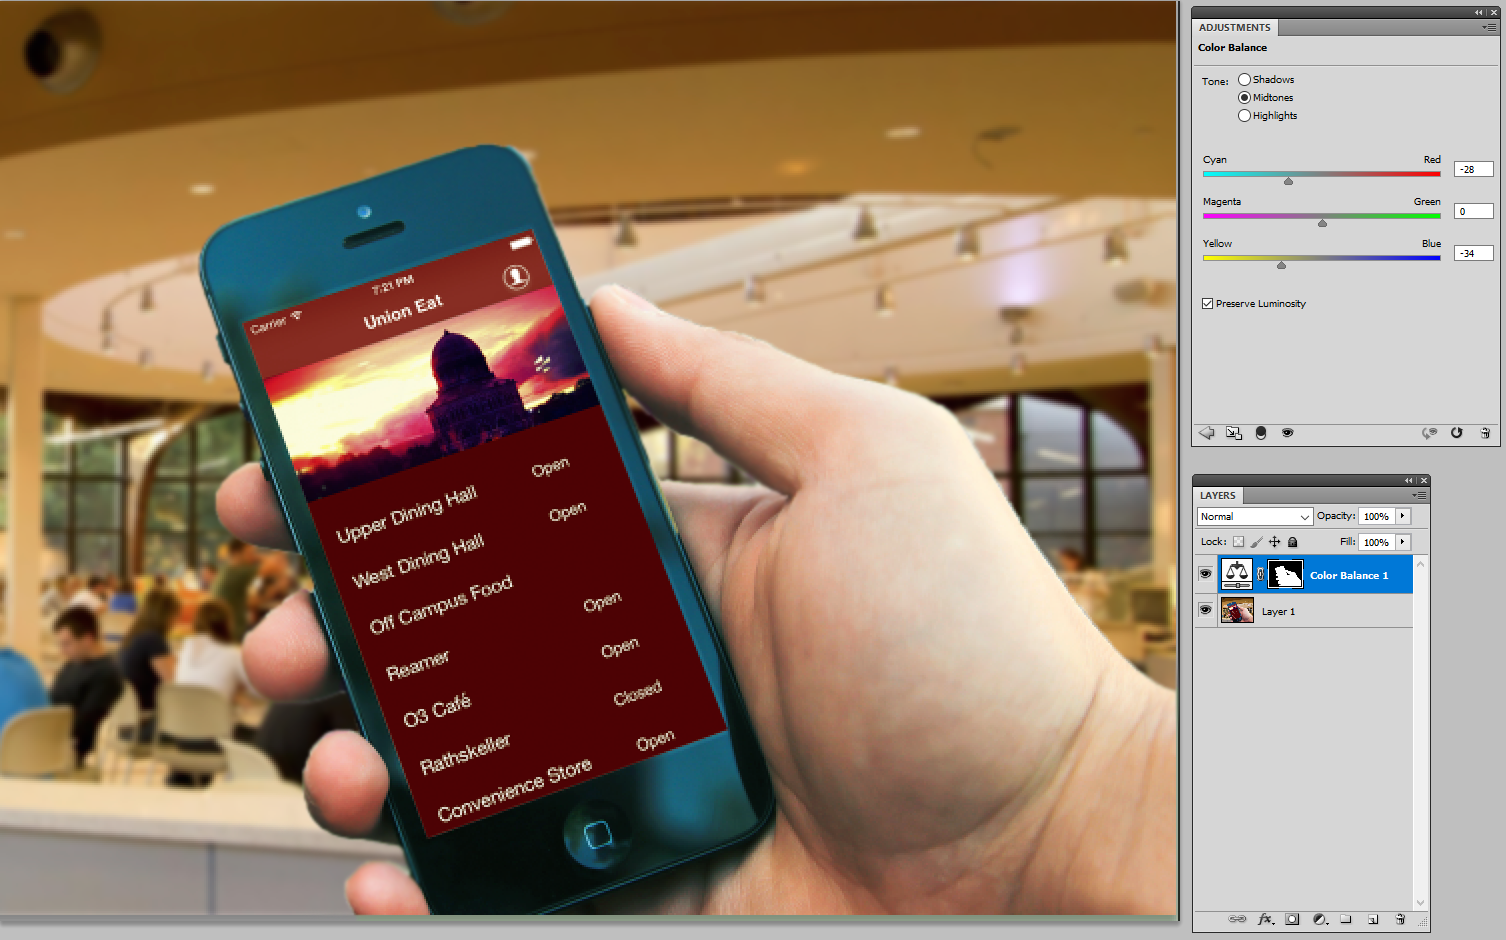
Insert a color balance adjustment layer and make with it the top layer more yellow so that the hand color resembles the skin colors of the white background people. That makes the foreground light same enough as the background light. It changes also the phone, but it has still good contrast.

BTW. I used layer mask to limit the colorized area. If you had separate top layer, let the adjustment layer have the "next layer only" switch ON.

Another possibility is to make the background to have more red and higher contrast. The edges of the top layer must still be fixed:

enter image description here

0

Almost every question: How can I make this more realistic? Has the same answer.

Light and shadow.

In this case, the light is the reflective surface of the screen.

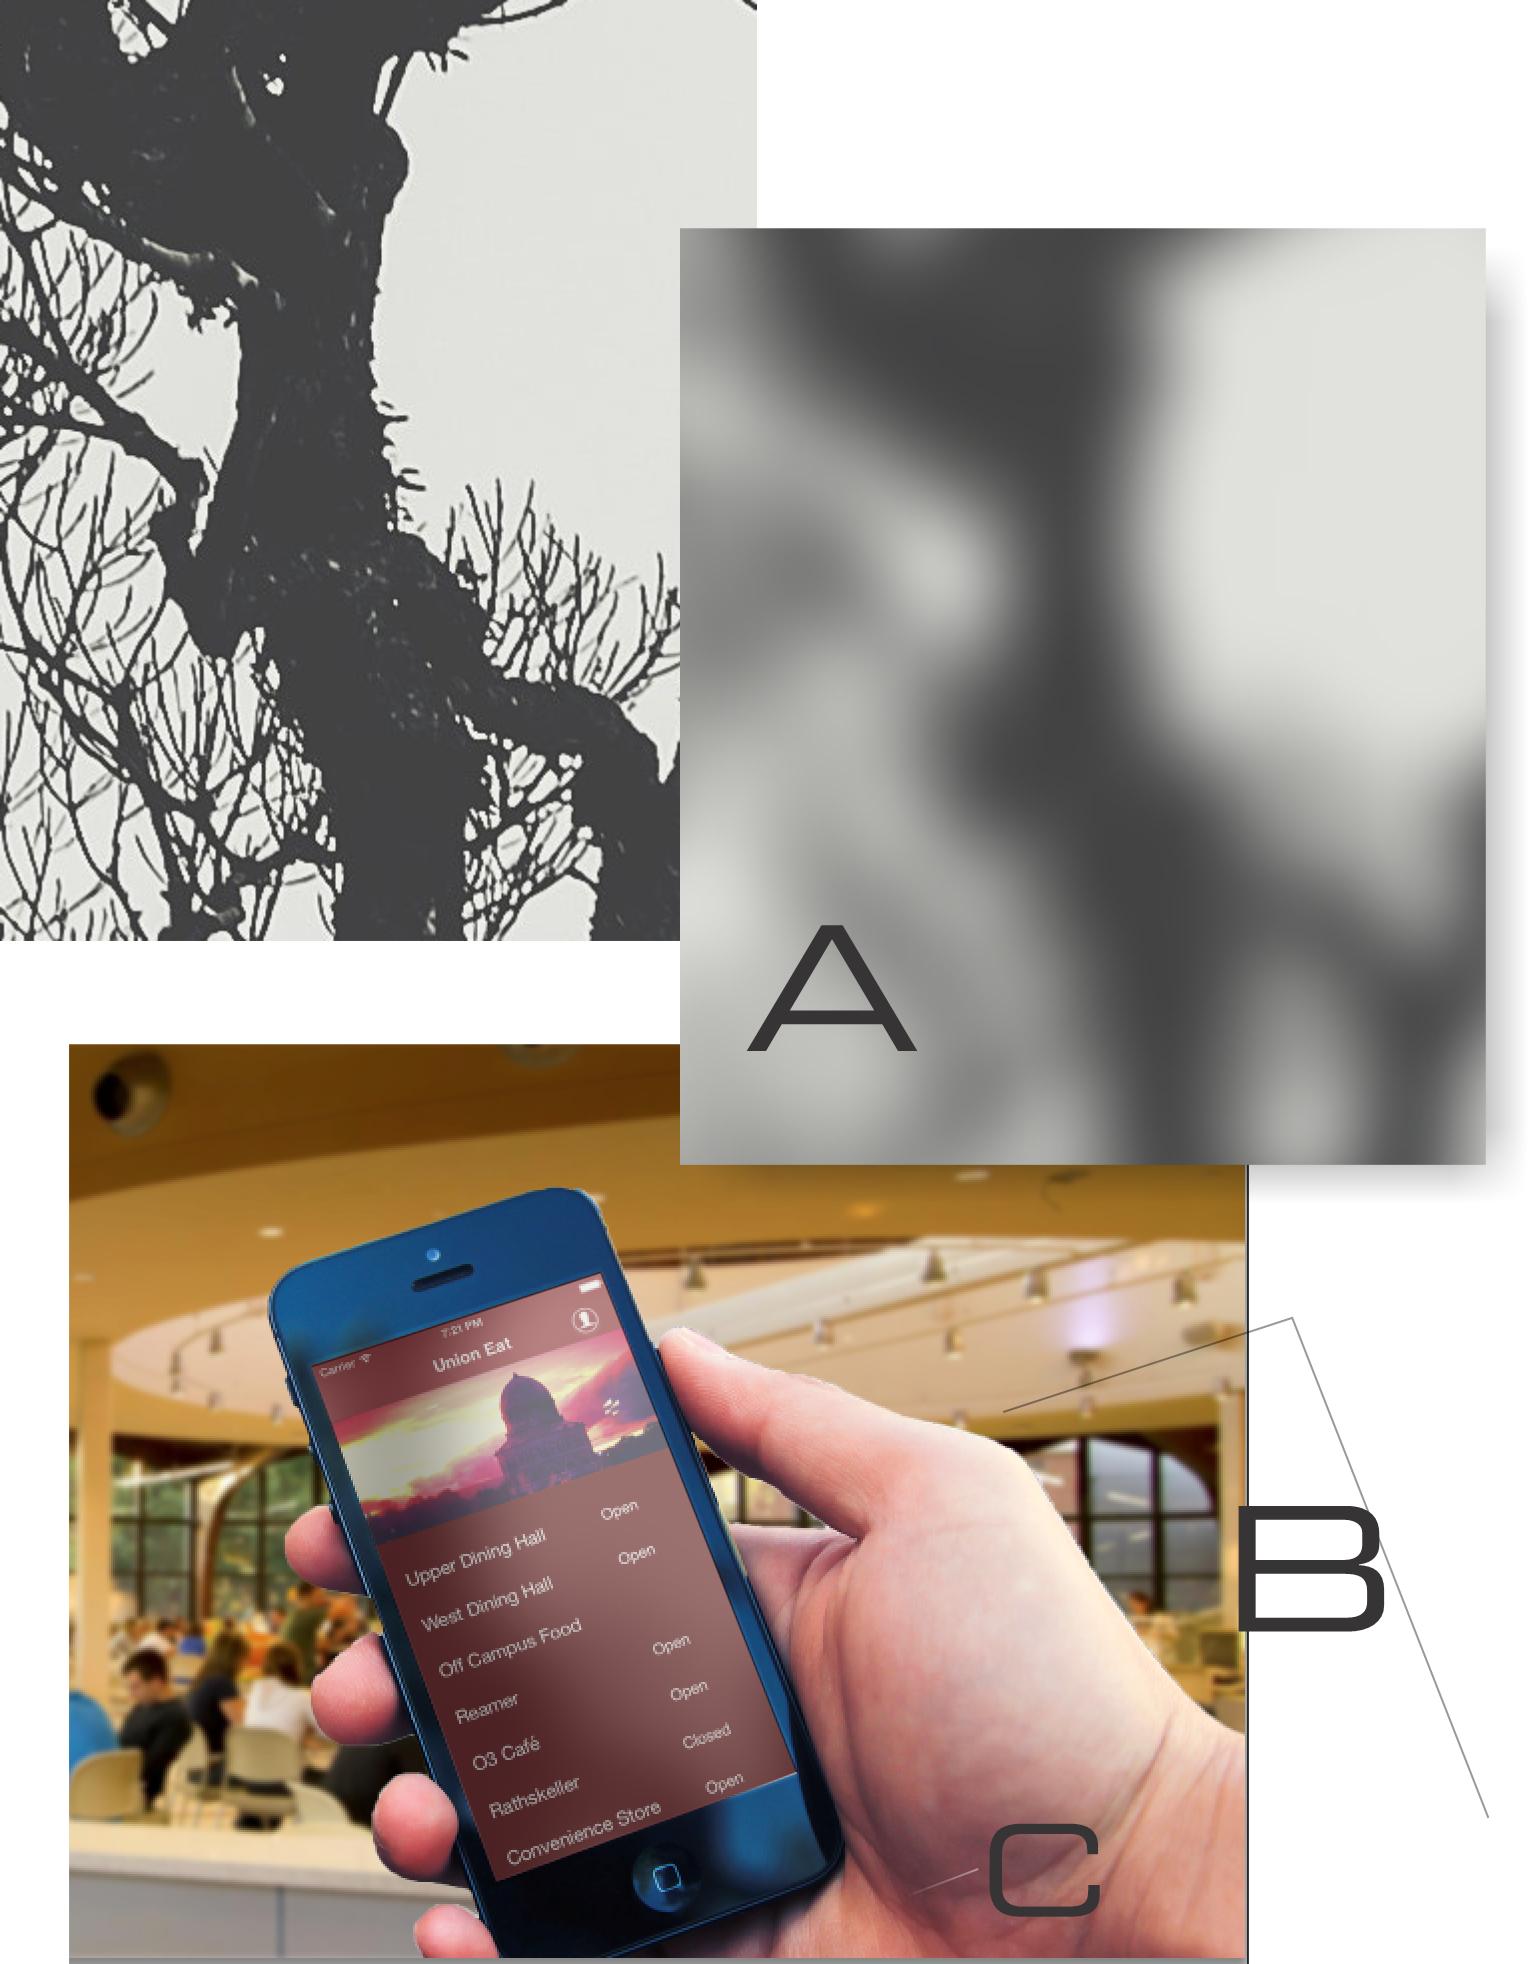
A. I need an organic reflection to match the rest of the phone. I feel that It looks as if some trees are behind.

I got a nice image of a tree, blurred it, and paste it inside a rectangle matching the screen with some 50% transparency.

https://www.pexels.com/photo/monochrome-photography-of-bare-tree-962317/

B. I made a simple black line also with some transparency and a multiply blending mode to simulate some depth vs the screen and the phone.

C. Your image already has this small reflection. But I exaggerated it with a white line, and guess what... some transparency.

Light and shadow... and light.

enter image description here

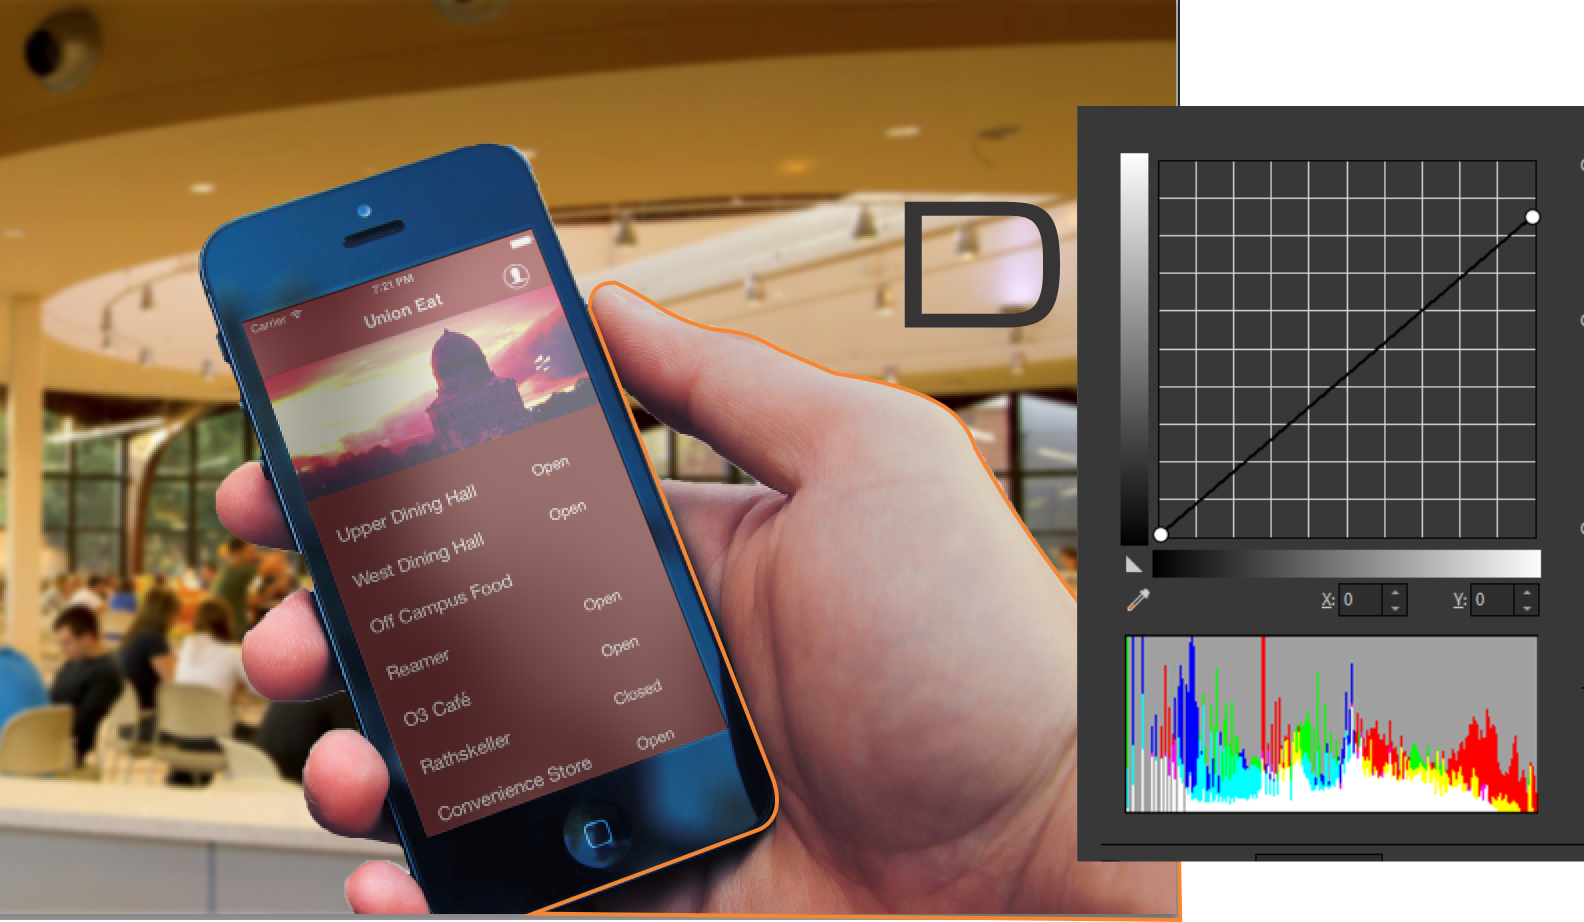
D. If you still have the image in layers, reduce the brightness of the hand using either curves or levels, so it matches the overall lightness of the background. I made a lazy selection.

Light and shadow again.

enter image description here

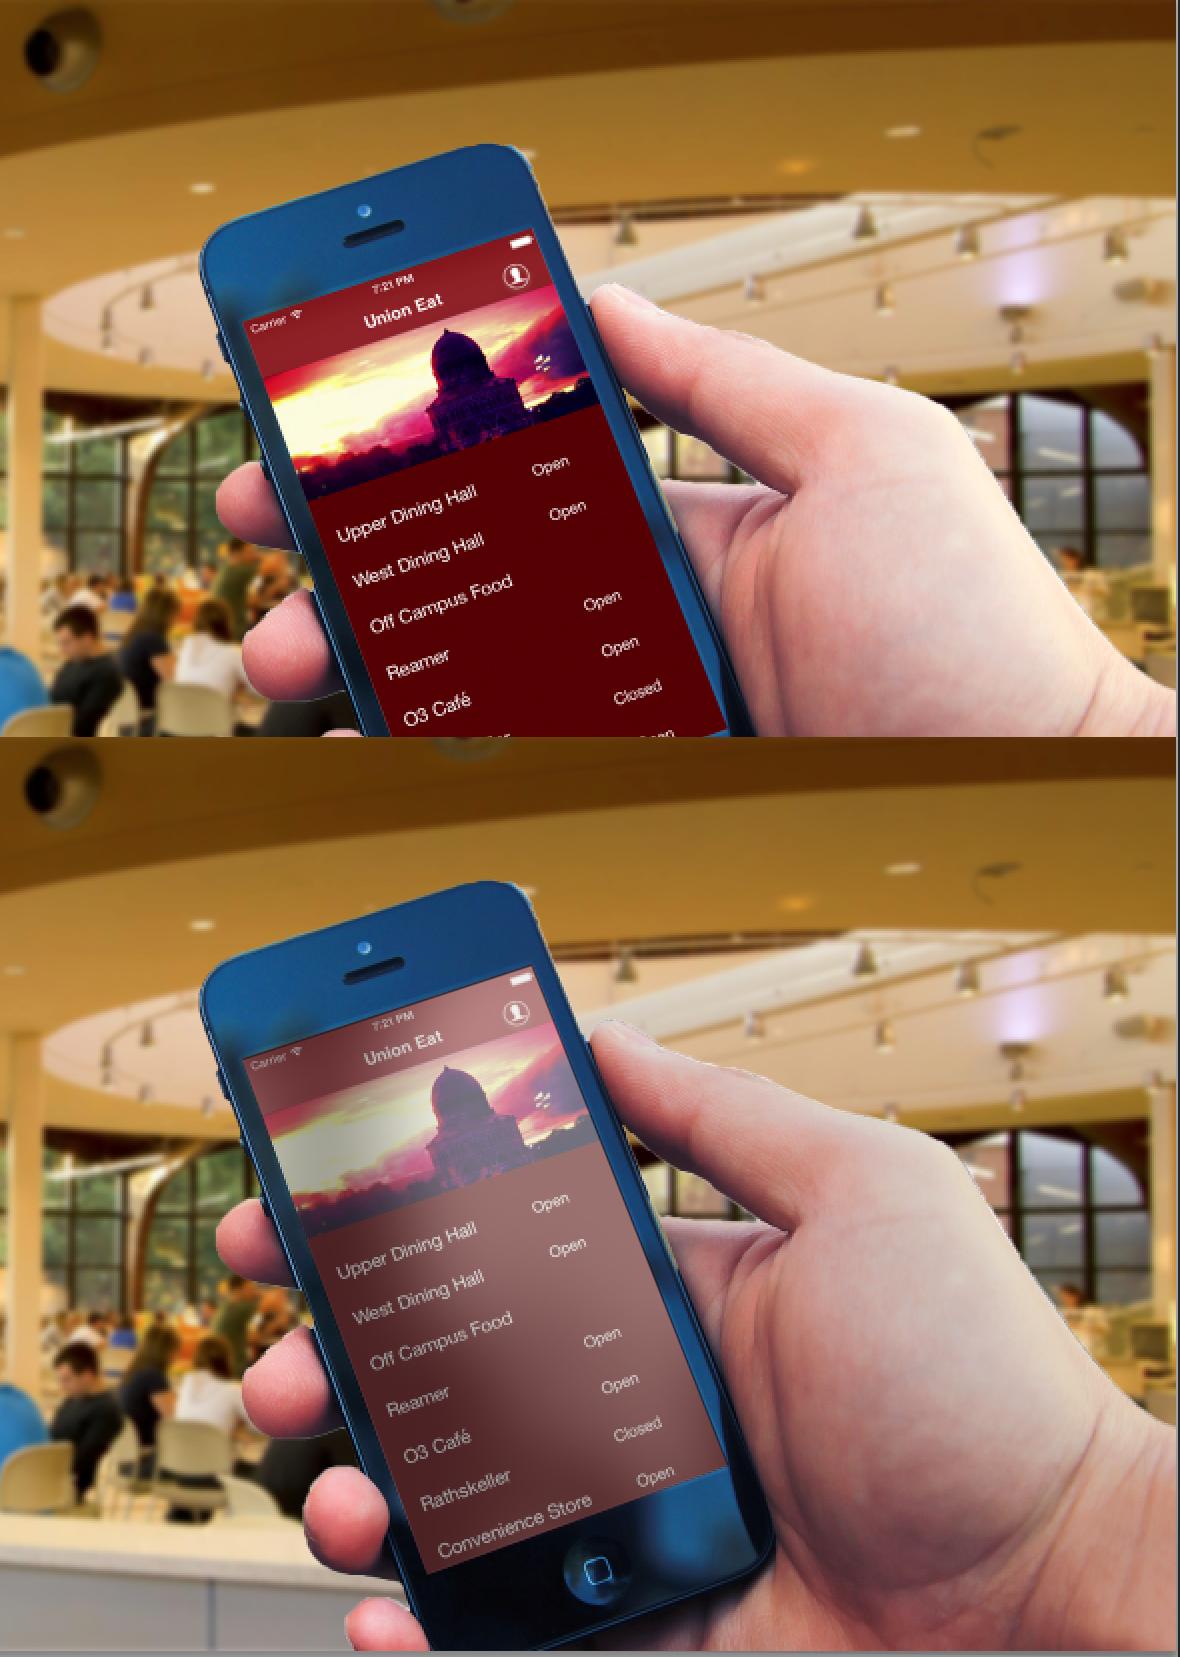
Here is the before and after. I have not retouched the fingers because of time. Of course, there are some other aspects, like feathering your original selection so it has not the glowing halo around the fingers for example.

Light and shadow.

enter image description here

Your Answer

By clicking “Post Your Answer”, you agree to our terms of service and acknowledge you have read our privacy policy.

Not the answer you're looking for? Browse other questions tagged or ask your own question.