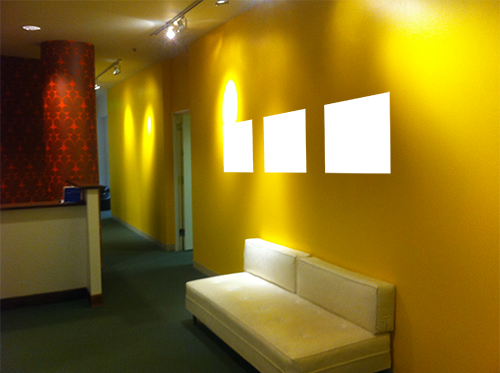
I'm new here and think it's wonderful that there are people you can ask when you get stuck... I'm not completely new to Photoshop, but this I can't figure out: I have a layer of yellow and a white element on it. The white wasn't in the picture originally, so I need to fake like the shadow covers it too. I have many such white elements, so I need a solution that doesn't involve manipulating the white objects themselves, it has to be a separate layer with some overlay function, but I can't figure out how to do it without influencing the yellow. Does anyone have any ide how to fix this? Much obliged!
-
Hi Elena, welcome to GDSE and thanks for your question. If you want to know more about the site, please see the help center or ping one of us in the Graphic Design Chat once your reputation is sufficient (20). Keep contributing and enjoy the site!– VincentCommented Jan 12, 2016 at 14:41
3 Answers
I've worked on a solution for this.
I started with an image like this:
Made a copy of a portion of the yellow wall and moved the layer on top:
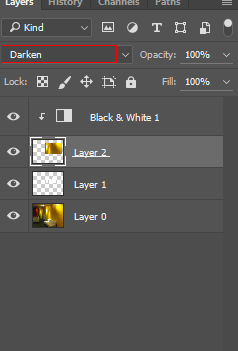
Set the Blending Mode to Darken
and add a Black and White adjustment layer - and Alt or Option click the line between the Black and White layer and the one below create a clipping mask
Layers:
Black & White= Adjustment layer clipped to layer below
Layer 2= Copy of a portion of the background - with blending mode set toDarken
Layer 1= The white boxes that we started with
Layer 0= Original Photo including yellow walls
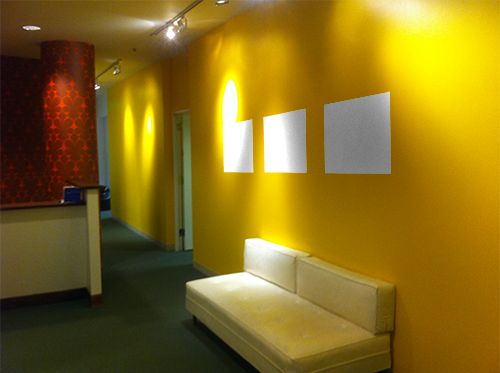
Then the shadows from the background will apply to the white boxes.
-
2Just so it is clear for the OP, the layer named "Layer 1" in the screen-capture is where the white boxes are. They are not painted onto the original image layer. This is non-destructive and therefore reversible.– YorikCommented Jan 12, 2016 at 21:22
-
Thanks for pointing that out, Yorik: I've added a description of my layers screenshot for clarity. I made my original answer in a bit of a rush.– Jory LCommented Jan 12, 2016 at 21:30
-
I like this solution since it "reuses" the existing shadows. It may be a special case though, and may not work with e.g. excising an ex-boyfriend from all existing group photos :) Certainly works for the question and cropped image in the OP– YorikCommented Jan 12, 2016 at 21:39
-
1Thanks so much! This was exactly what I was looking for! Hope it works now :)– ElenaCommented Jan 13, 2016 at 20:44
-
Hi Jory O, great outcome! I am looking to do the same technique but am unable to replicate the same results. When I place a copy of "Layer 0" on top of the white boxes and place the blending mode to darken. "Layer 2" is still opaque and I cannot see the white boxes anymore. Any idea of what step I have missed?– AndrewHCommented Jan 15, 2016 at 14:55
If you simply draw a rectangle marquee around the white boxes and right click, you will see the option to fill. In the dialog select fill with content aware and it will complete the shadow for you.
Make sure you do one box at a time.
I hope this helps.
Jigz
-
1Hi Jigz, welcome to GD.SE! Unless I missed a step, this will completely get rid of the white box. The question asked was how to simulate a shadow over a white box that is not originally apart of the yellow layer.– AndrewHCommented Jan 12, 2016 at 15:49
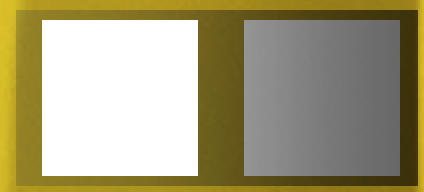
I first want to create a gradient similar to the shadow
I make a selection to the right. Open the gradient panel (g or shift + G to get to the gradient). Double click on the gradient bar at the top.
I use the foreground to transparent option. I messed around with the values and found out that the color stop on the left could be black at 75% opacity and the color stop on the right could be #363636 at 30% opacity.
I move that layer over both white squares and duplicate the gradient shadow layer.
I then use a clipping mask on both white squares, 1 shadow layer for each white square.
Result
You can either change the opacity of the gradient or the layer itself to fine tune the brightness of the shadow.


