6

I know nothing about image editing & conversion so please don't come down too hard on me.
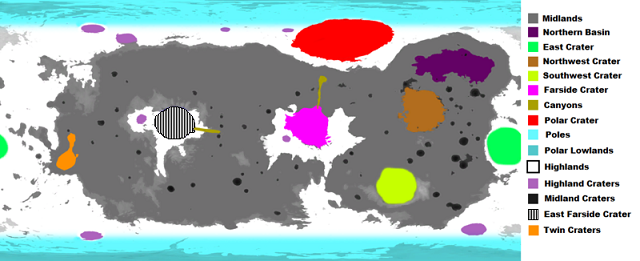
What I'd like to do is, to convert some color pictures (these ones here) into black & white so I can print them, yet still be able to tell apart biomes.

My issue is, "normal" bw conversion doesn't help: The end result will either "hide" areas for maps having several biomes, or get invisible when printed (average 'home quality' inkjet printing).


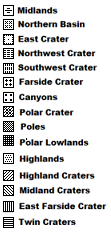
So my thinking was to use a very old technique I've seen on old terrain maps eons ago: replace colors with "bars" / "shapes", so it literally is enough to use black color only (no shades or anything). The end result should look something like indicated on this image:

As you can see, on the picture above I changed "East Farside Crater" from color blue to "vertical bars".

At the end of the day, the whole map should look something like this:

In other words, the colors on the map(s) should be replaced with the shapes shown above.

Questions: Is there an online conversion tool for that? If not, is there a technique built-in to image editors to do stuff like this? (prefferably in GIMP) Does this technique has a name? (Could come handy for better googling it)

Thanks for reading this and for the help in advance!

ps.: I also tried "image to ASCII" with some online tools, but those didn't work out very well (were also hiding away important details). But I might not found the proper tool, so this kind of conversion can also be a solution.
Anything that works for the very basic goal: print the linked maps on home quality inkjet without hiding any details according to biome information.

0

2 Answers 2

4
+100

Using GIMP, you could:

  • fill layers with your black & white patterns (one layer per pattern), and then
  • use colour selection (Shift+O), select all the zones of one colour by clicking on it, and
  • use that selection as a mask on the corresponding pattern layer (right-click → add mask to layer → initialise with "selection"), or alternatively invert the selection, select the pattern layer and delete.

The process is a bit manual but should be fairly quick for a simple map like this. If there is some anti-aliasing on the edges of the zones, either increase the size of the selection a bit (selection → grow) or increase the tolerance of the colour selection (in the tool's configuration, below the toolbox).

You could in principle automate it to some extent via script-fu, if you're willing to put in a few hours of programming.

  • Open your colour image in GIMP
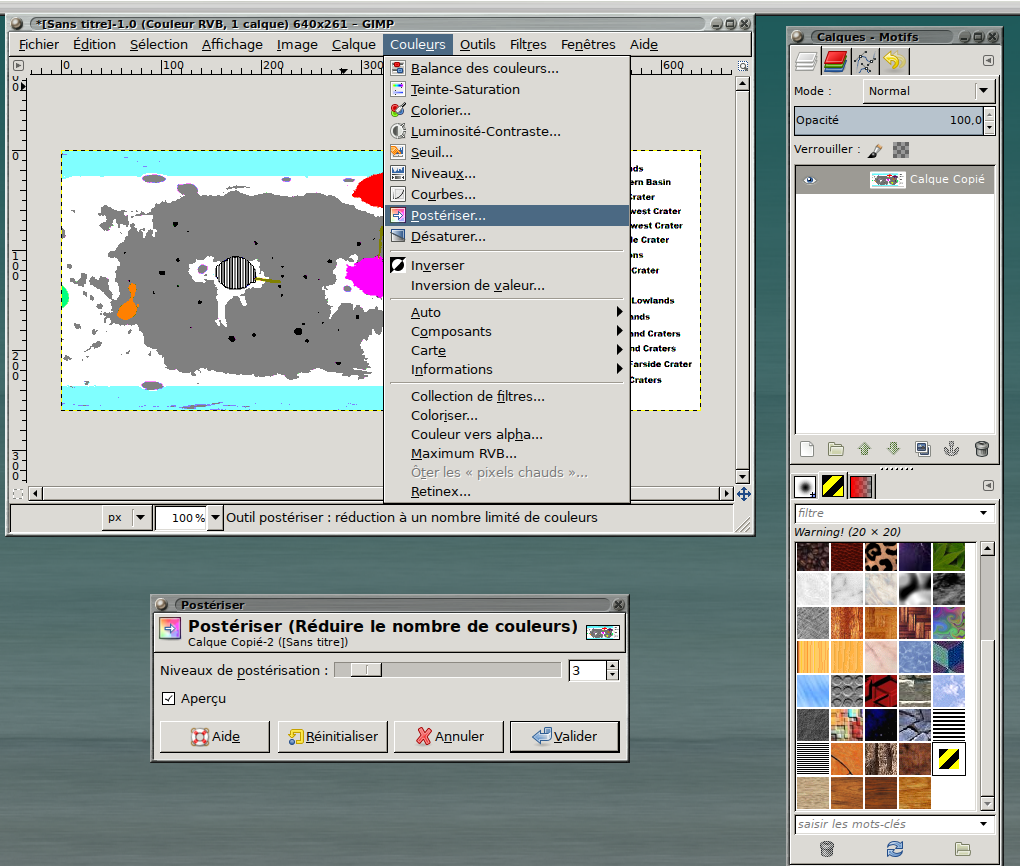
  • At this point, you may want to "posterize" the image, to reduce the number of colours it contains, so that the selection is not as affected by anti-aliasing issues (pixels on the border of two zones which are not exactly of the colour of one nor of the other). An image with a higher quality (higher resolution / originally saved in a lossless format like PNG instead of a lossy format like JPEG) would give you better results, too. To posterize the image, use the menu Color → Posterize, and adjust the number of colours until you have an acceptable result. I didn't think about using this in the screenshots below, but it will definitely help. screenshot of the posterize dialog
  • Open your b&w legend in GIMP
  • Copy the whole b&w legend (Ctrl+A, Ctrl+C), close that window
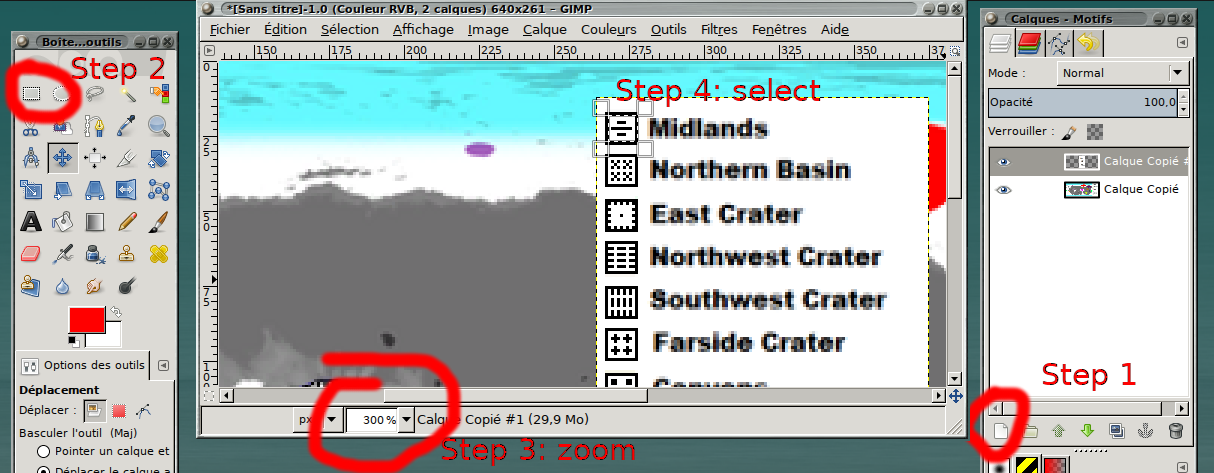
  • Paste the b&w legend onto the colour image (Ctrl+V), and click the "New layer" button (step 1)
  • Use the selection tool (step 2) to select the small square in the legend (step 4). Zoom in if you need precision (step 3) screenshot of the steps
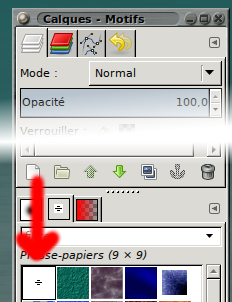
  • In the "Patterns" tab, select the "clipboard" pattern, showing what you just copied screenshot of the pattern tab
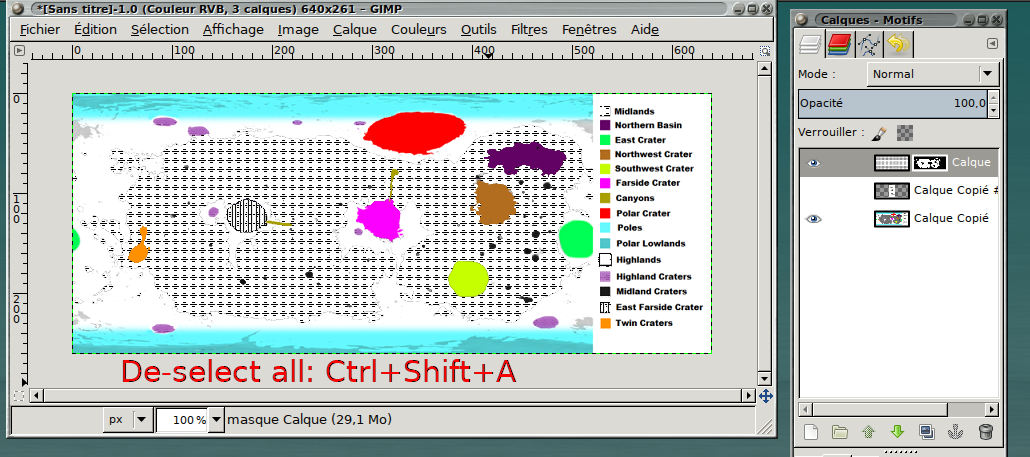
  • Deselect all (Ctrl+Shift+A or Selection → None)
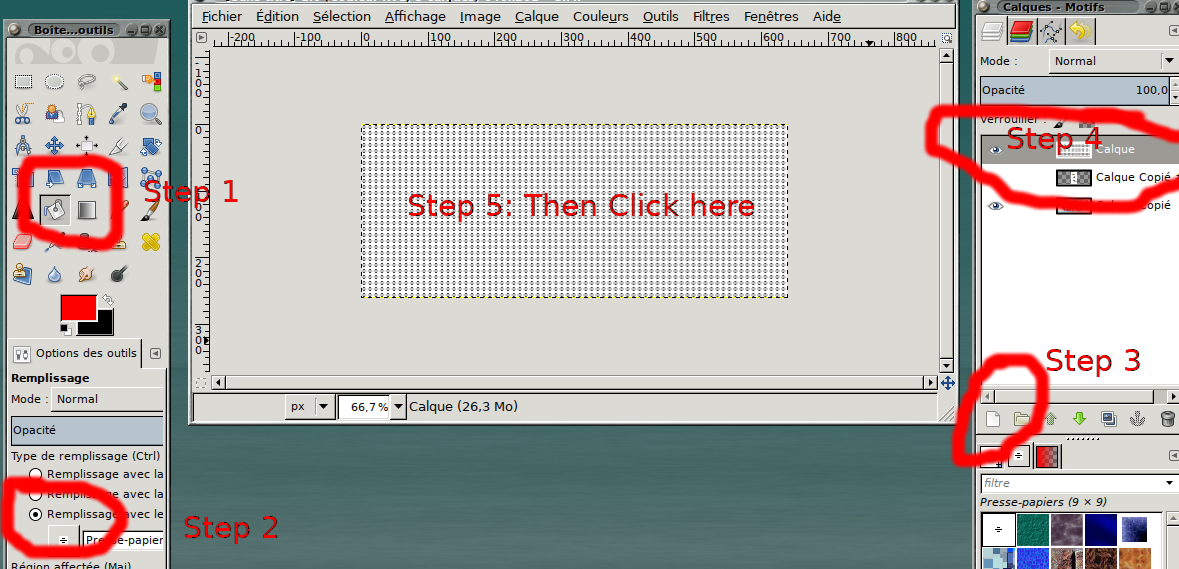
  • Select the bucket fill tool (step 1)
  • Select "fill with pattern" in the tool options (step 2)
  • Create a new layer in the "Layers" tab (step 3)
  • Fill the whole layer with the pattern by clicking in the middle of the image (step 4) screenshot of the steps
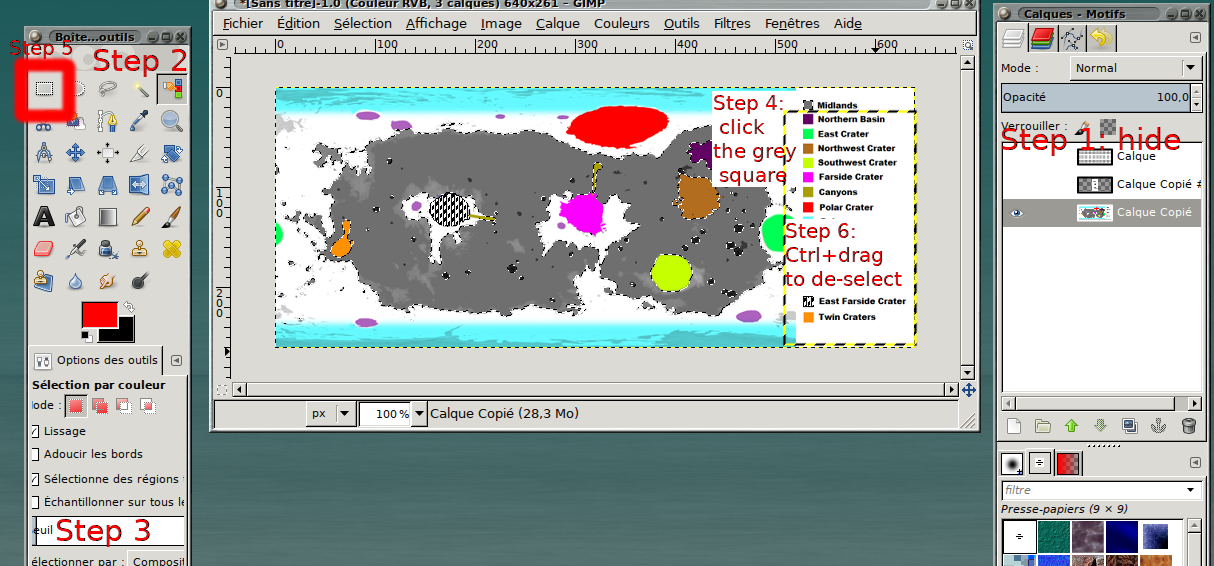
  • Hide the patterned layer by clicking on the "eye" icon next to it in the "Layers" window (setp 1)
  • Also hide the b&w layer, for good measure
  • Pick the "Selection by colour" tool (step 2), choose its threshold (step 3, the threshold 54 worked well for the "midlands" zone, because it has both light grey and dark grey, for the others use smaller thresholds and/or select multiple times, combining the selections with "shift")
  • Click the grey square in the legend to select all grey zones (step 4)
  • The "Selection by colour" was a bit too greedy and selected some of the anti-aliasing around the text. Pick the rectangle selection tool (step 5) and Ctrl+drag across the text in the legend to deselect that part, to clean up (step 6)
  • Alternatively, you can use the "magic wand" tool (fourth tool in the top row of the toolbar on the screenshot below). It works like the "selection by colour" tool, except that it only selects contiguous pixels of the same colour, instead of selecting pixels with that colour all over the place. By combining the selection (using shift+click), you can still select multiple zones with that tool. If you posterized your image a bit too much, and there are some colours which were supposed to be separate but got reduced into a single colour, the "magic wand" tool will help you select only the zones you want (or, use the "selection by colour" and de-select with the "rectangle selection" the parts you don't want, as explained int the points above). screenshot of the steps
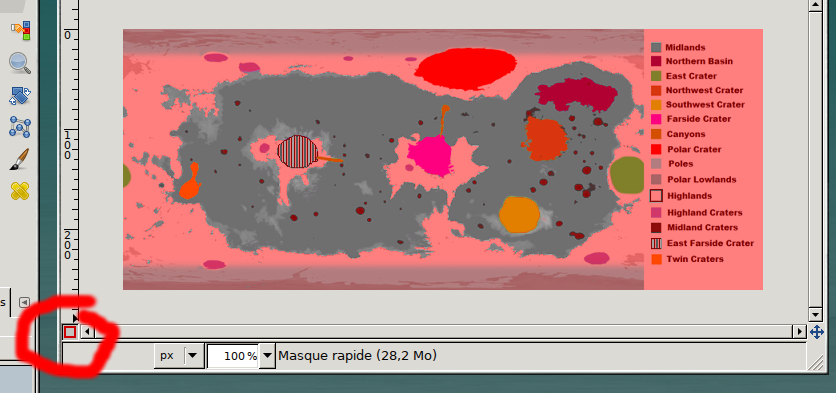
  • To review what you have selected, you can click the "rapid mask" button in the lower left corner to see the unselected part in a red semi-transparent overlay; the selected part will be clear. You can edit the selection on-the-fly in this mode using the paintbrush, and painting white to select, black to deselect. Click the "rapid mask" button again to turn it off. screenshot of the rapid mask mode
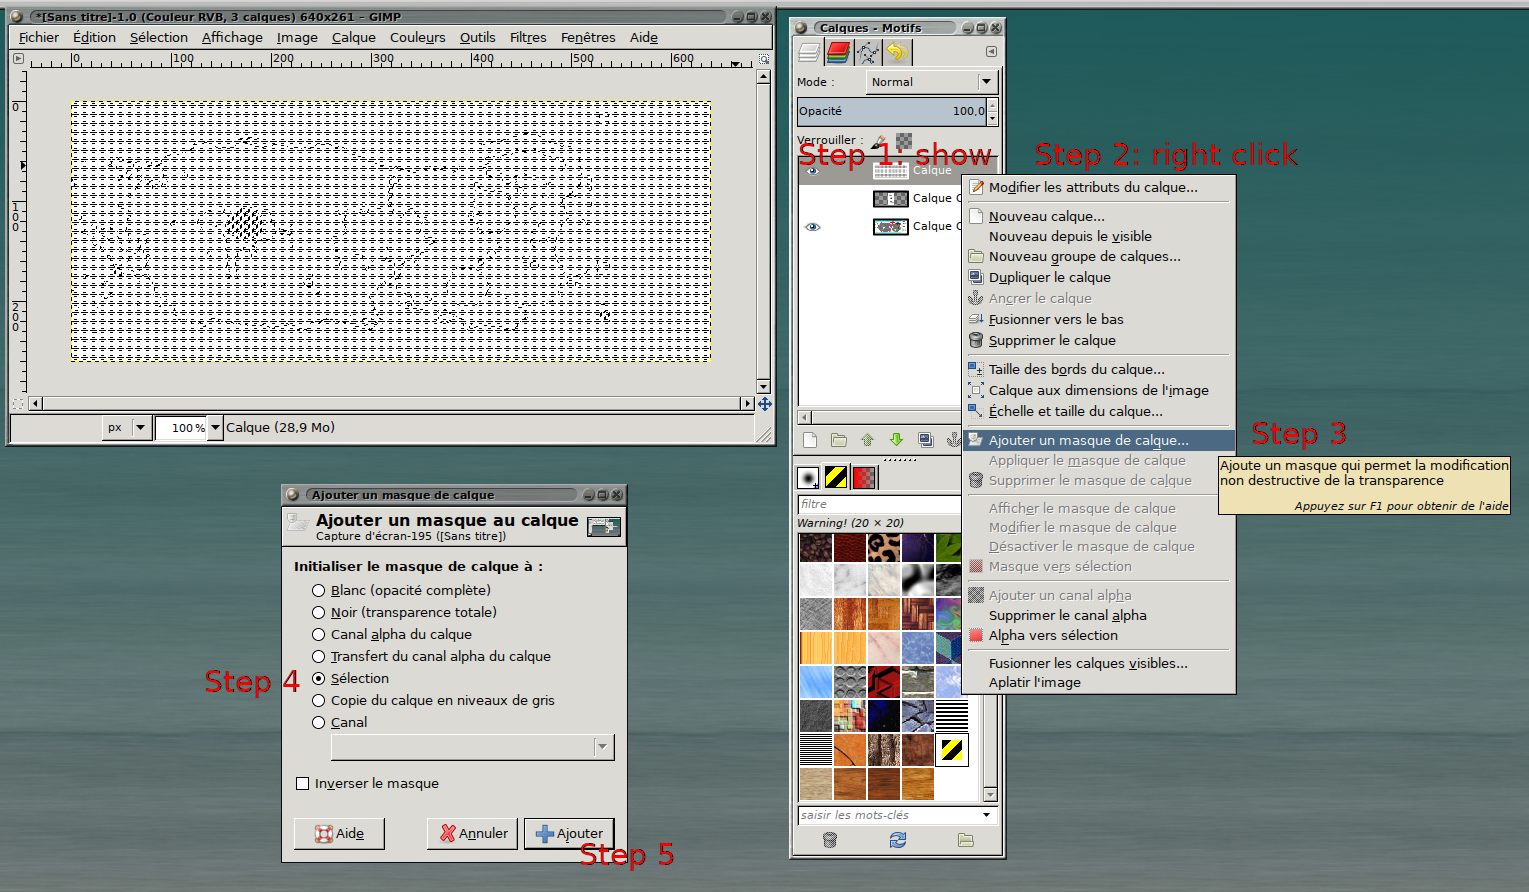
  • Show again the patterned layer by clicking the empty spot where the eye would be left to its name in the "Layers" tab (step 1)
  • Right click the layer name (step 2), and choose "add mask" (step 3)
  • Choose "Initialize the mask to:" "Selection" in the dialog box that appears (step 4)
  • Click the "Add" button (step 5) screenshot of the steps
  • Deselect all (Ctrl+Shift+A), and admire the result
  • screenshot of the result after changing one blob of colour
  • Lather, rince, repeat.

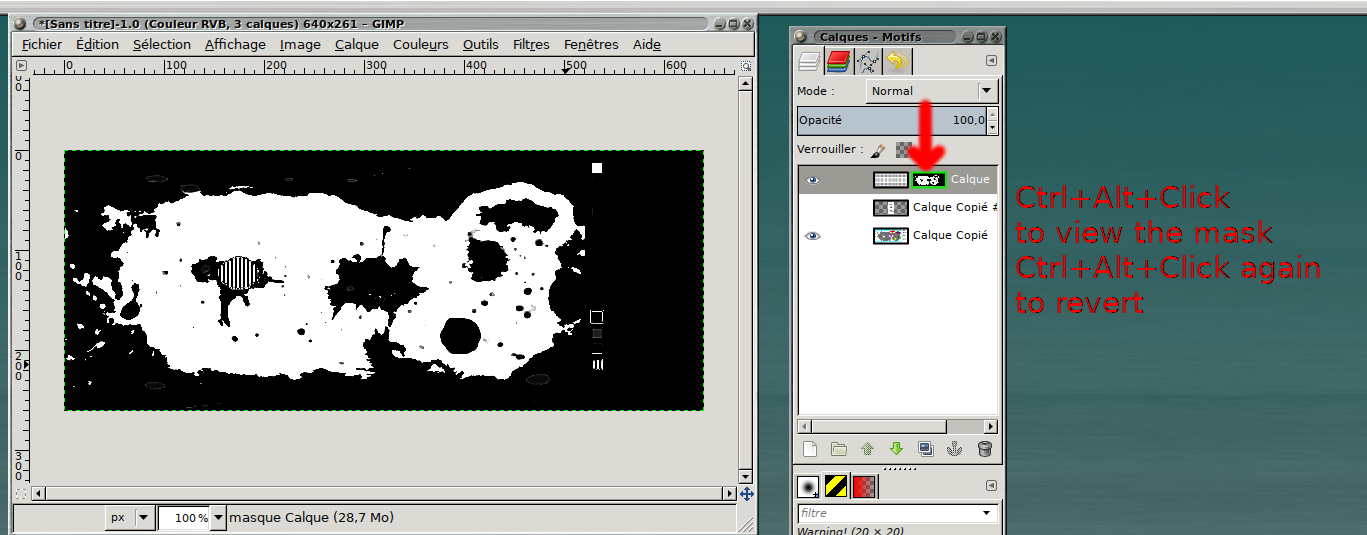
Strictly speaking, you could manage without using one separate layer per pattern, but I think it will make it easier to fix mistakes later on. For example, the mask appears as a second miniature rectangle next to the layer name. By left-clicking on it, you get to edit the mask (instead of the layer itself, which contains the pattern). By Ctrl+Alt+Clicking on it, you get to see the mask itself, and the same command reverts back to showing the masked layer.

screenshot off the displayed mask

5
  • Hi Georges, not a bad answer at all. Maybe you could expand it a bit with screenshots to show how it is done, and some more explanation of why this would work. Thanks and keep contributing!
    – PieBie
    Commented Oct 24, 2016 at 13:14
  • Thank you! This sounds promising but as I said, I'm not very good with image editing so it would be nice if you could add a little more help just as @PieBie described. Thank you in advance (until then, I upvote for the promising solution ;)
    – user78758
    Commented Oct 24, 2016 at 14:22
  • @Mark I updated my answer with step-by-step instructions and screenshots. Commented Oct 26, 2016 at 13:13
  • HAHH! It's amazing how dumb I am when it comes to drawing/painting/image-editing! THANK YOU for the details, it is much appreciated! [EDIT: can only award the bounty in 20 hours. will do so by then. Thanks again!]
    – user78758
    Commented Oct 26, 2016 at 13:29
  • @Mark Before you start working on it, I edited my answer to say that you could posterize the image before, to reduce the number of colours and make the selection job easier + included a short explanation about the "magic wand" selection tool, which you could use instead of the "select by colour" tool. Commented Oct 26, 2016 at 13:33
4

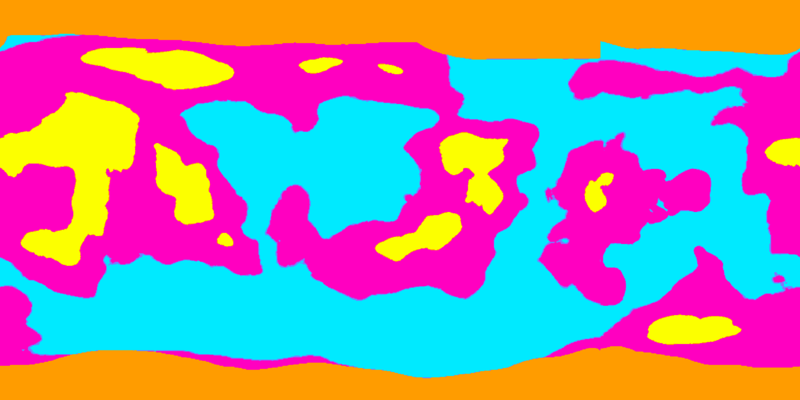
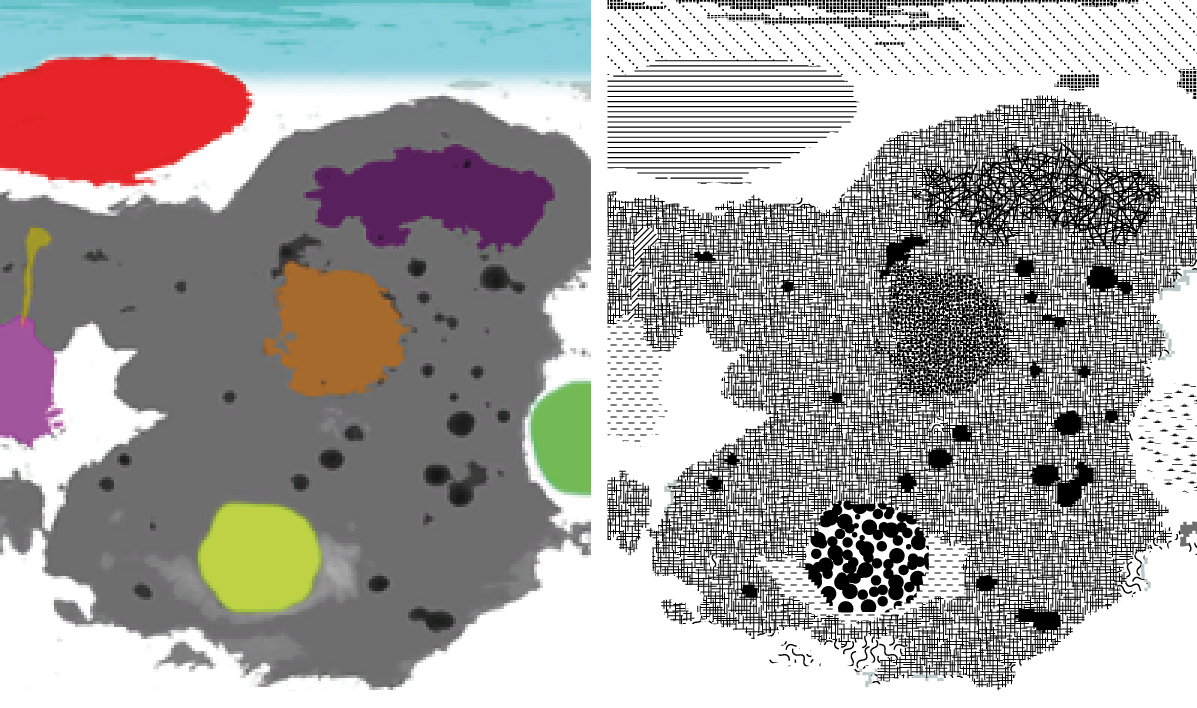
While gimp would work, its a bit tedious. I would image trace the map with inkscape or other vector tool and then replace the fills with patterns. Because its less work than doing this with GIMP. So if we take this example:

enter image description here

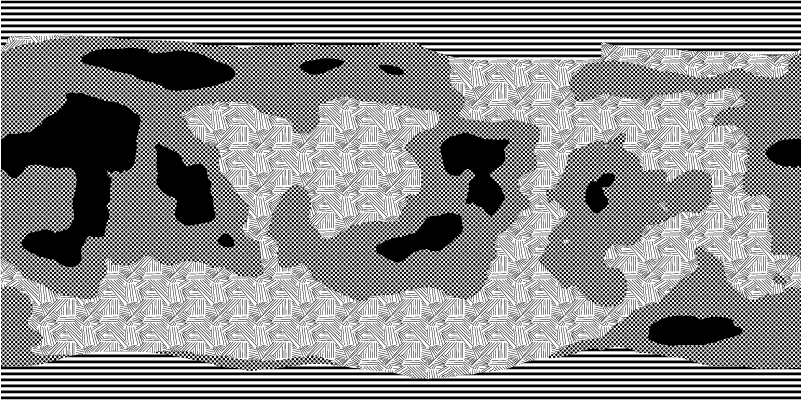
and change it to vectors with trace(because its faster to do than your demo), select all swatches and replace them with patterns you get in 5 minutes:

enter image description here

Ok so i used illustrator because i don't have inkscape installed but its a comparable amount of work. Plus it will print much better.

Edity

I dont think I agree with the analysis that this has more problems. It has all the same benefits as color separation in gimp and you can trace at pixel accuracy tough that slightly defeats the point as patterns will make the borders slightly more diffuse.

So here is what i get when i do it on the source image with my own limited pattern collection that's totally unsuitable for the job.

enter image description here

Anyway your mileage will vary.

6
  • Nice moire on teh dot pattern :)
    – joojaa
    Commented Oct 26, 2016 at 12:36
  • 1
    Very good technique! I doubt it will work with an image with such a low quality as the one the OP posted without some editing of the resulting vector image, though. Commented Oct 26, 2016 at 13:12
  • 1
    @GeorgesDupéron Yes maybe, because the map has blurred areas and the filling makes borders less visible anyway this fidelity loss is actually not a bad trade off for MUCH clearer patterns printing
    – joojaa
    Commented Oct 26, 2016 at 14:53
  • 1
    @Mark i dont really have to lose fidelity, though the patterning itself will lose fidelity by force. I can even resolve overlaps if i want (did some on purpose). But no it was really meant as an alternative approach for attack. But this si MUCH better for printing as the pattern size is decoupled form the image size. So round dots are round dots on print. See image above, i could have fixed the flaws but i have a strict 10 minute time budget.
    – joojaa
    Commented Oct 26, 2016 at 15:20
  • 1
    Oh and PS i do not try to get the 100 point bonus i have no need for score. I have only one score based thing to achieve let others get the points.
    – joojaa
    Commented Oct 26, 2016 at 15:31

Your Answer

By clicking “Post Your Answer”, you agree to our terms of service and acknowledge you have read our privacy policy.