0

I have a raster image with an obvious gradient of exposure and contrast from top to down. I can easily find perfect adjustments using Photosho/Image/Adjustments/Levels or Curves enter image description here for any individual part of the image, but I need a corrected continous image (according to the unfortunate gradient in exposure/contrast). I found solutions for lots of gradients and tried adjustment layers, but could not figure out how to make an adjustement gradient for levels/curves/gamma.

EDIT for clarification:
I am dealing with grayscale imaging data, where the visibility of the dark/bright contrast on print depends on correct settings/adjustments. With the original data in the imaging application, you can play with brightness/contrast on the screen and easily identify the bright structures in parts of the image, but for print, one needs to find one setting that fits for the whole image area.
As example I added the famous checkerboard illusion (taken from http://web.mit.edu/persci/people/adelson/checkershadow_illusion.html, where the shade increases smoothly. checkerboard illusion
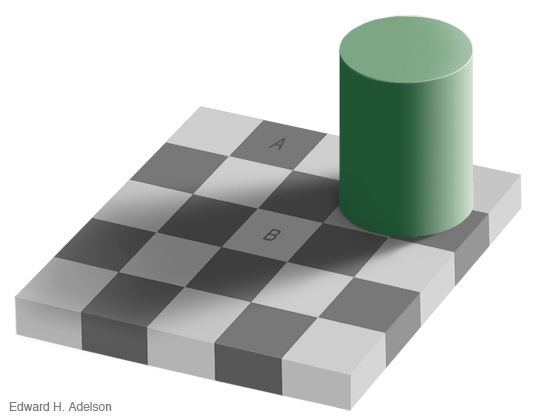
So what I'd like to do is to create a mask/adjustment layer/whatever, that corrects for the uneven exposure/"shades". For the beginning, I'd be satisfied with a linear gradient into one direction.
I am looking forward to any help!

4
  • 1
    ...eeeh!? Sorry, I don't follow. Do you have a screenshot?
    – Vincent
    Commented Sep 13, 2014 at 14:05
  • Why you posted an illusion as an example?
    – Rosenthal
    Commented Sep 13, 2014 at 16:13
  • @Neo I posted only an example that contains a shift in brightness, since I can't post original data (human MRI data where in theory people could be identified). If I could create my own example, I could easily use that technique to solve the problem.
    – Martin
    Commented Sep 13, 2014 at 16:31
  • @Martin WOW!! I knew you were talking about Biomedical!!!
    – Rosenthal
    Commented Sep 13, 2014 at 16:36

2 Answers 2

1

I completely agree with Neo (thanks) that imaging postprocessing can often be done best in the source application or in ImageJ. But sometimes it is not possible.
After searching and trying for several hours, I actually just now found an (at least at the first glance) easy solution within photoshop:

  1. layer / new adjustment layer / Curves (or whatever is desired) --> adjust sliders --> affects range/gamma/etc. of the WHOLE image. But then,
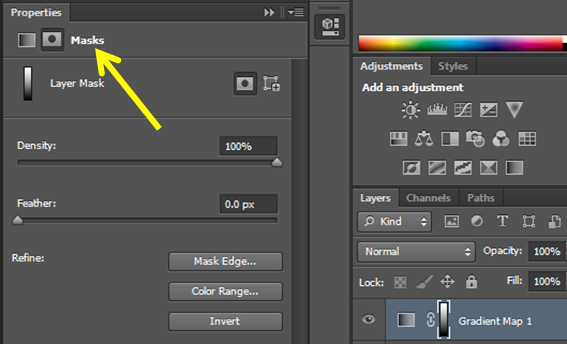
  2. in the gradient map layer "flyout" (see screenshot), click "Masks" gradient map mask
  3. in the gradient tool box, select e.g. a linear white-to-black gradient, and draw it at the desired direction and part of the image, e.g. from bottom left to top right according to the exposure inhomogeneity... voila! gradient tool

Finally, needless to say, that imaging postprocessing should not be abused but communicated to the readership if applicable.

0

Unfortunately what you want to do is not possible in Photoshop, this is called local contrast normalization and it is used for example in biomedical imaging to bring the image, or other type of signal, into a range that is more familiar or normal to the senses, hence the term normalization. Often, the motivation is to achieve consistency in dynamic range for a set of data, signals, or images to avoid mental distraction or fatigue. For example, a newspaper will strive to make all of the images in an issue share a similar range of grayscale.

This problem is easily solved in the field of Computer Graphics, where you can find computer algorithms and specialized software that makes the process of grayscale conversion more friendly.

Your Answer

By clicking “Post Your Answer”, you agree to our terms of service and acknowledge you have read our privacy policy.

Not the answer you're looking for? Browse other questions tagged or ask your own question.