added 772 characters in body
Source Link
Scott
  • 211.5k
  • 21
  • 297
  • 575

Select the start and end paths....

Choose Object > Blend > Make

Then

Choose Object > Blend > Blend Options and set the drop down menu to Specified Steps and enter 8 in the text field -- 8 because you start with 2 thus resulting in 10 steps including start and end.

enter image description here

Leaving the blend in tact means if you move either path at the end with the Direct Selection tool (white arrow), the spacing will adjust to accommodate any repositioning.

If you want each step to be an individual, selectable, path - Choose Object > Expand. When the Expand Options window pops up, tick only the Object option and hit the OK button. Then you may need to also ungroup.


or


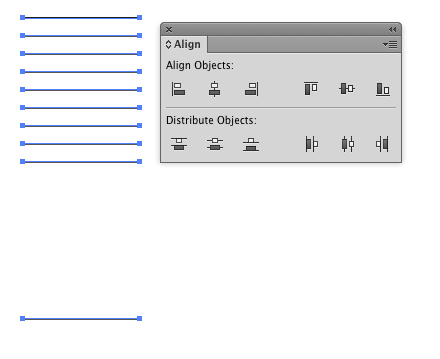
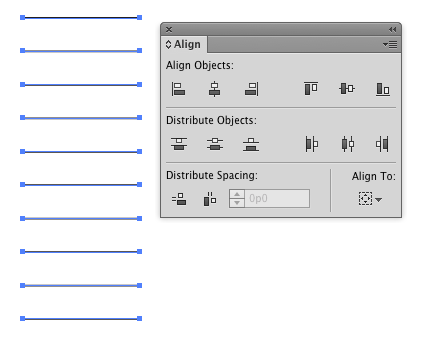
Start with 10 paths...

enter image description here

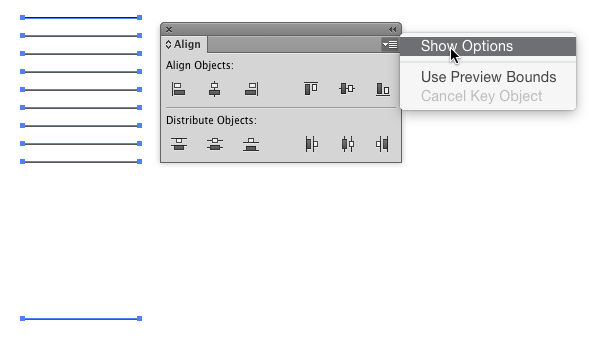
On the Align Panel click the menu button and choose Show Options.

enter image description here

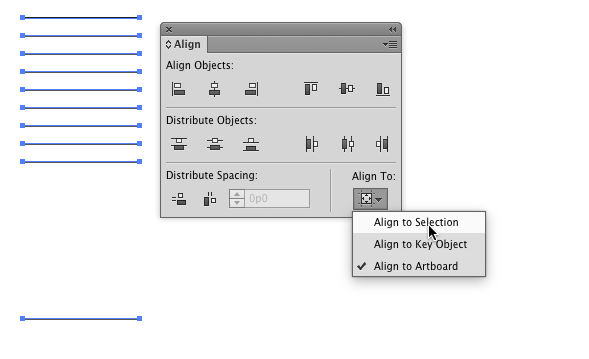
Then in the Options, set the Align To to Selection

enter image description here

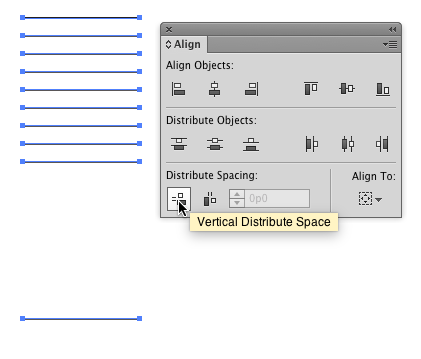
Then lastly click the Vertically Distribute Space button.

enter image description here


enter image description here

Select the start and end paths....

Choose Object > Blend > Make

Then

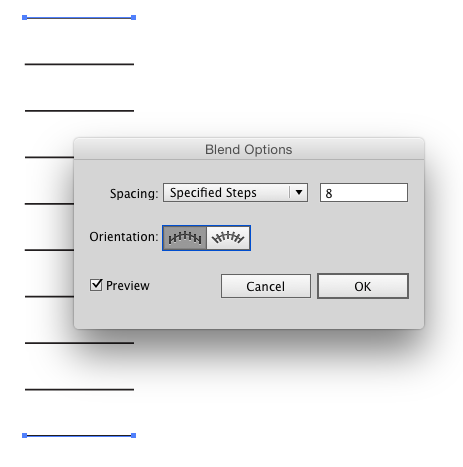
Choose Object > Blend > Blend Options and set the drop down menu to Specified Steps and enter 8 in the text field -- 8 because you start with 2 thus resulting in 10 steps including start and end.

enter image description here

Leaving the blend in tact means if you move either path at the end with the Direct Selection tool (white arrow), the spacing will adjust to accommodate any repositioning.

If you want each step to be an individual, selectable, path - Choose Object > Expand. When the Expand Options window pops up, tick only the Object option and hit the OK button. Then you may need to also ungroup.


or


Start with 10 paths...

enter image description here

On the Align Panel click the menu button and choose Show Options.

enter image description here

Then in the Options, set the Align To to Selection

enter image description here

Then lastly click the Vertically Distribute Space button.
enter image description here


enter image description here

added 87 characters in body
Source Link
Scott
  • 211.5k
  • 21
  • 297
  • 575

Select the start and end paths....

Choose Object > Blend > Make

Then

Choose Object > Blend > Blend Options and set the drop down menu to Specified Steps and enter 8 in the text field -- 8 because you start with 2 thus resulting in 10 steps including start and end.

enter image description here

Leaving the blend in tact means if you move either path at the end with the Direct Selection tool (white arrow), the spacing will adjust to accommodate any repositioning.

If you want each step to be an individual, selectable, path - Choose Object > Expand Appearance. When the Expand Options window pops up, tick only the Object option and hit the OK button. Then you may need to also ungroup.

Select the start and end paths....

Choose Object > Blend > Make

Then

Choose Object > Blend > Blend Options and set the drop down menu to Specified Steps and enter 8 in the text field -- 8 because you start with 2 thus resulting in 10 steps including start and end.

enter image description here

Leaving the blend in tact means if you move either path at the end with the Direct Selection tool (white arrow), the spacing will adjust to accommodate any repositioning.

If you want each step to be an individual, selectable, path - Choose Object > Expand Appearance. Then you may need to also ungroup.

Select the start and end paths....

Choose Object > Blend > Make

Then

Choose Object > Blend > Blend Options and set the drop down menu to Specified Steps and enter 8 in the text field -- 8 because you start with 2 thus resulting in 10 steps including start and end.

enter image description here

Leaving the blend in tact means if you move either path at the end with the Direct Selection tool (white arrow), the spacing will adjust to accommodate any repositioning.

If you want each step to be an individual, selectable, path - Choose Object > Expand. When the Expand Options window pops up, tick only the Object option and hit the OK button. Then you may need to also ungroup.

added 87 characters in body
Source Link
Scott
  • 211.5k
  • 21
  • 297
  • 575

Select the start and end paths....

Choose Object > Blend > Make

Then

Choose Object > Blend > Blend Options and set itthe drop down menu to Specified Steps enteringand enter 8 in the text field -- 8 because you start with 2 thus resulting in 10 steps including start and end.

enter image description here

Leaving the blend in tact means if you move either path at the end with the Direct Selection tool (white arrow), the spacing will adjust to accommodate any repositioning.

If you want each step to be an individual, selectable, path - Choose Object > Expand Appearance. Then you may need to also ungroup.

Object > Blend > Make

Then

Object > Blend > Blend Options and set it to Specified Steps entering 8 -- 8 because you start with 2 thus resulting in 10 steps including start and end.

enter image description here

Leaving the blend in tact means if you move either path at the end with the Direct Selection tool (white arrow), the spacing will adjust to accommodate any repositioning.

If you want each step to be an individual, selectable, path - Choose Object > Expand Appearance. Then you may need to also ungroup.

Select the start and end paths....

Choose Object > Blend > Make

Then

Choose Object > Blend > Blend Options and set the drop down menu to Specified Steps and enter 8 in the text field -- 8 because you start with 2 thus resulting in 10 steps including start and end.

enter image description here

Leaving the blend in tact means if you move either path at the end with the Direct Selection tool (white arrow), the spacing will adjust to accommodate any repositioning.

If you want each step to be an individual, selectable, path - Choose Object > Expand Appearance. Then you may need to also ungroup.

Source Link
Scott
  • 211.5k
  • 21
  • 297
  • 575
Loading