added 3 characters in body
Source Link
Billy Kerr
  • 89.5k
  • 6
  • 83
  • 179

You could use GIMP (which is free) to create such a texture. No need to buy anything! Since you have no experience, here's a very simple method:

  1. Open a new image in GIMP using File > New, and set the image size to the size of the health bar you want.

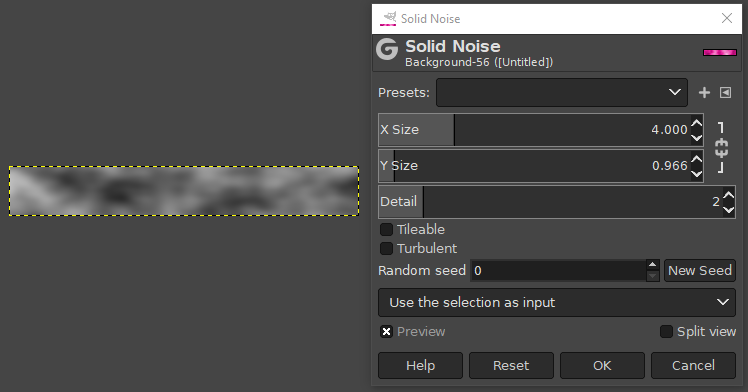
  2. Click Filters > Render > Noise > Solid Noise. Deselect the link icon to break the aspect ratio. This is located to the right of the X and Y size sliders. Adjust the X, Y and Detail sliders until you get a texture you like. For example:

enter image description here

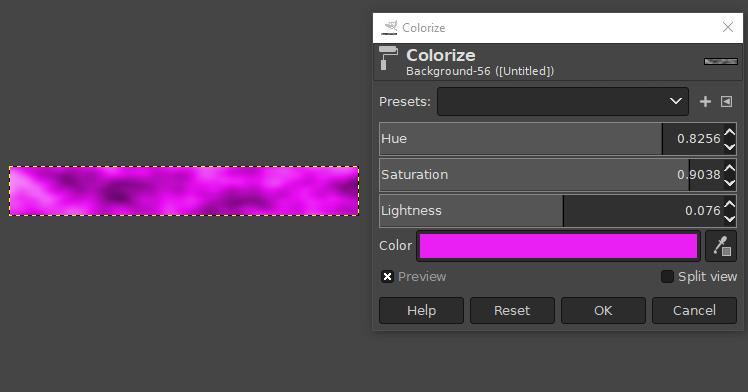
  1. Click Colors > Colorize and choose a nice bright colour:

enter image description here

  1. Click Layer > New Layer, choose transparency as the fill colour

  2. Select a bright contrasting colour as the foreground colour (I chose a bright blue shown below)

  3. With the Gradient Tool, click and drag to make a Foreground to Transparent gradient. You can choose this option in the gradient dialog which is shown as FG (t) in the example below

enter image description here

Finally set the layer blending Mode in the layers panel to Value (HSV). This will allow more of the texture detail to show through the blue overlay.

  1. Finally set the layer blending Mode in the layers panel to Value (HSV). This will allow more of the texture detail to show through the blue overlay.
enter image description here

You could use GIMP (which is free) to create such a texture. No need to buy anything! Since you have no experience, here's a very simple method:

  1. Open a new image in GIMP using File > New, and set the image size to the size of the health bar you want.

  2. Click Filters > Render > Noise > Solid Noise. Deselect the link icon to break the aspect ratio. This is located to the right of the X and Y size sliders. Adjust the X, Y and Detail sliders until you get a texture you like. For example:

enter image description here

  1. Click Colors > Colorize and choose a nice bright colour:

enter image description here

  1. Click Layer > New Layer, choose transparency as the fill colour

  2. Select a bright contrasting colour as the foreground colour (I chose a bright blue shown below)

  3. With the Gradient Tool, click and drag to make a Foreground to Transparent gradient. You can choose this option in the gradient dialog which is shown as FG (t) in the example below

enter image description here

Finally set the layer blending Mode in the layers panel to Value (HSV). This will allow more of the texture detail to show through the blue overlay.

enter image description here

You could use GIMP (which is free) to create such a texture. No need to buy anything! Since you have no experience, here's a very simple method:

  1. Open a new image in GIMP using File > New, and set the image size to the size of the health bar you want.

  2. Click Filters > Render > Noise > Solid Noise. Deselect the link icon to break the aspect ratio. This is located to the right of the X and Y size sliders. Adjust the X, Y and Detail sliders until you get a texture you like. For example:

enter image description here

  1. Click Colors > Colorize and choose a nice bright colour:

enter image description here

  1. Click Layer > New Layer, choose transparency as the fill colour

  2. Select a bright contrasting colour as the foreground colour (I chose a bright blue shown below)

  3. With the Gradient Tool, click and drag to make a Foreground to Transparent gradient. You can choose this option in the gradient dialog which is shown as FG (t) in the example below

enter image description here

  1. Finally set the layer blending Mode in the layers panel to Value (HSV). This will allow more of the texture detail to show through the blue overlay.

enter image description here

edited body
Source Link
Billy Kerr
  • 89.5k
  • 6
  • 83
  • 179

You could use GIMP (which is free) to create such a texture. No need to buy anything! Since you have no experience, here's a very simple method:

  1. Open a new image in GIMP using File > New, and set the image size to the size of the health bar you want.

  2. Click Filters > Render > Noise > Solid Noise. Deselect the link icon to break the aspect ratio. This is located to the right of the X and Y size sliders. Adjust the X, Y and dDtailDetail sliders until you get a texture you like. For example:

enter image description here

  1. Click Colors > Colorize and choose a nice bright colour:

enter image description here

  1. Click Layer > New Layer, choose transparency as the fill colour

  2. Select a bright contrasting colour as the foreground colour (I chose a bright blue shown below)

  3. With the gradient toolGradient Tool, click and drag to make a Foreground to Transparent gradient. You can choose this option in the gradient dialog which is shown as FG (t) in the example below

enter image description here

Finally set the layer blending Mode in the layers panel to Value (HSV). This will allow more of the texture detail to show through the blue overlay.

enter image description here

You could use GIMP (which is free) to create such a texture. No need to buy anything! Since you have no experience, here's a very simple method:

  1. Open a new image in GIMP using File > New, and set the image size to the size of the health bar you want.

  2. Click Filters > Render > Noise > Solid Noise. Deselect the link icon to break the aspect ratio. This is located to the right of the X and Y size sliders. Adjust the X, Y and dDtail sliders until you get a texture you like. For example:

enter image description here

  1. Click Colors > Colorize and choose a nice bright colour:

enter image description here

  1. Click Layer > New Layer, choose transparency as the fill colour

  2. Select a bright contrasting colour as the foreground colour (I chose a bright blue shown below)

  3. With the gradient tool, click and drag to make a Foreground to Transparent gradient You can choose this option in the gradient dialog which is shown as FG (t) in the example below

enter image description here

Finally set the layer blending Mode in the layers panel to Value (HSV). This will allow more of the texture detail to show through the blue overlay.

enter image description here

You could use GIMP (which is free) to create such a texture. No need to buy anything! Since you have no experience, here's a very simple method:

  1. Open a new image in GIMP using File > New, and set the image size to the size of the health bar you want.

  2. Click Filters > Render > Noise > Solid Noise. Deselect the link icon to break the aspect ratio. This is located to the right of the X and Y size sliders. Adjust the X, Y and Detail sliders until you get a texture you like. For example:

enter image description here

  1. Click Colors > Colorize and choose a nice bright colour:

enter image description here

  1. Click Layer > New Layer, choose transparency as the fill colour

  2. Select a bright contrasting colour as the foreground colour (I chose a bright blue shown below)

  3. With the Gradient Tool, click and drag to make a Foreground to Transparent gradient. You can choose this option in the gradient dialog which is shown as FG (t) in the example below

enter image description here

Finally set the layer blending Mode in the layers panel to Value (HSV). This will allow more of the texture detail to show through the blue overlay.

enter image description here

Source Link
Billy Kerr
  • 89.5k
  • 6
  • 83
  • 179

You could use GIMP (which is free) to create such a texture. No need to buy anything! Since you have no experience, here's a very simple method:

  1. Open a new image in GIMP using File > New, and set the image size to the size of the health bar you want.

  2. Click Filters > Render > Noise > Solid Noise. Deselect the link icon to break the aspect ratio. This is located to the right of the X and Y size sliders. Adjust the X, Y and dDtail sliders until you get a texture you like. For example:

enter image description here

  1. Click Colors > Colorize and choose a nice bright colour:

enter image description here

  1. Click Layer > New Layer, choose transparency as the fill colour

  2. Select a bright contrasting colour as the foreground colour (I chose a bright blue shown below)

  3. With the gradient tool, click and drag to make a Foreground to Transparent gradient You can choose this option in the gradient dialog which is shown as FG (t) in the example below

enter image description here

Finally set the layer blending Mode in the layers panel to Value (HSV). This will allow more of the texture detail to show through the blue overlay.

enter image description here