added 105 characters in body
Source Link
AndrewH
  • 12.8k
  • 3
  • 34
  • 59

Gradient and opacities using layer masks

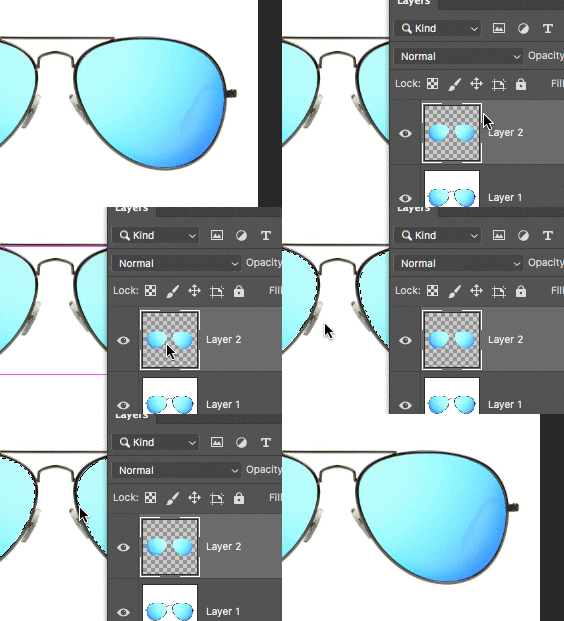
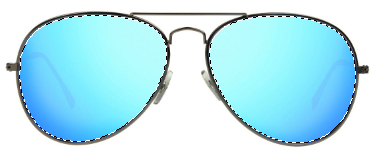
  1. Select the layer with the lenses. Create a selection of the lenses. I did a quick select with the magic wand tool.

Selection Lenses

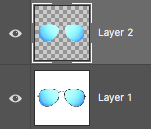
  1. With the lens layer selected, press CTRL + J (Windows) or CMD + J (Mac) to create a copy of the selection onto a new layer.

New lens layer

  1. Select the new lens layer, CTRL + Left Click (Windows) or CMD + Left Click (Mac) on the thumbnail to select the object.

Select

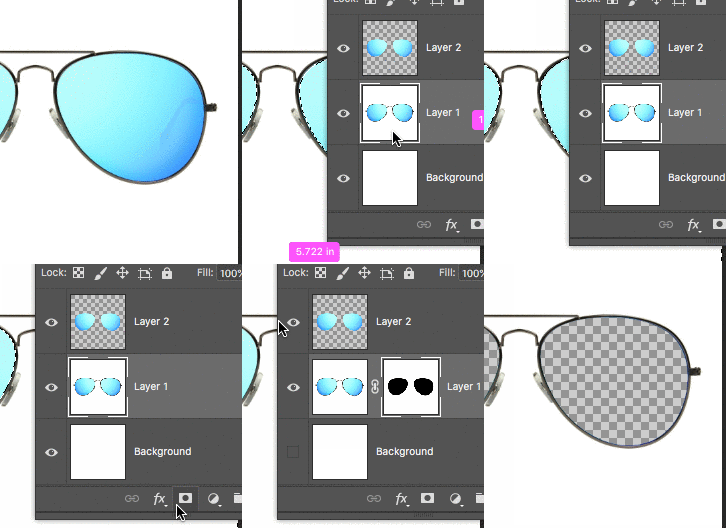
  1. The lens have the same selection around them. Go to Select -> Inverse. Click "Layer 1" and choose "Add Layer Mask" to hide the lenses from the original image.

Layer Mask

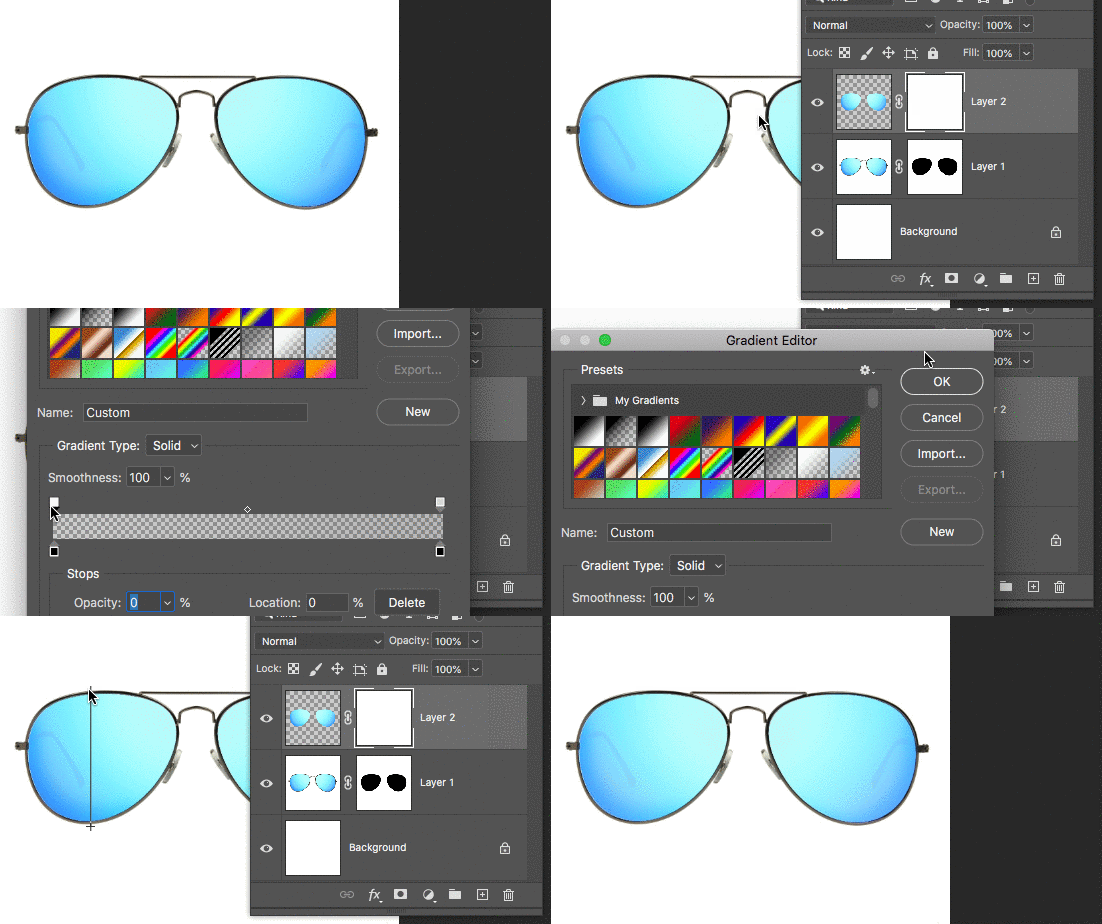
  1. Add a layer mask to "Layer 2", then select the Gradient Tool (G). Make the top left carrot 0% to be 100% color and the right side 20% to let 20% of color below it to show through. Add a gradient to the layer mask to hide part of the lenses.

final

The top of the lenses are 100% opaque, the bottom of the lenses are 80% opaque because we're letting 20% of colors below show through.

Download PSD File: https://drive.google.com/file/d/1XScaOvAK_L85xcHm56PB0nCUGSHChPDh/view?usp=sharing

Gradient and opacities using layer masks

  1. Select the layer with the lenses. Create a selection of the lenses. I did a quick select with the magic wand tool.

Selection Lenses

  1. With the lens layer selected, press CTRL + J (Windows) or CMD + J (Mac) to create a copy of the selection onto a new layer.

New lens layer

  1. Select the new lens layer, CTRL + Left Click (Windows) or CMD + Left Click (Mac) on the thumbnail to select the object.

Select

  1. The lens have the same selection around them. Go to Select -> Inverse. Click "Layer 1" and choose "Add Layer Mask" to hide the lenses from the original image.

Layer Mask

  1. Add a layer mask to "Layer 2", then select the Gradient Tool (G). Make the top left carrot 0% to be 100% color and the right side 20% to let 20% of color below it to show through. Add a gradient to the layer mask to hide part of the lenses.

final

The top of the lenses are 100% opaque, the bottom of the lenses are 80% opaque because we're letting 20% of colors below show through.

Download PSD File: https://drive.google.com/file/d/1XScaOvAK_L85xcHm56PB0nCUGSHChPDh/view?usp=sharing
added 300 characters in body
Source Link
AndrewH
  • 12.8k
  • 3
  • 34
  • 59

Gradient and opacities using layer masks

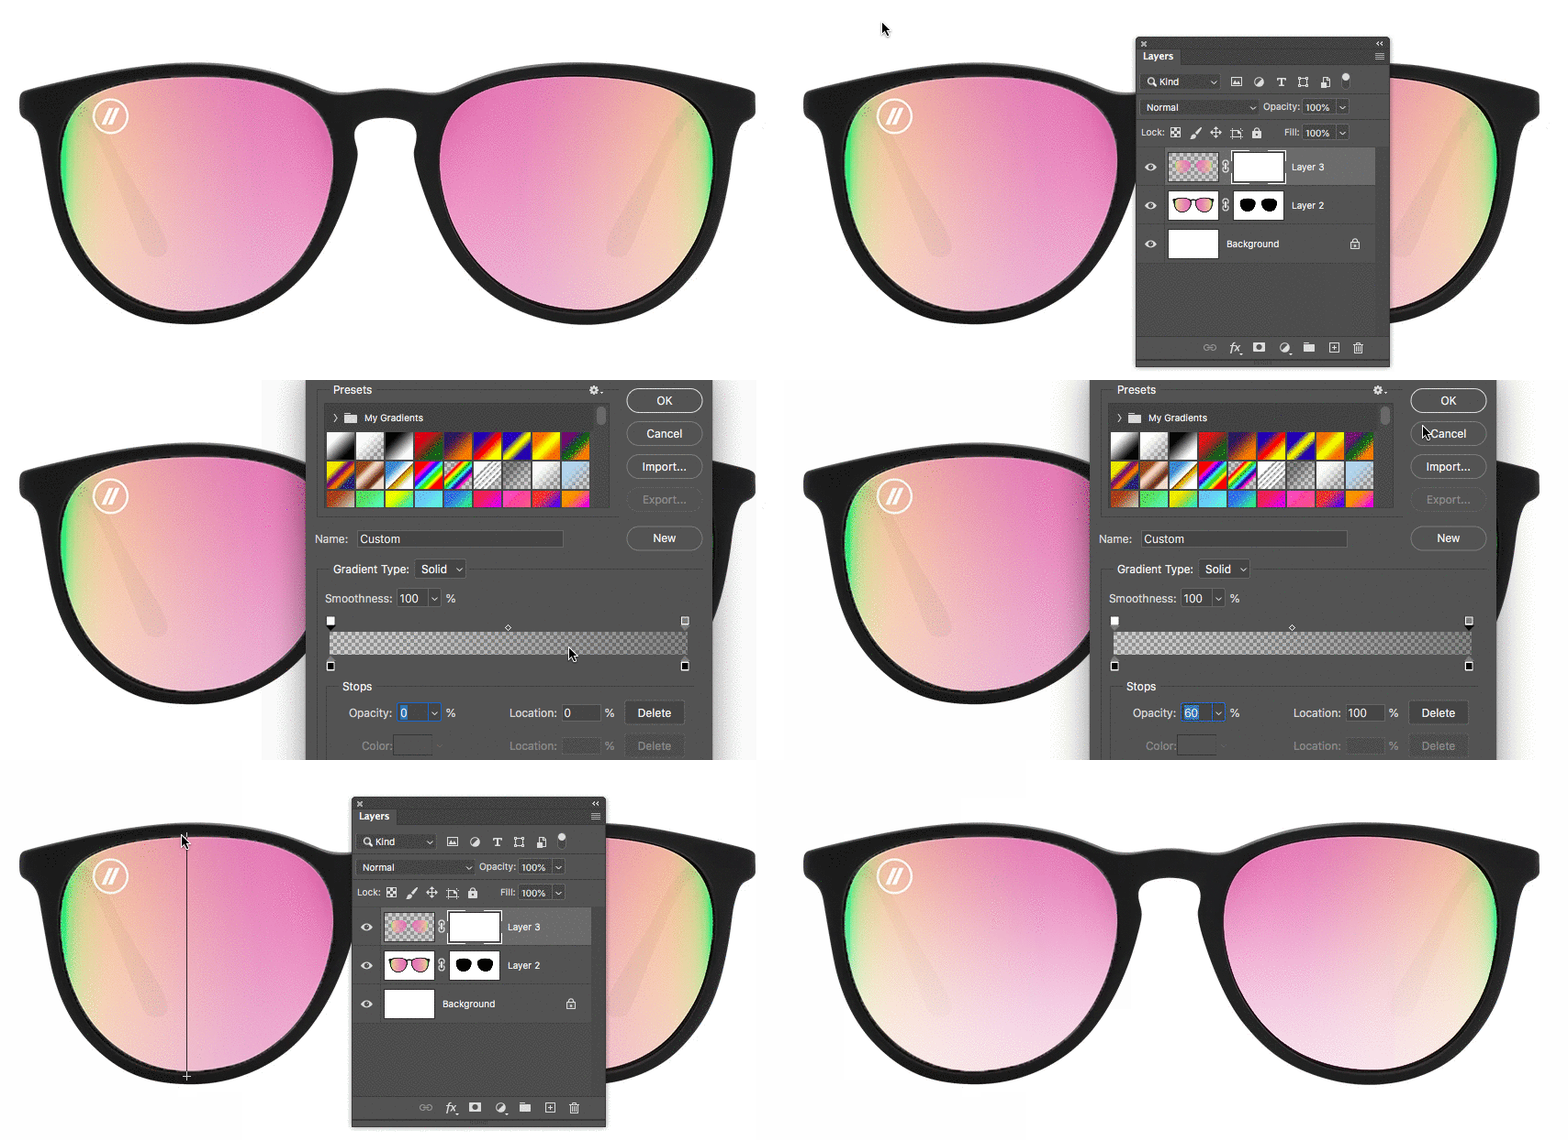
  1. Make a new Layer, make a selection of the lenses and fill with black. Set the Layer -> Fill to 0%

  2. Make sure the sunglasses layer masked out the lenses.

  3. Double-click on the Layer with the blacked filled lenses shape to open up the Layer Style.

  4. Go to the Gradient section, and double-click on the gradient preview.

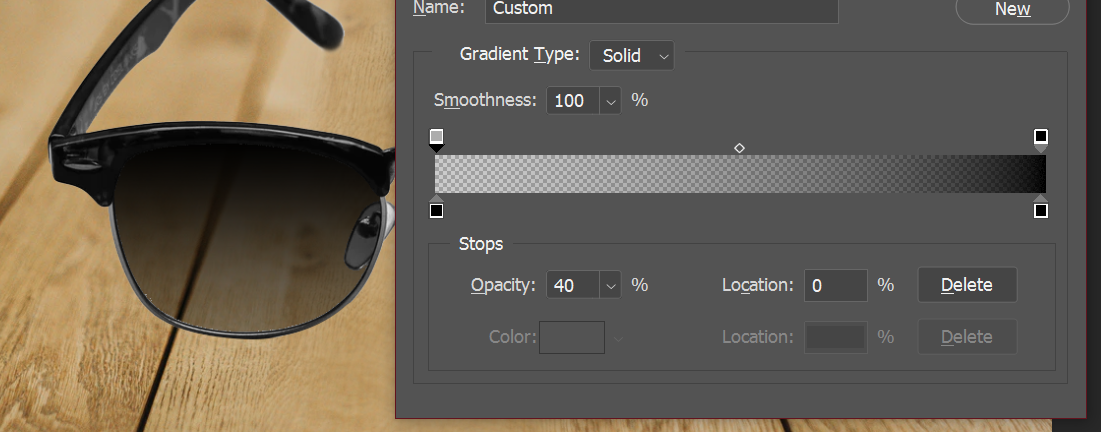
  5. The new window will let you customize the gradient. Above the gradient bar is a square-down triangle. Left-click that icon, new options will show below and you can change the opacity for that 1-stop in the gradient.

    Select the layer with the lenses. Create a selection of the lenses. I did a quick select with the magic wand tool.

SunglassesSelection Lenses

  1. With the lens layer selected, press CTRL + J (Windows) or CMD + J (Mac) to create a copy of the selection onto a new layer.

Here is how to add a gradient to an existing lensNew lens layer

  1. Select the new lens layer, CTRL + Left Click (Windows) or CMD + Left Click (Mac) on the thumbnail to select the object.

If you want to keepSelect

  1. The lens have the same selection around them. Go to Select -> Inverse. Click "Layer 1" and choose "Add Layer Mask" to hide the lenses from the original image.

Layer Mask

  1. Add a layer mask to "Layer 2", then select the Gradient Tool (G). Make the top left carrot 0% to be 100% color and the right side 20% to let 20% of color below it to show through. Add a gradient to the layer mask to hide part of the lenses.

final

The top of the original lenses are 100% opaque, then you need to apply the gradient tobottom of the layer mask. Make one side black with 0% opacity because you want to keep it 100%lenses are 80% opaque and the other side should be 60% opacity. Then draw a gradient on your layer maskbecause we're letting 20% of colors below show through.

Sunglasses part 2

  1. Make a new Layer, make a selection of the lenses and fill with black. Set the Layer -> Fill to 0%

  2. Make sure the sunglasses layer masked out the lenses.

  3. Double-click on the Layer with the blacked filled lenses shape to open up the Layer Style.

  4. Go to the Gradient section, and double-click on the gradient preview.

  5. The new window will let you customize the gradient. Above the gradient bar is a square-down triangle. Left-click that icon, new options will show below and you can change the opacity for that 1-stop in the gradient.

Sunglasses

Here is how to add a gradient to an existing lens

If you want to keep the original lenses, then you need to apply the gradient to the layer mask. Make one side black with 0% opacity because you want to keep it 100% opaque and the other side should be 60% opacity. Then draw a gradient on your layer mask.

Sunglasses part 2

Gradient and opacities using layer masks

  1. Select the layer with the lenses. Create a selection of the lenses. I did a quick select with the magic wand tool.

Selection Lenses

  1. With the lens layer selected, press CTRL + J (Windows) or CMD + J (Mac) to create a copy of the selection onto a new layer.

New lens layer

  1. Select the new lens layer, CTRL + Left Click (Windows) or CMD + Left Click (Mac) on the thumbnail to select the object.

Select

  1. The lens have the same selection around them. Go to Select -> Inverse. Click "Layer 1" and choose "Add Layer Mask" to hide the lenses from the original image.

Layer Mask

  1. Add a layer mask to "Layer 2", then select the Gradient Tool (G). Make the top left carrot 0% to be 100% color and the right side 20% to let 20% of color below it to show through. Add a gradient to the layer mask to hide part of the lenses.

final

The top of the lenses are 100% opaque, the bottom of the lenses are 80% opaque because we're letting 20% of colors below show through.

added 334 characters in body
Source Link
AndrewH
  • 12.8k
  • 3
  • 34
  • 59
  1. Make a new Layer, make a selection of the lenses and fill with black. Set the Layer -> Fill to 0%

  2. Make sure the sunglasses layer masked out the lenses.

  3. Double-click on the Layer with the blacked filled lenses shape to open up the Layer Style.

  4. Go to the Gradient section, and double-click on the gradient preview.

  5. The new window will let you customize the gradient. Above the gradient bar is a square-down triangle. Left-click that icon, new options will show below and you can change the opacity for that 1-stop in the gradient.

Sunglasses

Here is how to add a gradient to an existing lens

If you want to keep the original lenses, then you need to apply the gradient to the layer mask. Make one side black with 0% opacity because you want to keep it 100% opaque and the other side should be 60% opacity. Then draw a gradient on your layer mask.

Sunglasses part 2

  1. Make a new Layer, make a selection of the lenses and fill with black. Set the Layer -> Fill to 0%

  2. Make sure the sunglasses layer masked out the lenses.

  3. Double-click on the Layer with the blacked filled lenses shape to open up the Layer Style.

  4. Go to the Gradient section, and double-click on the gradient preview.

  5. The new window will let you customize the gradient. Above the gradient bar is a square-down triangle. Left-click that icon, new options will show below and you can change the opacity for that 1-stop in the gradient.

Sunglasses

Here is how to add a gradient to an existing lens

If you want to keep the original lenses, then you need to apply the gradient to the layer mask. Make one side black with 0% opacity because you want to keep it 100% opaque and the other side should be 60% opacity. Then draw a gradient on your layer mask.

Sunglasses part 2

deleted 1 character in body
Source Link
AndrewH
  • 12.8k
  • 3
  • 34
  • 59
Loading
Source Link
AndrewH
  • 12.8k
  • 3
  • 34
  • 59
Loading