26

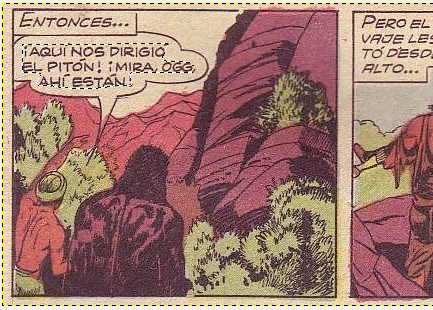
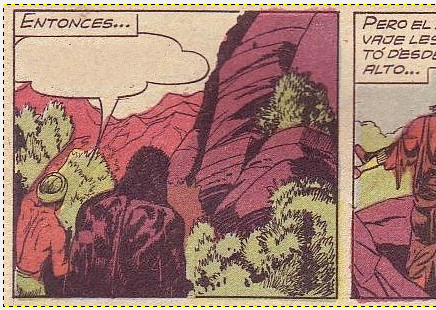
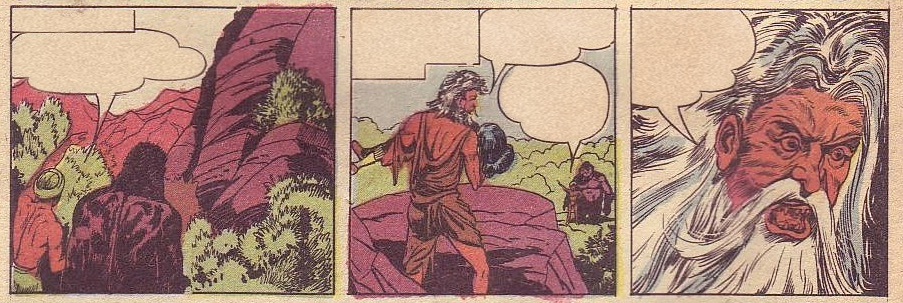
I'm taking very old (1940s and '50s) comics and trying to remove the text from some of their word balloons. I don't want to just erase their contents to pure white space, though, as the paper colour and texture isn't pure white; it's slightly yellowed, and grainy (paper quality back then wasn't great). What I'd like to end up with is something that looks like the original scan as though the comic was never lettered.

At the moment, I'm trying to find the largest blank space possible inside a given word balloon, copy the best square or circle I can fit inside it, and paste that square or circle repeatedly to cover the text. This is painstaking, and also results in an end effect that's kind of weird in and of itself, as I have the same bit of texture repeating over and over and over.

I've tried "smudging" results, but that gives me something that's again kind of weird-looking. What would you suggest?

Currently using Seashore on the Mac, but I could also use GIMP.

EDIT: Sample comic enclosed by request. Note that the paper in the word balloons and captions has a colour and texture that I'd like to preserve.
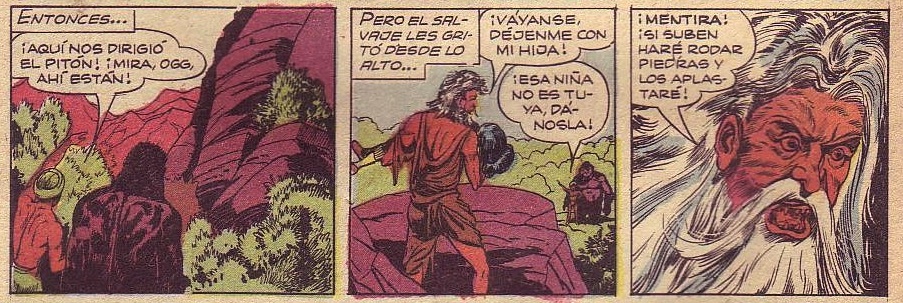
Sample comic

0

5 Answers 5

21

With Gimp comes a plugin Resynthesize together with a Python script Heal Selection. On Linux the plugin is contained in the package gimp-plugin-registry.

After selecting an area with the select tool:

enter image description here

We can "heal" this selection from "Filters > Enhance > Heal selection...". Here I made a random healing with 10 pixels from the surrounding:

enter image description here

4
  • 2
    +1, this is what I would've suggested. One tip worth noting is that, if you want to do this to a lot of text at once, it can be useful to start by making a small separate layer filled with blank paper texture and then using it as a texture source. This speeds up the synthesis process (since there will be fewer rejections) and makes sure that it doesn't accidentally end up copying pieces of the surrounding drawing. Also, the full plugin (as opposed to the "heal selection" script) has a lot of setting you can play with to adjust the results. Commented Jan 9, 2014 at 23:28
  • 2
    Also, if at all possible, do this before saving the images as JPEG. In the example images above, you can see that, even though the text itself is gone, some of the compression artifacts around it are still there. You'll get much better results with less trouble if you do this with the raw, uncompressed scans instead. Commented Jan 9, 2014 at 23:34
  • Your links are now dead
    – Ruslan
    Commented Jun 30, 2020 at 20:42
  • @Ruslan: thanks for the notice... edited giving a link to a GIT-page for that package.
    – Takkat
    Commented Jun 30, 2020 at 20:55
15

I would approach this in a similar way to horatio, but I would probably keep the original image in tact as much as possible (assuming you want to preserve it).

I'd create a similar texture to the paper like so:

noise texture

It's just a noise texture against a subtle gradient with some distortions via a horizontal and vertical scale.

You'll notice some color variations that I applied using the Burn and Dodge tools to help it blend in to the existing artwork since the color is not uniform across the whole comic.

I used a Clipping Mask with very soft edges around the text removed to produce this result:

Finished result comic

I used Photoshop to do this, but the same principles should apply in GIMP.

5
  • 1
    This is a good result. The bubble lines act as a visual barrier. Kind of like a facet change on a wall when you have paint that doesn't quite match.
    – horatio
    Commented Jan 9, 2014 at 19:17
  • 1
    If I were to do this I would suggest doing at least 5 or 6 different textures with slight variations in colors, degradation, and spots so it looks a bit more natural then having identical texture on every page (assuming you're doing multiple pages)
    – Ryan
    Commented Jan 9, 2014 at 19:18
  • My first instinct was to start with a 128 grey and run a difference cloud on it, adjusting the levels afterwards to avoid high contrast (and then noise and a Hue w/colorize). I suspect JohnB's idea is a better result.
    – horatio
    Commented Jan 9, 2014 at 19:20
  • @horatio good observation with the "visual barrier". You can definitely detect that there has been an alteration in my example if you look closely enough. I suspect a) that nobody would be looking that closely and b) adding new text to the bubbles would draw the viewer away from any inconsistencies
    – JohnB
    Commented Jan 9, 2014 at 19:31
  • @Ryan good idea, and it is very simple to create so making different textures can be done swiftly
    – JohnB
    Commented Jan 9, 2014 at 19:32
5

Because you are editing out text (e.g. radically altering the original), one way to do this is to cheat:

Edit the image so that the yellowed paper is no longer yellowed. Blank out to your heart's content, then overlay a new all-over fake yellowing paper effect. This will be uniform.

3
  • +1. instead of fiddling endlessly with tiny section, this would probably be the most efficient and easy. There are masses of textures you could find or make that would do the job.
    – benteh
    Commented Jan 9, 2014 at 19:12
  • One flaw in my answer ( :P ) is that you run the risk of desaturating all the colors. I haven't thought it all the way through yet.
    – horatio
    Commented Jan 9, 2014 at 19:15
  • The idea is sound, though.
    – benteh
    Commented Jan 9, 2014 at 19:16
4

The copy and paste will give best results without ruining the texture and color of that particular balloon. What I generally do is start fairly small copy paste a few times, then merge the layers together (does Seashore have layers?) but stop just before the original. Then you have a larger sample to continue working with. Before you continue copying and pasting that layer soften the edge and that will fix the weird results you're having. I just use a large soft eraser. Then resume copying and pasting it, flattening as needed, and softening as needed.

Depending on the comic you could probably get away with making it oversized by a fair bit and then using the same 'cover layer' for all balloons. Just get the good empty sample, drop it on top, and then remove the excess for that particular spot.

Of course if Seashore doesn't have layers I would say to get Gimp.

1
  • for "remove excess" you might just have a large single texture the size of the image, and then apply a layer mask, editing the layer mask wherever you want to cover the text.
    – horatio
    Commented Jan 9, 2014 at 18:54
4

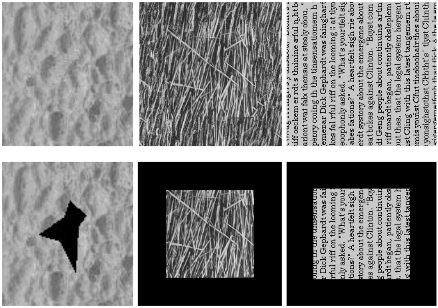
If you are feeling adventurous you can implement the Texture-Synthesis algorithm described here

it fills pixels with those which have a similar neighborhood creating an almost seamless extension of a texture or filling in holes, here are some examples enter image description here

Gimp supports scripting, so you could write a plugin for this (I planned to do it myself a while ago but then got sidetracked. Your question reminded me about it again)

1
  • 2
    This sounds like the Resynthesizer plugin for GIMP (or Content Aware in Photoshop)
    – JohnB
    Commented Jan 9, 2014 at 21:55

Your Answer

By clicking “Post Your Answer”, you agree to our terms of service and acknowledge you have read our privacy policy.

Not the answer you're looking for? Browse other questions tagged or ask your own question.