1

I am using GIMP to create altitude profiles for the stages of a planned bicycle tour. Playing around on my first attempt, I created the profile below. (Note the smooth edge between the land and sky.)

enter image description here

After putting the project down for a day or so, I had forgotten my steps, but went ahead and tried to repeat the process for all stages. However, this time I could not achieve such a sharp, smooth edge between land and sky. (Note, particularly, the pixelation of the gentle rise at the beginning of the stage.) In the latter case, I have simply used feathering to smooth the edge of the land from green to alpha. The sky is a background layer.

enter image description here

I suspect what I did unwittingly in the first instance is to leave a lighter green on the edges of the land, which thereby produced a more blended transition. In the second instance, I have used a hard, dark edge of a single colour, then feathered it with alpha. Even with the feathering, the pixels are clearly visible.

Does anyone know of a good technique to create a smoother edge between stark contrasts of tone, without increasing the blur radius? (I do not want the edge to look fuzzy.) Any help would be greatly appreciated. Thank you.

11
  • 2
    What image did you start with? Is this from a photograph, or did you draw it? Why use GIMP for this? Personally, I'd be more inclined to use a vector image editor to make a diagram like this. Inkscape is free and Open Source like GIMP.
    – Billy Kerr
    Commented Feb 19, 2022 at 20:24
  • 1
    The image is small so there is a tendency to zoom it which make the pixels show because they are enlarged.
    – xenoid
    Commented Feb 19, 2022 at 20:33
  • 1
    @POD - If you don't want to manually redraw the mountains, you could get a half decent result by auto tracing the bitmap in Inkscape: See example
    – Billy Kerr
    Commented Feb 19, 2022 at 22:08
  • 1
    If you use the road profile from the Maps sidebar, it's all the more useful to use paths: you make the path on the thumbnail and then scale it up (or stretch it horizontally) with no loss of sharpness.
    – xenoid
    Commented Feb 19, 2022 at 22:43
  • 1
    You can get better resolution raster images by avoiding Google (which is terrible for bike routing BTW). RideWithGPS, Komoot, and many other tools (some free) will produce a better route and give you an elevation plot nearly the whole width of your screen. If you've got a GPX file of your route you can import it into any of those. My own crude tool for comparing routes used to as well, but I've switched to cumulative climb.
    – Chris H
    Commented Mar 3, 2022 at 11:56

2 Answers 2

2

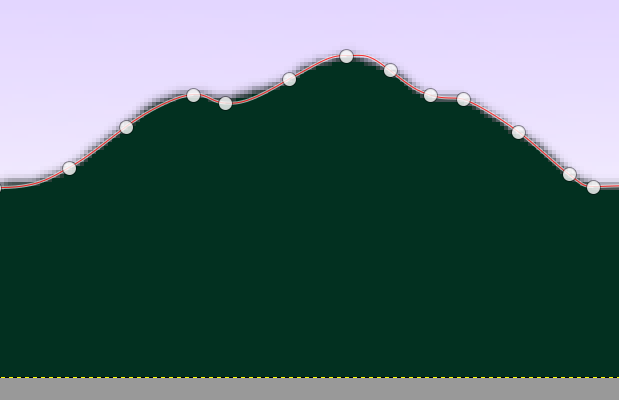
The best way to get something sharp and smooth is to use a path:

enter image description here

Section zoomed in over your image:

enter image description here

That's only 78 points, takes a couple of minutes. Once you have the path you create a selection from it and bucket-fill:

enter image description here

Another good thing about a path is that if you have the data, you can make a CSV out of it, and have the CSV converted to a path.

1
  • That produces a very clean line, thank you.
    – POD
    Commented Feb 20, 2022 at 4:59
0

For those who might be interested, whilst the answer above solved the problem perfectly, it was rather time-consuming. A suggestion in the comments from my original post was to use Inkscape to trace path around the bitmap, then import the vector image into GIMP again as a bitmap. This produced a tidy image, but it tended to simplify the edge detail too much. The solution to this was to scale the image along the y-axis—I used a factor of 5—and those details were preserved. I then simply scaled the traced image the other way before import into GIMP.

enter image description here

Your Answer

By clicking “Post Your Answer”, you agree to our terms of service and acknowledge you have read our privacy policy.

Not the answer you're looking for? Browse other questions tagged or ask your own question.