7

Why doesn't The Gimp have drawing tools? Weird isn't it?

Something I'm trying to do today, and not for the first time, is take in a picture and just annotate it with a couple of arrows pointing to particular things I want to highlight.

And, again, I'm surprised to discover that there's no "arrow-drawing" tool. Or any basic geometric shape tools. The Gimp is the natural place to do what I'm doing (annotate a bitmap), not Inkscape nor LibreOffice Draw. But this functionality is surprisingly NOT THERE (presumably because Gimp is meant to be for painting not vector drawing.)

But this is such an obvious use-case that I'm surprised no-one has ever tried to add these tools.

Do I just not know how to find the right tool, or does The Gimp not support shapes?

2
  • I hope you don't mind, I edited your question so we could re-open it. Instead on focusing on the why, I referred more to the how ("how to use shapes in Gimp"). Please feel free to re-edit!
    – Yisela
    Commented Jul 11, 2013 at 4:43
  • 1
    I would argue Inkscape is more of a natural place to do this. Paste in your bitmap, then annotate away with a full range of vector tools.
    – DA01
    Commented Mar 23, 2014 at 1:08

3 Answers 3

7

As far as I'm concerned, there aren't native shapes in The Gimp.

There is, however several solutions:


====1====
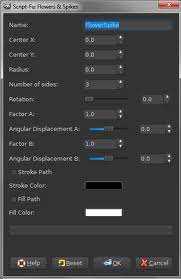
a collection of scripts that create paths, called Shape Paths.

Supported shapes:

  • Squares
  • rectangles, rounded rectangles
  • circles, ellipses, ovals
  • polygons
  • stars
  • flowers
  • gears
  • triangle waves, square waves and sine waves

enter image description here

====2====
Another thing you can do is export customized paths (using the Path utility) and import them when you need them. It's probably better if you use Inkscape for this. You can also use the shapes of PNG files.

====3====
A last option is to use dingbat fonts, because you can use them the same way you'd use a shape template :)

0
1

If you want STRAIGHT LINES (or RECTANGLES), then (just create a new layer and) :

1) choose BRUSH and click mouse anywhere.
2 ) After clicking, then press SHIFT and click on another place;

Between them will be straight Line!

1

You can use the tools you already know (Libre Office 6.1+, MSO, etc) as sources of finished annotations layered on GIMP images via copy-paste IF the graphics quality tradeoff is acceptable for your use. Tested on GIMP 2.10.6. You have the following caveats:

  • “Office” suite tools such as Libre Office Impress, LO Draw and MSO equivalents are designed to produce good-enough graphics for office-use docs and presentations. Pro, high-res graphics are NOT a design point for these office tools. The resolution difference when pasted as an annotation layer over a high-res image in GIMP can be noticeable, especially if in GIMP you subsequently include the annotation layer in any of the fun transforms, scaling and such in GIMP, and especially for text. LO 6.1 does not offer a way to choose an output resolution nor indicates what it is. A hint of the LO output resolution can be had via Tools→Options→LibreOffice→Print and look at the highest resolution available in the drop-down list for “Reduce bitmaps”. On Windows 10 this is 600 DPI.
  • The incoming paste to GIMP creates a GIMP floating layer (shows in the Layers tab of the Layers-Patterns window) containing an object of what you copied from the source application. The default paste in to GIMP is a bit map object. LO versions 6.1+ of Impress offers a way to select graphics objects on an Impress page and Format→Convert them various other internal formats, including “metafile”. It is possible C-V of an LO “metafile” object may give more graphically adaptable results in GIMP. Experiment!

Procedure:

  • In your office application, typically the presentation app but experiment with the drawing app as well, create a new dummy doc in which to create your annotations. I use LO Impress but you use what you know.
  • Create your annotation objects if you can as single native objects from the application’s library (callouts, geometric objects, text boxes, whatever is available). This maximizes your ability to place and tweak the size objects once pasted in to GIMP. Grouped objects in the source application become single objects in GIMP. In the source app edit your objects for exact shape, and font, line, fill, color and transparency styles because you already know how to do that best in the source office-suite app.
  • In GIMP, create a new, transparent Layer above all other layers in the stack displayed in the “Layers – Patterns” window Layers tab. You can use the context menu (right-click) in the “Layers – Patterns” window Layers tab, the “+New layer” button in the same tab, or main menu bar Layer→New layer. This transparent layer will eventually receive your annotation object pastes.
  • Select your source app object then clipboard-copy, then make the GIMP image window the active desktop window (click in the title bar), then paste Cntrl-V. In the “Layers – Patterns” window Layers tab you should see a new “Floating Selection (Pasted Layer)” at the top of the stack as also the new active layer showing overlain on the GIMP image window.
  • In the GIMP Toolbox window select the Move tool and tool option button Move layer and tool option radio button “Move the active layer”. In the GIMP image window you can now select, hold and freely move the new floating layer around for positioning and also apply any other tools.
  • Subsequently, you need to “anchor” the floating layer either explicitly via Layer→Anchor in the menus or just by pasting again from the clipboard. The anchor function in effect pastes the floating layer on the next lower layer down layer in the layer stack. Conveniently above, you created a transparent layer to receive this anchor paste. You can have all your annotations land on the same transparent layer or create individual receiving transparent layers for each floating layer you paste from your source app.

Tip: Do your work in GIMP at the native resolution of your base image then subsequently create down-scaled (Image→Scale image) output versions as needed for smaller file size. This means the scaling is applied equally to your annotations and down-scaling algos can help reduce the perceived quality diffs between your annotations and the base image.

Your Answer

By clicking “Post Your Answer”, you agree to our terms of service and acknowledge you have read our privacy policy.

Not the answer you're looking for? Browse other questions tagged or ask your own question.