5

enter image description here

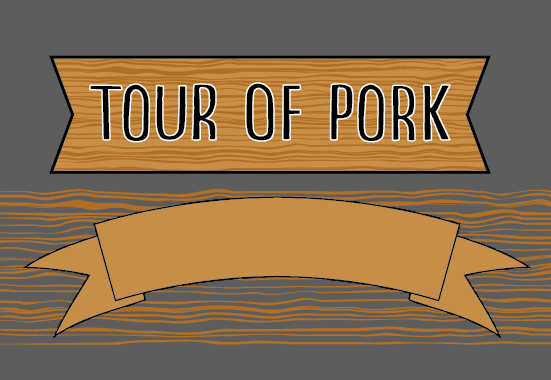
I've used a clipping mask to obtain the top ribbon, but I was wondering how I could get the same effect with the bottom ribbon, where the ribbon is filled in with the horizontal lines.

Thanks in advance, Michael

5
  • 4
    I don't really understand. The method would be the same for both images.
    – Scott
    Commented Oct 21, 2013 at 20:05
  • The top ribbon required me to create a box that fully contained the horizontal lines. The bottom ribbon does not contain the horizontal lines in full, but the lines actually overflow out of the ribbon. This doesn't let me use a clipping mask. I was wondering if there is some sort of invert clipping mask that could do what I want.
    – M.Y.
    Commented Oct 21, 2013 at 20:08
  • Anyone have any ideas?
    – M.Y.
    Commented Oct 21, 2013 at 20:48
  • 2
    I don't understand at all. By definition a clipping mask HIDES items outside a shape's boundaries. Can't you simply select a ribbon shape and the lines and choose Object > Clipping Mask > Make?
    – Scott
    Commented Oct 21, 2013 at 21:49
  • Scott is correct, but we can go one further, using the pathfinder tool panel (see comment below). Commented May 7, 2014 at 6:05

3 Answers 3

15

To answer the title of creating an "inverse clipping mask" .. you do this by:

  1. selecting your two objects (traditionally the clipping mask is the layer above the object to clip)
  2. open your pathfinder panel (Window -> Pathfinder or Shift - Ctrl/Command - F9)
  3. press the option/alt key and click the Minus Front (2nd Shape Mode icon) at the same time

This creates a compound path with the mask shape as an inverse clipping mask.

0

I think what you are asking is how to get the squiggly lines in the ribbon.

One way you could do it is..

  • Select the layer with the squiggly lines.
  • Ctrl+Click on the layer with your ribbon (the one you want the pattern on).
  • On your layer window/tab, click on the "Add layer mask" button.

This is the most simplest way I can think of doing it. But if you wanted the squiggly lines to bend with your ribbon, that's going to take some work.

To align the pattern with the arch of the ribbon..

  • -Divide the ribbon in half, vertically( so you have left and right pieces). Delete one half and keep the other.
  • Select your squiggly line layer. Go to Edit > Transform > Warp
  • Play around with warping the lines until you get your desired effect.
  • Follow masking instructions from above.
  • Duplicate the layers to create a mirrored half.

If you follow the above, you will notice that your mirrored squiggly lines may not look too great. If you are up for the challenge, I suggest you try warping the entire squiggly line layer to fit the curve of your ribbon.

I hope this was helpful. Good luck.

3
  • The warping works wonderfully, thanks. The problem I've had all along was that when I make the clipping mask, everything becomes transparent. Any insight?
    – M.Y.
    Commented Oct 23, 2013 at 17:21
  • Nevermind, the problem was that the ribbon consisted of 3 different objects which were grouped. I ungrouped them, clipped each part separately, and grouped them afterwards. Thank you!
    – M.Y.
    Commented Oct 23, 2013 at 17:56
  • @MichaelYom Your title asks something else completely different that this answer would not be appropriate for, I would change the title of your question to be more precise in what you are asking to achieve. Commented May 7, 2014 at 6:07
0

Update to 2020 - remember to tick the box below the Knockout Group tick box Knockout settings

Your Answer

By clicking “Post Your Answer”, you agree to our terms of service and acknowledge you have read our privacy policy.

Not the answer you're looking for? Browse other questions tagged or ask your own question.