I would like to add an arrow to an Inkscape project. I read this question but it didn't tell how to actually make the arrow:
5 Answers
- Draw a line (Shift+F6)
- Open Fill and Stroke dialog (Shift+Ctrl+F)
- Select Stroke Style tab
- Choose an arrow for the Start Marker or End Marker
Source: draw line arrows in inkscape
-
-
2If you want to make it out of lines, then you can draw the lines with the freehand tool (F6), the Bezier curve tool (Shift F6), or the brush stroke tool (Ctrl F6). If your arrow contains multiple line objects, you can group them into a single object by selecting them and then choosing Object > Group from the menu.– SuragchCommented Oct 25, 2015 at 8:16
-
I do not see a arrow option when I am in the Stroke Style tab, I do not know if this has perhaps been changed in the past 3 years?– BrandonCommented Nov 10, 2018 at 22:55
-
@Suragch : could it be done with diagram connectors instead of normal drawn line? I tried it with connectors and it didn't work– NinaCommented Jun 29, 2020 at 19:04
-
To expand on Suragch's answer...
When you first create an arrow, it will be a stroke. You may want it to be a path instead, which I think is what Tomáš Zato was getting at with his comment. In my experience, lines with markers can be rendered incorrectly by some SVG applications. Converting the line to a path helps ensure image fidelity. It also allows you to do things like set a different stroke and fill color for the line (so that it can stand out when it doesn't contrast well with the background).
- Draw a line (Shift+F6)
- Open Fill and Stroke dialog (Shift+Ctrl+F)
- Select Stroke Style tab
- Choose an arrow for the Start Marker and/or End Marker
- Change the stroke width to increase/decrease the size of the arrow
- Using the selection tool F1
- Click Path > Stroke to Path. This will convert the stroke into multiple paths--one for the line itself and one for each marker.
- Ungroup the line (Ctrl+Shift+G)
- With both the line and stroke selected, click Path > Union. (If there were multiple markers, you'll need to do this one-at-a-time for each marker).
You can see that it worked by using the Node tool F2 and hovering over the line. You'll see a red outline of the new path.
Alternatively you can
- enable grid view: View > Grid (or press # on your keyboard)
- enable snapping to grids: you can find it by going to View > Show/Hide > Snap Controls Bar - and then watch for the tool bar that dis/appears
- draw your arrow using the line drawing tool (
Shift+F6) placing your nodes at grid intersections
-
2This is the answer I'm looking for. How can I make such an arrow to be consistent path? Without nodes overlaping I mean.– kelinCommented Feb 24, 2017 at 8:26
The most simple and effective solution is to use an arrow text symbol.
- Add a Text in Inkscape
- Copy an arrow symbol and paste it in Inkscape
- To convert text to path, go to Path > Object to Path
- Set the Fill color of the arrow, add Stroke, etc.
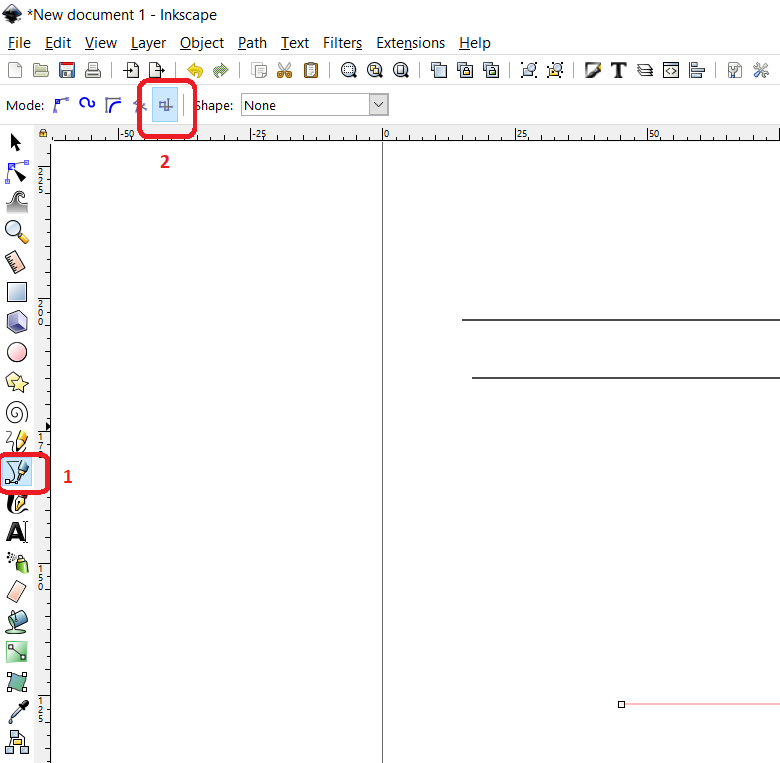
I usually select the tool from the Inkscape toolbar. As shown in the figure, follow these steps to draw straight lines
- Select icon to draw a line (higlight 1) or press the keyboard shortcut Shift+F6
- Then, on the top left corner you can see different options. Select the last option as highlighted in figure with number 2.
- Place the first and second point of the line with the left click of the mouse. Right-click when you wants to end editing.
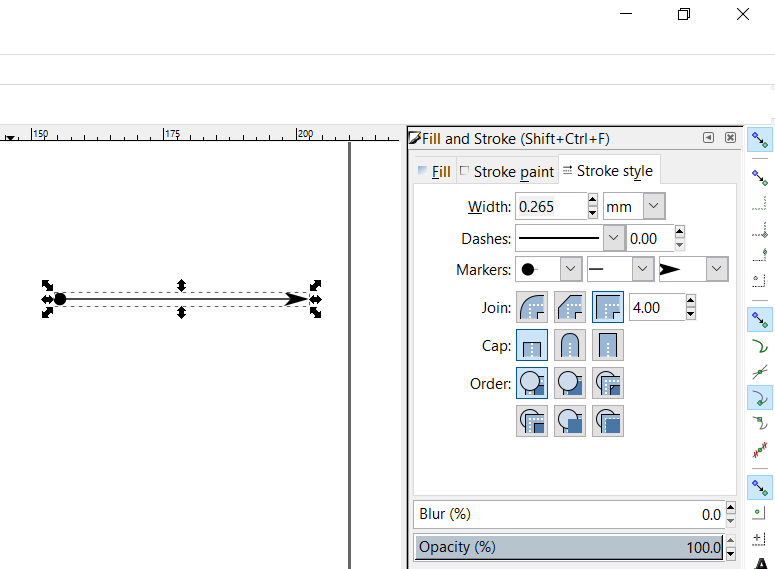
- Open the
Fill and Strokedialog (Shift+Ctrl+F) - Select
Strokestyle tab and select the arrow style


