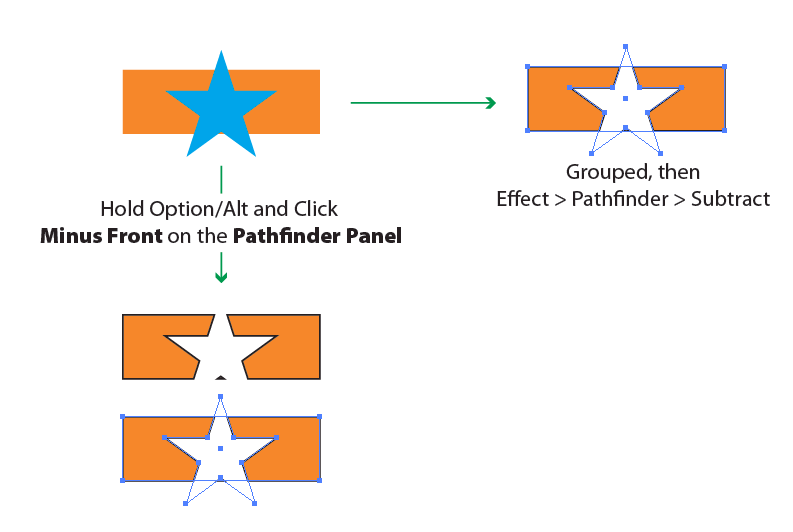
You don't really want a clipping mask here, or an "inverted" clipping mask. You want a compound shape. A clipping mask hides artwork outside the mask shape. You want to hide portions within a shape.
Easy ways to generate compound shapes...
(Which are different than Object > Compound Path)
Star above rectangle in stacking order, and select both.
Hold down the Option/Alt key and click Minus Front on the Pathfinder Panel.
- By default Pathfinder operations auto-expand (since CS4), making them destructive. If you hold down the Option/Alt when you click a Pathfinder Button, it tells the operation to not auto-expand, resulting in a compound shape. (This is the reverse of how Pathfinder operates prior to CS4.)
One can also group the shapes, then use Effect > Pathfinder > Subtract to get the same, non-destructive, result.

The difference between these two method is primarily how they appear in the Layers Panel. The Group with the Effect, will be seen as a standard "Group" in the Layers Panel - and the Effect appears in the Appearance Panel when that Group is selected. The Compound Shape generated by the Pathfinder Button will be listed as a "Compound Shape" in the Layers panel. Other than the name it will appear similar to a Group, but there is no effect for it when looking at the Appearance Panel.
Using Object > Expand Appearance on either method results in destructively "baking in" the compound appearance.
The Pathfinder commands create compound shapes which are different than Object > Compound Path > Make. I can't definitively state the difference between the menu's compound "paths" and pathfinder's compound "shapes" - I simply know they operate differently (and are labeled different in the Layers Panel.) I do not believe there is any way for a user to intentionally create a compound shape, other than the option/pathfinder operation detailed above. All user-driven menu commands create compound paths, not shapes.


