0

I want to take out all the wrinkles and folds from shirt image and save in new file.

I mean is it possible to remove all other colors from shirt and leave only wrinkles in it? So we can paste those wrinkles on some other shirt image?

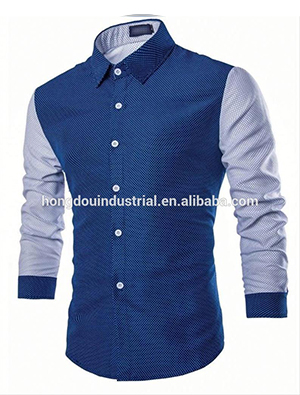
For Example I have this shirt

enter image description here

You can see that there are wrinkles and folds in shirt's arm etc. I want to remove everything and just leave those wrinkles. So I can paste those wrinkles on my other shirt photos.

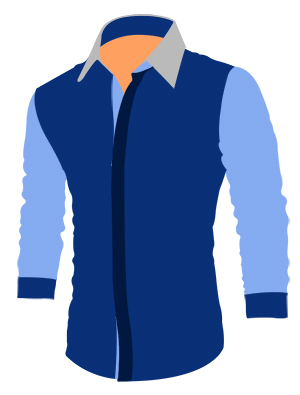
My target is that I have been given plan fabric pictures and now I have to make those pictures like they have wrinkles as in the above picture. But I don't know how to do it. And wrinkles are to be copied from other pictures my client provide me along with fabric pictures. Take an example as I have this fabric picture

enter image description here

and now I have to paste those wrinkles in it. Thanking you in advance.

2

3 Answers 3

4

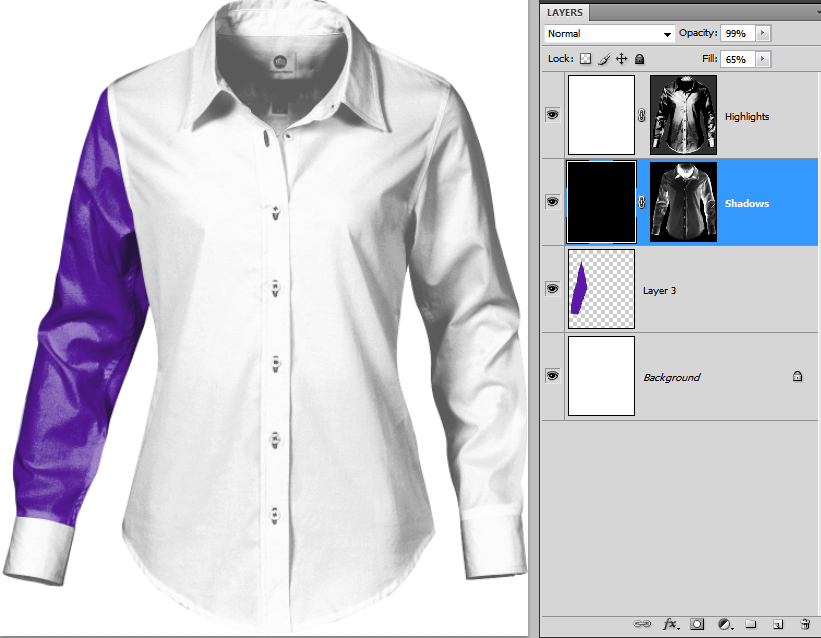
Perhaps if you start off with a plain white shirt on a white background, an image something like this:

Plain white shirt

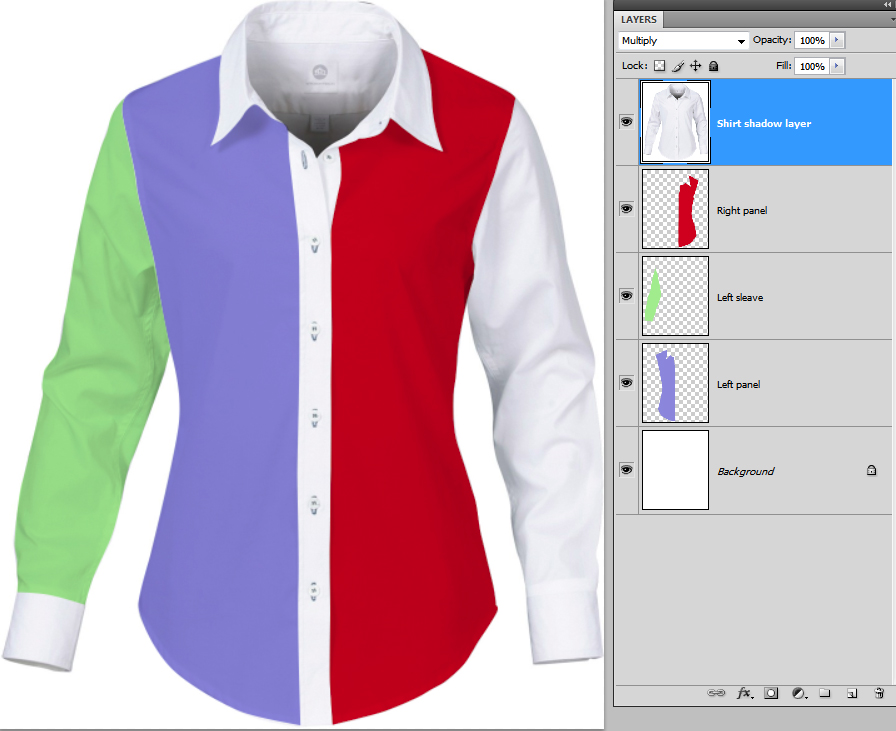
Then you could make that image your top layer, and set the layer blending mode to Multiply. Then you can add the colour panels under that on different layers. The background layer should be filled white.

Example Showing layers

If the shadows aren't dark enough, you could duplicate the shadow layer to intensify them.

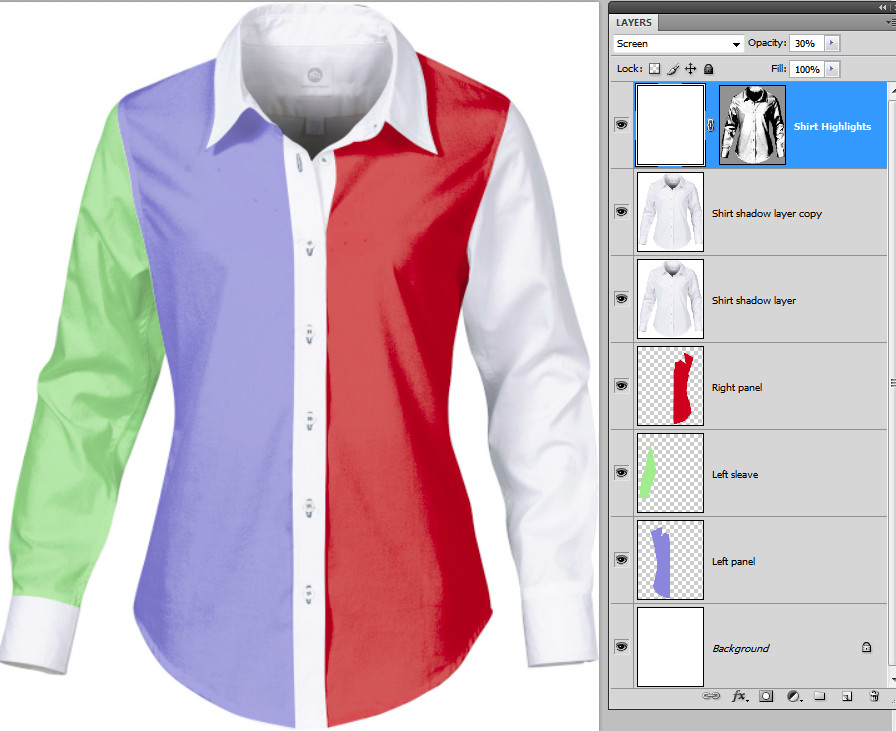
This leads to a rather flat image. So as an enhancement, you could use Select > Colour Range to select the highlights on a copy of the shirt layer, and use that selection to add a layer mask to a plain white layer - set the blending mode of the highlights layer to Screen, and lower the opacity a bit.

Example with highlights added

Another technique might be to separate the shadows in the same way I did for highlights, making a layer mask. The results look even more realistic.

Example with shadows extracted

7
  • 1
    Just noticed I can't spell sleeve!
    – Billy Kerr
    Commented Apr 14, 2017 at 16:28
  • Billy Please can you give this PSD file so I can work on it and understand it in better way please Commented Apr 15, 2017 at 7:10
  • Sure - here's the link to the PSD. filedropper.com/example_3 The photo is not mine by the way, so you'll need to find one you can use. I include it here only for example purposes.
    – Billy Kerr
    Commented Apr 15, 2017 at 9:51
  • Billy Please please please can you please do above steps on my new image please. It is really clean and white like your pic. I have been trying it for 3 days and even following your answer is not giving me the output as you have achieved. I Don't know why output is always not good as yours. Please please please I request you to do above steps on this image please pasteboard.co/4BVOAkN7S.jpg Commented Apr 15, 2017 at 14:18
  • Please Billy. It's really important for me. Commented Apr 15, 2017 at 14:25
3

Wrinkles in fabric are indicated by three things - shadow, highlight, pattern distortion. Since your fabric has no pattern distortion, you merely need to indicate shadows and highlights. This can be done relatively easily by merely painting on new layers.

I would not try anything such as extracting the wrinkles from the photo. That would take far too much time and ultimately never yield excellent results.

Using the photo as a "guide" of sorts . . .

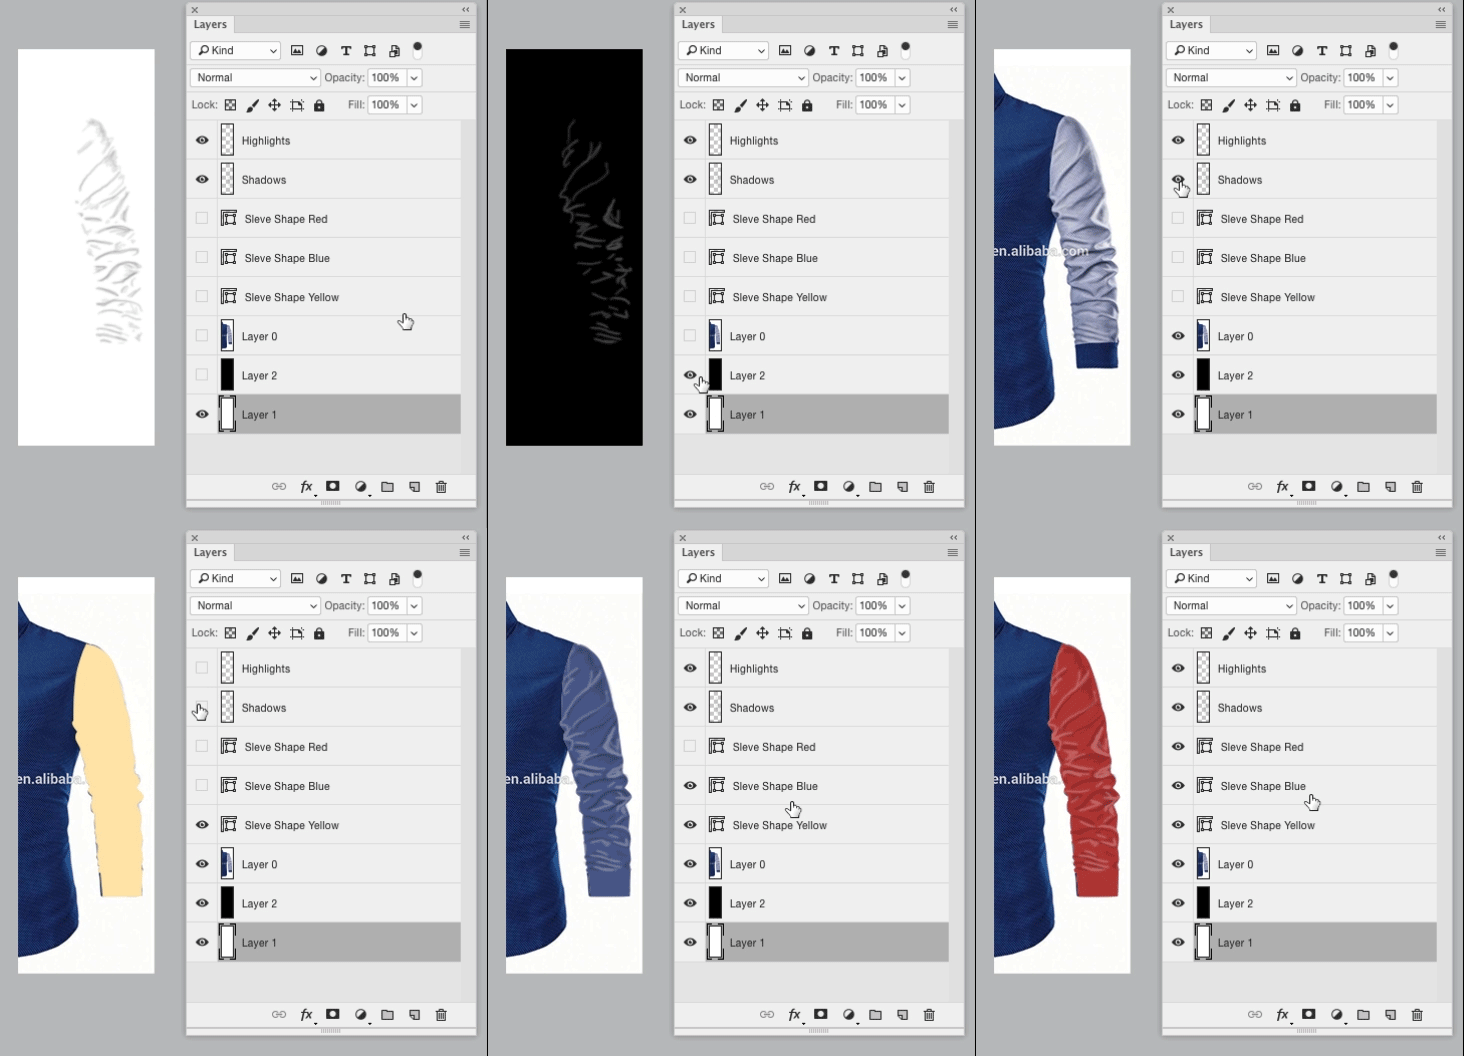
  • Create a new layer above the photo, grab a brush, and paint black where the shadows in the photo fall. Set the layer blending mode to Multiply.

  • Then create another new layer above the photo, and paint white where the highlights in the photo fall. Set the layer blending mode to Screen.

When these two layers are overlaid on a shape, they'll create the depth for wrinkles.

Here's a quick animation to show the technique.

Painting here was done quickly so it could be improved and the opacity of the shadows/highlights would need adjustment based upon the underlying color (for example, the highlights are a bit too prominent on the blue and red shapes).

enter image description here

If you really want to get into proper lighting techniques when painting these types of wrinkles, Burne Hogarth's Dynamic Wrinkles and Drapery is an excellent resource.

4
  • Metis I could not understand your said. Can you give me this psd file so I can work on it? Please Commented Apr 15, 2017 at 7:07
  • I didn't keep any files.. just made the sample and trashed it. Not sure what you aren't understanding - layer with shadows painted by hand.. layer with highlights painted by hand.... that's it essentially.
    – Scott
    Commented Apr 15, 2017 at 7:18
  • I am a web and software developer, Graphics is not my field. I even don't understand what's going on in other answers. Although I think the referred question is great but I just don't get it. graphicdesign.stackexchange.com/questions/21420/… none of it. Commented Apr 15, 2017 at 7:39
  • I don't know how I can further explain "paint black on a layer". (your linked question has essentially the same answers as the other answers on this question -- so there are at least 4 explanations of relatively that same technique. My technique here is different... it just requires you to paint on a layer. ) In all honestly, if you aren't "getting" any of this.... you may just be the completely wrong person for the project and may need to hire a designer.
    – Scott
    Commented Apr 15, 2017 at 7:43
1

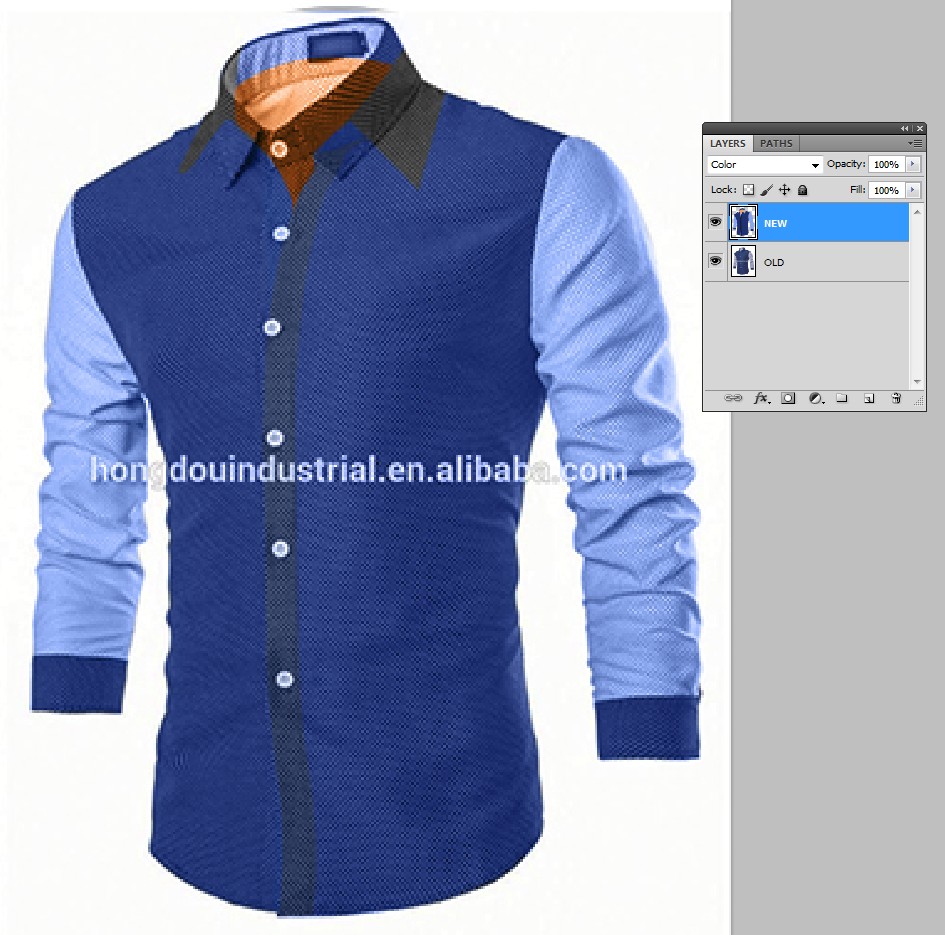
If you have exactly matchig pieces with new colors, you can give their color to the old wrinkled suit by making a new layer with blending mode "Color".

The result is full mess in the areas that do not fit, for example here in the collar and the neck opening.

enter image description here

The method can be reversed. Take only the good parts from the old image and make them to fit.

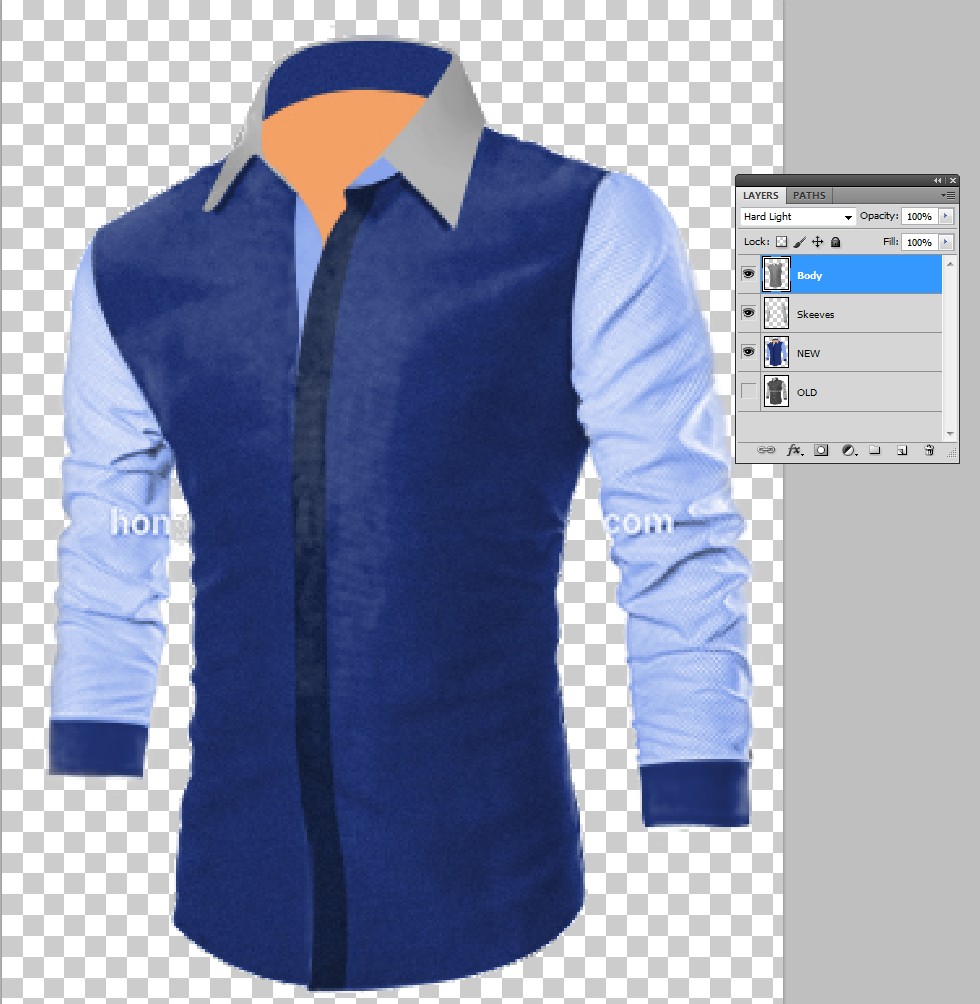
The reversed method:

enter image description here

  • Separate the radically differenttly colored parts in the old suit to different layers. The magic wand is useless. Use quick selection tool, polygonal lasso and clipping paths. Here no paths are used => generally very coarse part separation.
  • Desaturate the old suit parts
  • Adjust the old suit parts individually to have 50% grey average color
  • delete impossible parts from the old suit by cloning and erasing. Here the collar and neck opening areas are erased and the buttons are painted over by the cloning brush
  • by the smudge tool and warping make the remaining old suit parts to fit. You can also do minimal edits to the new suit.
  • give to the old suit parts blending mode = hard light.
  • the canvas texture grew to impossible when the old suit body was lightened to 50% grey. The texture was hided by blurring. Remember to select the body part before blurring to prevent the spreading. The blur was the Gaussian one and the radius was only 2 pix to save the general lightness variations.
  • some small parts were drawed by hand because there was nothing to copy. For example the shadow under the new collar.

The folds and wrinkles are extremely difficult to create by hand. But if you have got what it takes to see them right before doing them, you can get some substantial speed boost from Photoshop:

  • create a separate layer for a group of folds and wrinkles that have the same light. Select layer style = bevel&emboss, blending mode = hard light
  • paint with 50% grey
  • adjust the effext parameters for right light direction and shading transition widths
  • take the eraser with only few percent opacity. Brush the extras off.

Your Answer

By clicking “Post Your Answer”, you agree to our terms of service and acknowledge you have read our privacy policy.

Not the answer you're looking for? Browse other questions tagged or ask your own question.