0

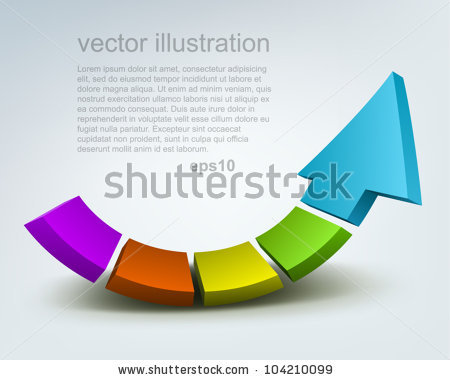
Can someone tell me how to do it like the picture above in illustrator?

enter image description here

I first drew an arrow (a rectangle and a triangle merged)

I then went to Effect → 3D → Extrude & Bevel to give the 3D shape.

Then I tried to Effect → Warp → Arc, but the arrow deformed itself (specially the arrowhead).

[Insert Example here]

I want to make it like the picture, rising but retaining its original shape.

5
  • 2
    Hi nat, thanks for your question. Could you tell us what you tried that didn't work? Always good to show some effort, and your chances for a good answer increase. We are not a tutorial-on-demand website. If you have any questions, please see the help center or ping one of us in the Graphic Design Chat once your reputation is sufficient (20). Keep contributing and enjoy the site!
    – Vincent
    Commented Feb 15, 2018 at 17:24
  • i first drew a arrow (a rectangle and a triangle merged), then i went to effect> 3d> extrude & bevel to give the 3d shape. then i tried to effect> wrap> arc, but the arrow deformed itstself (specially the arrowhead). I want to do like the picture, rising but retaining its original shape. Thanks
    – nat
    Commented Feb 15, 2018 at 17:38
  • 1
    Do you have an image of your effort? Thanks!
    – Vincent
    Commented Feb 15, 2018 at 17:53
  • Why does this have so many down votes? It's not a particularly bad question from what I can tell. Commented Feb 15, 2018 at 18:05
  • @LateralTerminal it started out as a very low-effort tutorial-on-demand question that some people are acting against, and they might not have reversed their downvotes yet. I know I haven't yet but will once I posted this comment.
    – Vincent
    Commented Feb 15, 2018 at 22:26

4 Answers 4

4

This requires wrapping the arrow around a cylinder.

Make your arrow and drag it to the symbols panel, choose type "graphic".

Make a rectangle to extrude into a cylinder.

Select it and go to Effect > 3D > Revolve. Default settings are good. Select "Map Art", choose your arrow symbol and the side surface.

Place the arrow onto the white part, size and position to fit. Check Preview and check "Invisible Geometry".

"OK" out of that screen back to the Revolve screen. Revolve and position the cube until you like the position of the arrow.

"OK" out of that, expand and ungroup the results until the shapes are individual.

Select your shapes, group and go Effect > 3D > Extrude.

Give it some depth and some perspective and rotate the cube until you are satisfied.

Expand and ungroup the results.

Apply custom gradients to each shape to make it look like the example.

enter image description here

1
  • Very well ... I spent a lot of time figuring out how to do it. And you have found a very good solution.
    – nat
    Commented Feb 16, 2018 at 11:01
1

With the Pen Tool (Click P to use it) to draw the outlines of the shapes

For every block there are 3 shapes - each with a slightly different/darker shading (for photo realism).

enter image description here

So you would need to draw out all your blocks (in 3 parts each)

Then add a Gradient to each of the parts.

3
  • Short answer to a short question? As-is, I'm tempted to slap an 'explain more' notice on this 😉
    – Vincent
    Commented Feb 15, 2018 at 17:55
  • And a gradient? Commented Feb 15, 2018 at 17:57
  • 2
    @Vincent you're right, I realized it's wrong, so I added in more info, Cheers.
    – Welz
    Commented Feb 15, 2018 at 18:14
1

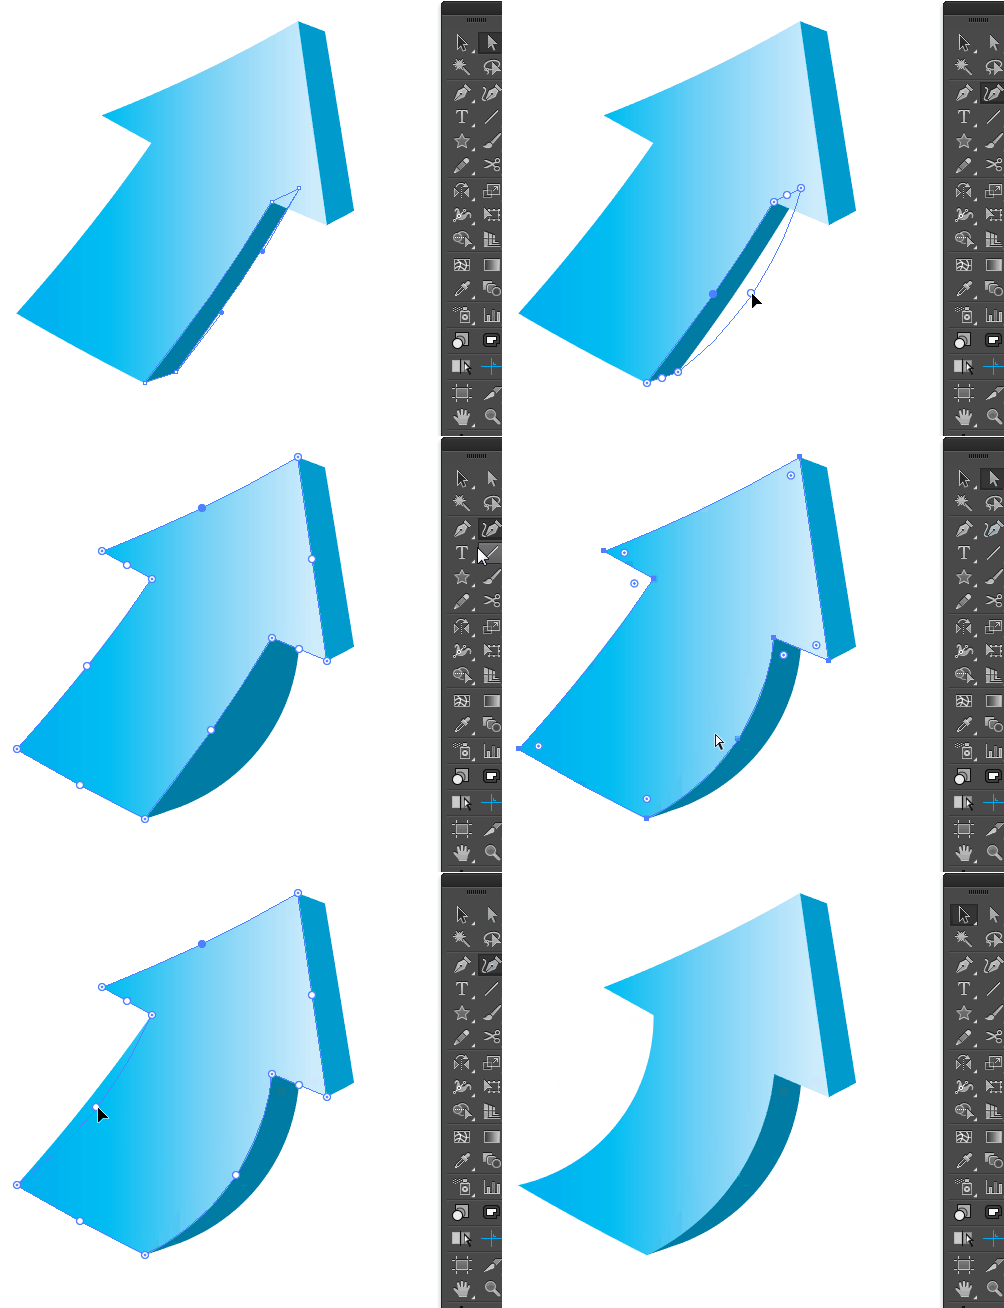
This is a particularly quick and poor arrow just for demonstration purposes.

I made the arrow from a triangle, rectangle and pathfinder to unite them.

Next I used the 3D options to extrude it. (This is optional, you could just draw it yourself and you might have to for certain shapes)

Next I deleted the parts I didn't want and recolored it with a simple gradient.

If you put more work into it yours will look better. You can of course bend your arrow the way you want it to be bent. If the pen tool is too daunting for you, you can try the curvature tool to bend it which is easier for beginners and can sometimes be faster once you get used to it.

Since you're new I'll show you an example of how the curvature tool works. The hotkey is shift + ~ You'd be using that an A to switch back and forth between selecting it and manipulating it if you wanted to get a faster workflow.

enter image description here

1

4 years old case, but it was elevated again up after someone tried to answer with a half of line. Here's a longer answer:

Illustrator's 3D effect Extrude & Bevel can make a part of it. You get the straight blocks. The arrow must be inserted by drawing.

enter image description here

  1. Four equal rectangles aligned horizontally. The distances are made equal by distributing.

  2. The rectangles are dragged to the brushes collection and defined to be an art brush. The brush is applied to a piece of circle. The piece was clipped with scissors.

  3. Object > Expand Appearance is applied to make the blocks freely editable. Stroke is removed and some fill colors are selected.

The colored blocks are grouped. Then they can be extruded like one. Here's the 3D Extrude&Bevel dialog:
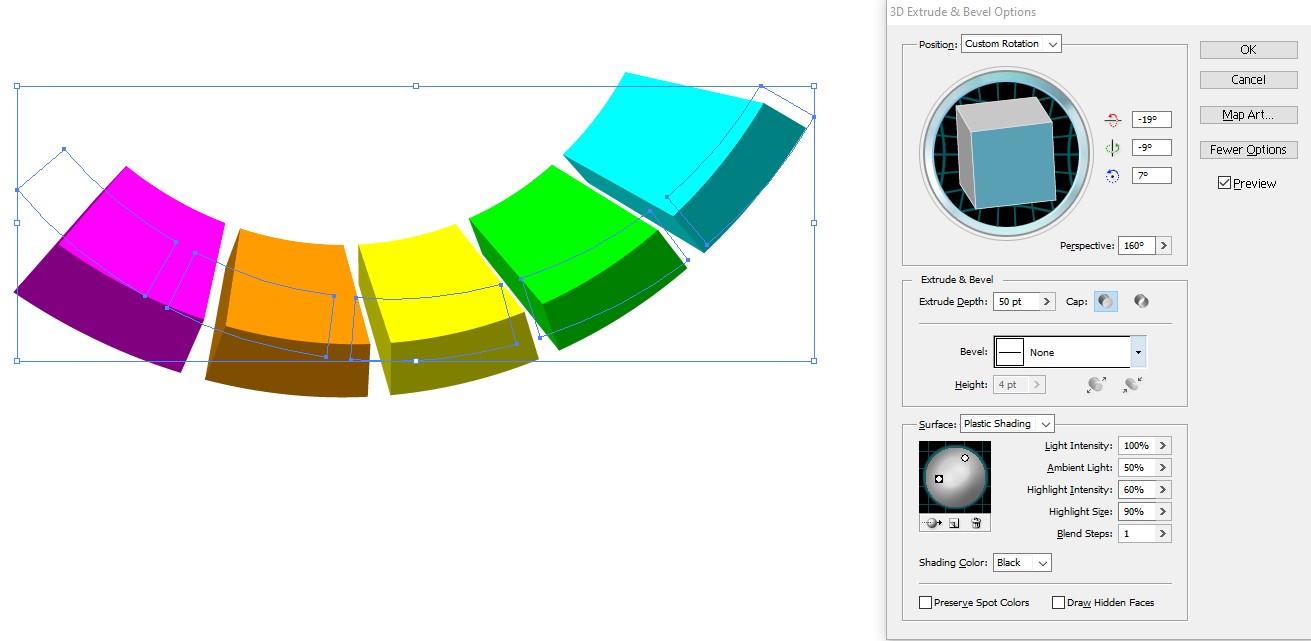
enter image description here

The perspective is as tight as possible. There's shading, but the number of blending steps is reduced to one to avoid the face splintering. To make it work also the lights needed some tweaks before there appeared the wanted 3 color shades per block.

When the 3D effect was fixed by applying Object > Expand Appearance, Release the clipping mask and Ungroup about 4 times all blocks and their faces were free.

In theory one could insert a couple of nodes and drag the faces of the cyan block with the direct selection tool to the wanted arrow shape. It would really need a skilled and talented Illustrator user. It's much easier to sketch the missing parts with the pen and combine the areas with the Shape Builder:
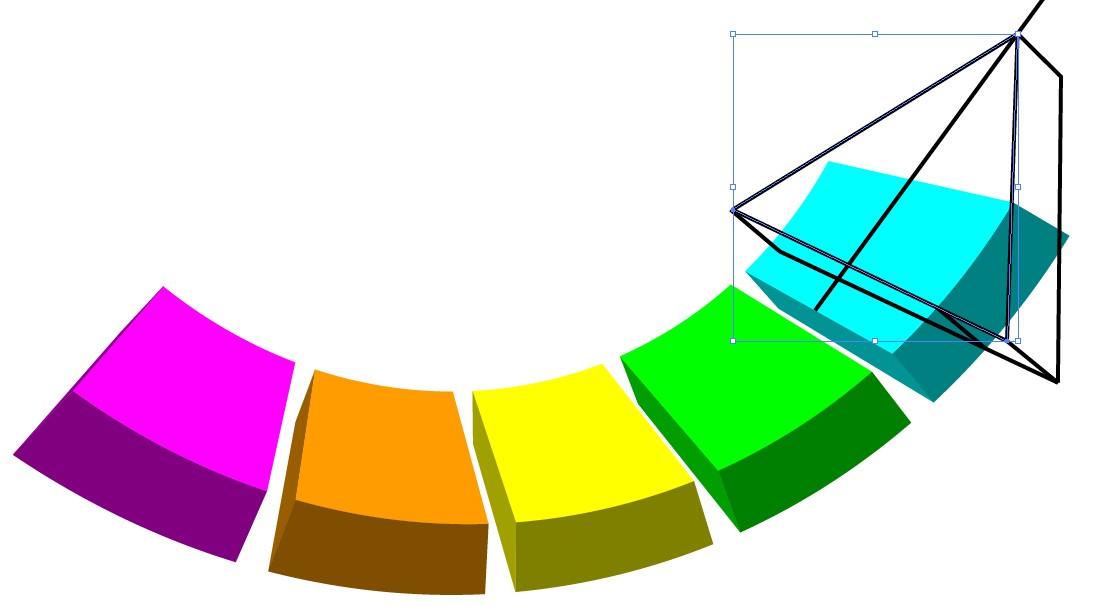
enter image description here

As you see, I cheated. The arrow is planar, not curved. Seeing the right curvature is not at all easy. I skip it. One can try to tweak it after the shape is otherwise ready. The arrow is made quite short, so it stands better the simplification.

Shape Builder creates the new shapes but the colors are lost. I had a spare copy where they could be taken with the color picker. The result:
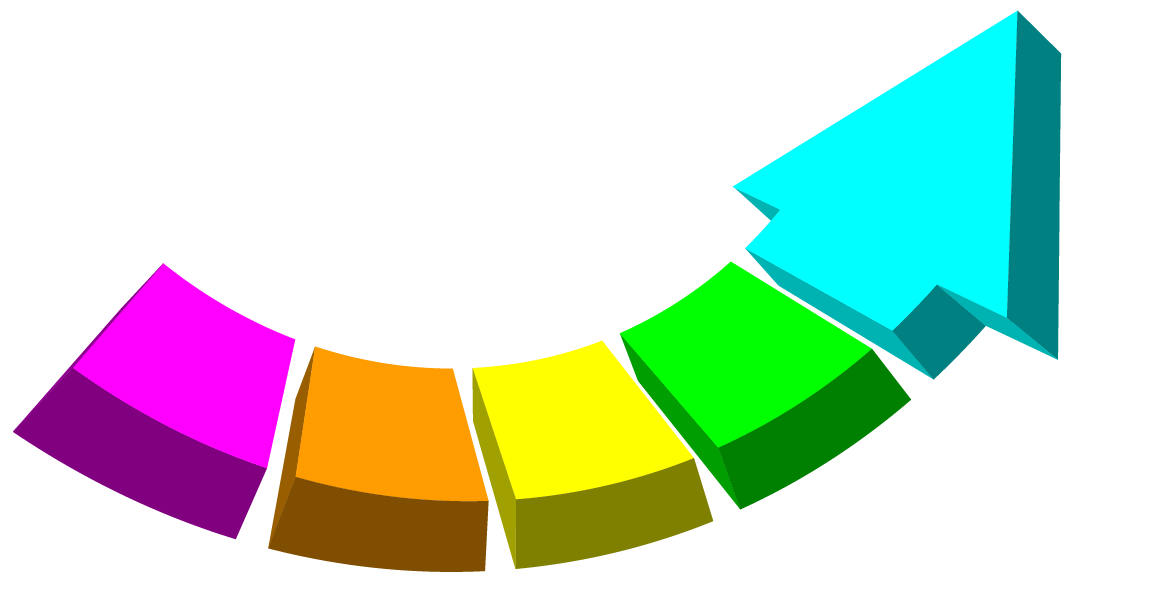
enter image description here

This is not at all perfect, but maybe it's usable. Questioner's example has a grey gradient shading. It makes the shape easily to look dirty. It works better, it the environment also is grey like in the given example. I guess the used colors are aimed to be printable. I used here the brightest available RGB colors. They cannot be printed.

To insert the gradient one should make a copy which contains only the top faces. When the are combined to a compound path they can have single gradient:
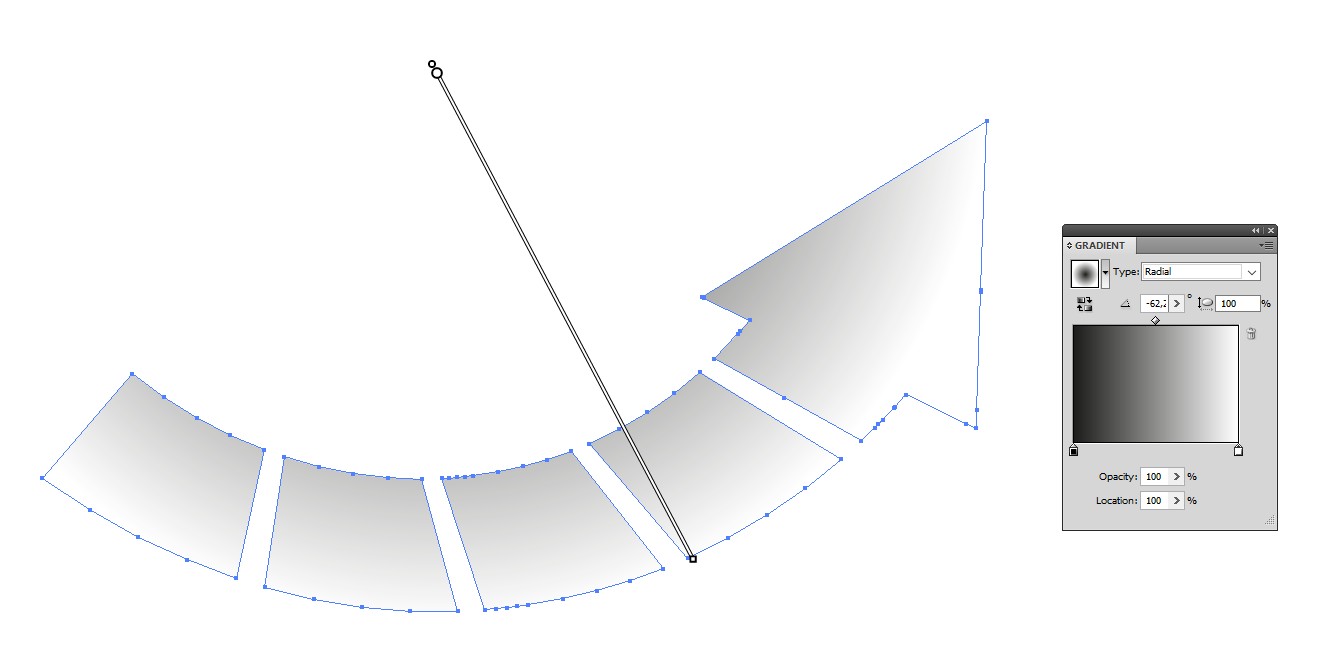
enter image description here

The compound path fits exactly on the original bright color faces. They make gradient shading with blending mode Multiply:
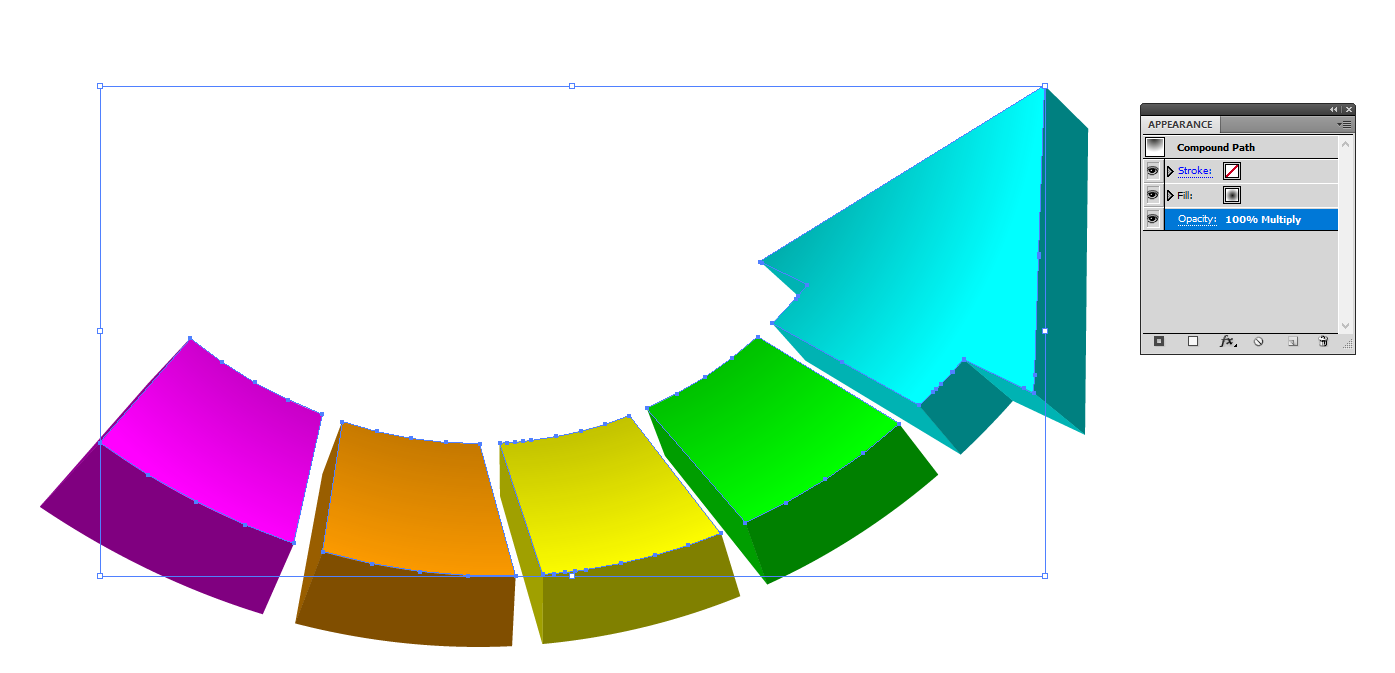
enter image description here

Your Answer

By clicking “Post Your Answer”, you agree to our terms of service and acknowledge you have read our privacy policy.

Not the answer you're looking for? Browse other questions tagged or ask your own question.