4

I want to use MagicaVoxel to create some sprites in an isometric view rather than creating all the angles in Photoshop. My plan is to then export PNGs from MagicaVoxel from various camera angles to get the required rotations.

But I've got a couple of little bits I can't quite figure out.

  1. How can I determine what the output size of a PNG file will be based upon the size of the MagicaVoxel scene when exporting in isometric format?

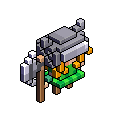
  2. When the PNG is exported from an isometric perspective it's adding a black stroke around the the edge cubes. Is there a way to disable this?

  3. Is it actually possible to change the camera angle that the ISO export is done by?

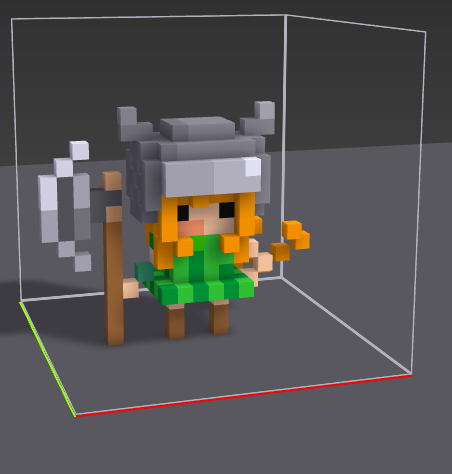
Here is a picture of the character in the editor

Character in editor

And here is the resulting export

Exported Character

2

3 Answers 3

3
  • The output size you adjust on the Render tab, input the dimensions in the "image" field.

  • You have a full page of shortcuts here. It seems you can disable "display Edge" with CTRL+E (or CMD+E on mac).

  • Or are you talking about rounded grids? If that's the case you can just uncheck the RG in the shape options.

  • You have to adjust the camera angle before you render your model. Or you can export an .obj and import to Photoshop where you can rotate and render as you wish.

1
  • So edge is already disabled in the viewer but it still renders it when I export to png unfortunately which is ultimately what I want to get this into SpriteKit. Not sure if I can do anything with tender in this regard as it’s all static imagery
    – TommyBs
    Commented Apr 18, 2018 at 20:26
2
  1. Open the config.txt file. The full path will be like: ...\MagicaVoxel-0.99.7.0-win64\MagicaVoxel-0.99.7.0-win64\config\config.txt.

  2. Locate the io_iso section.

  3. In the io_iso section, Locate the line: outline : '1' // outline and highlight : [0, 1]

  4. Replace the 1 with 0

It should now look like:

io_iso :
{
    size      : '2' // voxel size : [1, 8]
    height    : '4' // height : size * 2 : [1, 24]

    view      : '4' // num of views : [1, 4]
    outline   : '0' // outline and highlight : [0, 1]

    top       : '1.17 1.15 1.25'  // top lighting [0.0 - 1.0]
    left      : '0.37 0.35 0.55'  // left lighting
    right     : '0.87 0.85 0.95'  // right lighting
    bevel     : '0.13 0.13 0.13'  // bevel highlight
}
1
  • Hello Gostar, welcome to GDSE. Thanks for trying to help, but right now your answer is kinda gibberish. Please consult the tour to get to know our site and formatting help to find out how to improve the formatting of your answer.
    – PieBie
    Commented Feb 26, 2021 at 10:29
1

If you manually set your iso view with the render camera (there's an iso button in the bottom toolbar of the render area) you can turn on or off the edges, as well as the grid and the ground or alter the ground colour to white to keep your shadows, and manually set your resolution at the top of the render area.

The preset Export>Iso has an edge style applied and is a preset size also; to get control, don't use that preset: set up your view and use the camera button which saves the current render scene state.

1
  • 1
    I managed to discover the power of render last night and the alpha channels to preserve transparency and create glass effects
    – TommyBs
    Commented Apr 20, 2018 at 16:15

Your Answer

By clicking “Post Your Answer”, you agree to our terms of service and acknowledge you have read our privacy policy.

Not the answer you're looking for? Browse other questions tagged or ask your own question.