1

The issue I'm having is the following: I have an archive of about 700,000 tif images that were originally microfilms.

They are all black and white and are basically paper with information on it. I'm trying to figure out a way to trim/crop out the black background, so as to reduce the image size/resolution to show only the paper part as the whole image, but preserving everything inside the paper part.

Thing is, the images are REALLY messy and noisy. The black parts are really noisy, full of white dots and lines, and the paper section of the image is no better, only in reverse (full of black dots on white paper), and the actual information on the paper can be really blurry, sometimes looking like a bunch of black blotches.

I have access to ImageMagick, GIMP, Photoshop, and PhotoScissors (which I made an RPA script to automate, but the results were less than satisfactory)

So far I've had more success with ImageMagick, thanks to the help an amazing guy in their forum.

But the variety of the quality and resolutions of the images seems to be making it impossible to write a single line command line that manages to properly remove the black background and trim the image in order to leave it the way I need it.

Do you guys have any suggestions?

Here's a link for a drive folder with different images, organized by how bad they are. Also, with folders for what the end result must be like (end image format does not really matter).

https://drive.google.com/drive/folders/1R_EkpsOZs795n9i7-UoSHdh9pxrz8fVm?usp=sharing

6
  • 1
    Hi @SteelMasimo welcome to GD.SE. Could you update your answer with what you have tried/what is working for you so far? As it stands more information will help us help you better. Commented Feb 22, 2019 at 22:36
  • Hi @Ovaryraptor ! It seems to be working fine, with threshold selection at 50, size at 250 and image limit at 1. But for some reason, it's ignoring most of the images in the folder I specified. I made a test folder with 30 images, and it only saved 2 of them. It loaded all of them, I could see that, but it only completed the process in 2 of them, stopping at "plugin-sel2path" in most of the images and then loading the next one. Any idea how to solve this? Commented Feb 25, 2019 at 20:21
  • I'm glad you are getting some results form this method. I'm not an expert on using this method nor have I gone through the code for it. Could you update your Google Drive with your test of 30 images for me to test against? Commented Feb 25, 2019 at 21:49
  • Hey @Ovaryraptor! I've updated the drive with the original 40 images that were divided into folders, but on a single folder called "GIMP tests". The same thing happens with them. Out of the 40 images, only 10 were processed Commented Feb 26, 2019 at 14:15
  • Do you know anyplace I can learn more about this script and how to solve this issue? Commented Feb 26, 2019 at 14:16

1 Answer 1

1

I think I've found you a GIMP solution.

This repo has a nice script/plugin solution to help you automatically separate images. It's not perfect but it should get you close.

Following this guide.


  1. Download and install the latest version of GIMP (click here). Optional (and for Windows users only): Download deskew.exe (click here) to GIMP’s plugin directory.
  2. On my computer, this is C:\Program Files\GIMP 2\lib\gimp\2.0\plug-ins Download DivideScannedImages_improved_v2.zip (click here). *If you want the old (obsolete) version of the script you can still be found here.
  3. Unzip, and copy DivideScannedImages.scm to the GIMP scripts folder. On my computer, this is C:\Program Files\GIMP 2\share\gimp\2.0\scripts
  4. Restart GIMP. You should now see the “Batch Divide Scanned Images…” option as a sub-menu under “Filters -> Batch Tools”. Click on it.

enter image description here

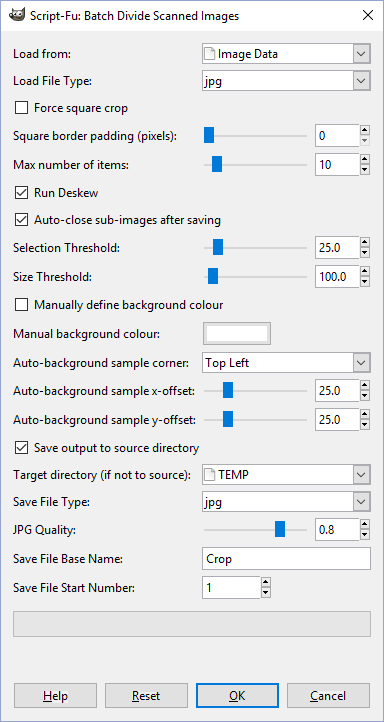
  1. Unlike Adobe Photoshop, this plugin gives you some choice on how you want it to behave. Many of these settings should be self-explanatory. Important is that your scanned images have a consistent region that represents the “background color”. Typically this would be the corners of your scanned image. For me, the following settings worked well:

enter image description here

“Selection Threshold” controls how sensitive the background color is defined in terms of separating it from the foreground photos. Play around!. Furthermore, I changed the “Max number of items” specifies the maximum number of sub-photos can be detected on a single page. In our case, no page contained more than 20 photos, so I set it to 20. Feel free to experiment with these settings. The “load from” directory should point to the folder of input scanned pages, and the “save directory” to an empty directory that will contain the output.

  1. Click on OK, and watch it run through all your photos.

Comparing Photoshop with GIMP surprised me, in that GIMP’s filter seemed to be much more reliable, even straight out of the box. It is also possible to customize the filter’s behavior to suit your specific stack of scans.

Note, however, that both of these solutions (Photoshop or GIMP) can and will fail for difficult cases. Here are some tips you should follow to maximize your chances of success:

  • The photos should not overlap or touch each other. If they do, they will not be divided from each other by the automatic script
  • The scan/photograph borders should be cropped in such a way that it doesn’t extend beyond the page background and the page background should extend up to or beyond the image borders e.g. – seeing the wooden floor (on which an album was placed while photographing it) will screw up the algorithm unless you carefully set up the “Background Sample X/Y offset” values.
  • The page background should be uniform (white or black are good), and have enough contrast relative to the photos
  • The page (including the background) should be evenly lit

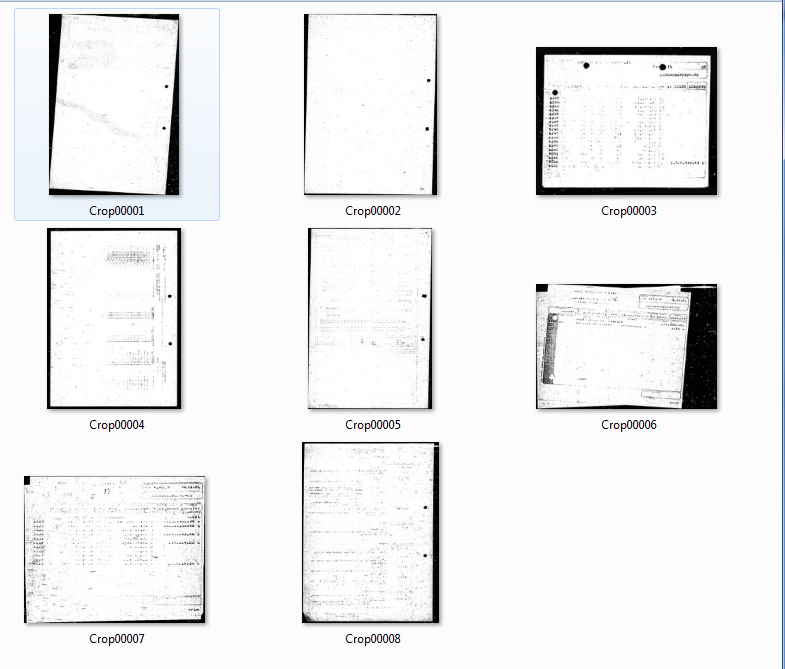
While this is not perfect I was able to generate some good results.

enter image description here

0

Your Answer

By clicking “Post Your Answer”, you agree to our terms of service and acknowledge you have read our privacy policy.

Not the answer you're looking for? Browse other questions tagged or ask your own question.