28

I am very new to Photoshop. I have created a 300px by 230px image. I'm trying to place 5 vertical guidelines at 0px, 57.5px, 115px, 172.5px, 230px.

I've placed the whole numbers manually by pulling vertical guidelines with the ruler, but I cannot put 57.5px, 172.5px to exact positions this way.

How can I set a guideline at an exact position in Photoshop?

3
  • 3
    It's always best to start with the help files: helpx.adobe.com/photoshop/using/grid-guides.html
    – Scott
    Commented Apr 10, 2015 at 4:40
  • 3
    Not sure if these fit your use case, but just so you know, there are also 3rd party extensions like guideguide and griddify.
    – Joonas
    Commented Apr 10, 2015 at 6:26
  • Welcome ongpark! Thanks for posting your question. Unfortunately, GD.SE is not designed to handle issues regarding technical support or basic software education. If you are seeking technical assistance with an application, please try the application manufacture's web site. If you are seeking to learn how to accomplish something within an application, please review the application help files or try an internet search with your question or an internet search for a tutorial. We are confident you will find answers.
    – Vincent
    Commented Apr 10, 2015 at 8:15

2 Answers 2

46

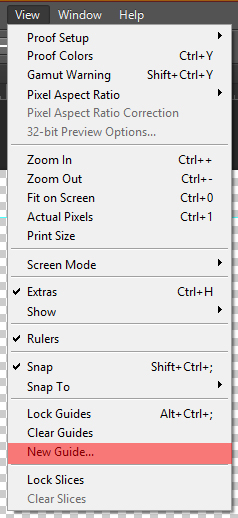
Other then dragging guides down from a ruler, you can go to the "New Guide" function in Photoshop. I'm using CS 6, just so you know.

This is where you can find the function

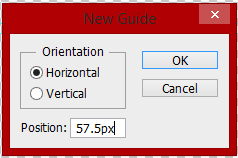
This is where you can find the function. Click it, and a box will appear.

enter image description here

From there, just put in where you need the guide and what direction you want it in, click "Ok" and you should be good to go!

2
  • 1
    Watch out: position is form left top corner. Not from zero on rulers. (Very bad behavior.) Commented May 17, 2017 at 10:49
  • Pro tip: you can use mathematical formulas for the position. For example: (815 * 2) + (60 *3)
    – Nicu Surdu
    Commented Dec 30, 2019 at 1:15
8

Show or hide a grid, guides, or smart guides

  1. Do one of the following:

    • Choose View > Show > Grid.
    • Choose View > Show > Guides.
    • View > Show > Smart Guides.
    • Choose View > Extras. This command also shows or hides layer edges, selection edges, target paths, and slices.

Place a guide

  1. If the rulers are not visible, choose View > Rulers.

    Note: For the most accurate readings, view the image at 100% magnification or use the Info panel.

  2. Do one of the following to create a guide:

    • Choose View > New Guide. In the dialog box, select Horizontal or Vertical orientation, enter a position, and click OK.
    • Drag from the horizontal ruler to create a horizontal guide.
    • Hold down Alt (Windows) or Option (Mac OS), and drag from the vertical ruler to create a horizontal guide.
    • Drag from the vertical ruler to create a vertical guide.
    • Hold down Alt (Windows) or Option (Mac OS), and drag from the horizontal ruler to create a vertical guide.
    • Hold down Shift and drag from the horizontal or vertical ruler to create a guide that snaps to the ruler ticks. The pointer changes to a double-headed arrow when you drag a guide.
  3. (Optional) If you want to lock all guides, choose View > Lock Guides.

Move a guide

  1. Select the Move tool , or hold down Ctrl (Windows) or Command (Mac OS) to activate the Move tool.

  2. Position the pointer over the guide (the pointer turns into a double-headed arrow).

  3. Move the guide in any of the following ways:

    • Drag the guide to move it.
    • Change the guide from horizontal to vertical, or vice versa, by holding down Alt (Windows) or Option (Mac OS) as you click or drag the guide.
    • Align the guide with the ruler ticks by holding down Shift as you drag the guide. The guide snaps to the grid if the grid is visible and View > Snap To > Grid is selected.

Remove guides from the image

  1. Do one of the following:

    • To remove a single guide, drag the guide outside the image window.
    • To remove all guides, choose View > Clear Guides.

Set guide and grid preferences

  1. Do one of the following:

    • (Windows) Choose Edit > Preferences > Guides, Grid, & Slices.
    • (Mac OS) Choose Photoshop > Preferences > Guides, Grid, & Slices.
  2. For Color, choose a color for the guides, the grid, or both. If you choose Custom, click the color box, choose a color, and click OK.

  3. For Style, choose a display option for guides or the grid, or both.

  4. For Gridline Every, enter a value for the grid spacing. For Subdivisions, enter a value by which to subdivide the grid.
    If desired, change the units for this option. The Percent option creates a grid that divides the image into even sections. For example, choosing 25 for the Percent option creates an evenly divided 4‑by‑4 grid.

  5. Click OK.

You can find the whole tutorial on https://helpx.adobe.com/photoshop/using/grid-guides.html

1
  • 1
    Hi srija, welcome to GDSE and thanks for posting this answer. You might find that it's both easier and produces a better result when you create a quote box (using a > at the start of the line). For one thing, a quote box won't have a scroll bar, for another, you don't have to add 4 - 8 spaces at the start of each line. Regardless, thanks for taking the time to post an answer anyway. :)
    – Dom
    Commented Apr 10, 2015 at 11:57

Your Answer

By clicking “Post Your Answer”, you agree to our terms of service and acknowledge you have read our privacy policy.

Not the answer you're looking for? Browse other questions tagged or ask your own question.