3

I'm going to be making images that include hundreds of lines of text of varying lengths, each of which will have the same "background", with the exception of the length of the background, which will need to be relative to the length of the text. I want to not have to manually fit text to a box each time.

The second twist is that I want the background to be reduced opacity, but I want the text to be 100% opacity.

So the text will always be the same size and solid white, over a (say) 80% opacity orange background. The "padding" (inset?) on all four sides of the text the text will be constant relative to the text. All that will change is the overall width of the text string, consistent with the overall width of the "box".

I have reviewed these two answers

How to fit text box size to text?

and

Change Background Color of Text Box in Illustrator CS5

which would seem to address this but don't quite. I am using Illustrator CS6.

1 Answer 1

3

As for fitting text boxes to text.. see the script in your first question link. That's the only method I'm aware of.

The fill issue is MUCH easier to solve.

  • select the area text with the Selection Tool (black arrow)
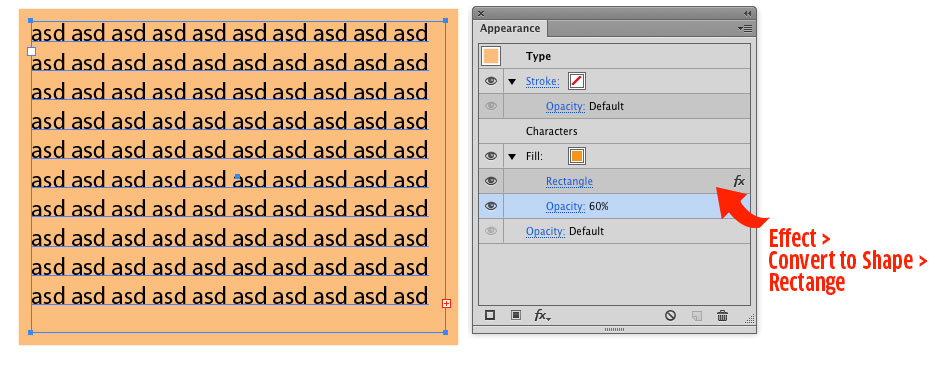
  • Add a new fill via the Appearance Panel
  • set fill color and drag the fill below the Characters item in the Appearance Panel
  • With the fill highlighted in the Appearance Panel, choose Effect > Convert to Shape > Rectangle and enter values you want. Then click OK
  • Click the Opacity indicator under the fill in the Appearance Panel and enter the Opacity you wish the fill to have. This will not alter the text.

fill

Set this up once, then drag the whole thing to the Graphic Styles Panel. When you need to apply this same appearance, simply select the Area Text box and then click the style in the Graphic Style Panel.

Note, the background is relative to the Area Text box... if the box changes size, the background will as well.

Added after seeing what the script does to the appearance.

The script does kill the appearance. So here's what I would do...

Set up the Graphic Style and save it.
Have an Area text box set up and ready for the script.

Now create a new Action and start recording...
- Run the script
- click the Graphic Style
Stop recording.
Assign an F key to the action.

Now all you need do is select an Area Text Box and hit the assigned F key. If the text box needs resizing while working, just tap the F key.

Caveat....

Illustrator has, and has had, a bug where scripts in actions are concerned. The action will not retain the script step if you quit Illustrator. So each time you launch Illustrator you would need to set up the action again. It's annoying, time consuming and a pain. However, recreating the action each time it's needed may be much faster than manually manipulating text boxes and appearances.

4
  • This is very helpful! The script and this Appearance/style method don't play nice together, but it gives me a lot to work with. The script has to be reapplied each time I want to resize the box to the text. That would be tolerable, but it also molests the appearance set by your recommended method.
    – Brian D
    Commented Jan 29, 2013 at 1:50
  • @BrianD ahh, I see it does. I've updated my answer above.
    – Scott
    Commented Jan 29, 2013 at 2:05
  • Scott, this is really helpful. I've been playing with my graphics just using your Style approach -- even with having to resize the text box for each line, the Style is so helpful. Might not be much harder than reapplying every time an ai file gets reopened for use. I'll try both ways and see which is less of a headache. Thanks!
    – Brian D
    Commented Jan 29, 2013 at 2:15
  • Glad I could help :)
    – Scott
    Commented Jan 29, 2013 at 2:17

Your Answer

By clicking “Post Your Answer”, you agree to our terms of service and acknowledge you have read our privacy policy.

Not the answer you're looking for? Browse other questions tagged or ask your own question.