9

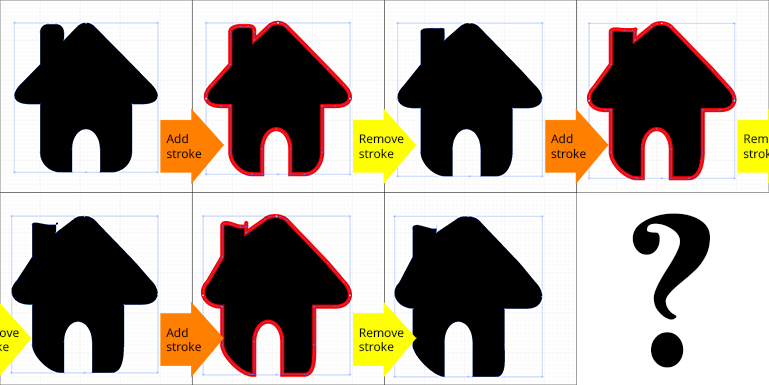
I very recently started learning how to use Adobe Illustrator (CS6), and just now I noticed something strange. When I add a 1pt stroke to my shape, it gets slightly distorted. This distortion does not disappear if I remove the stroke. (But only if I remove the stroke by setting its weight to 0. Using CTRL+Z does return the shape to its former state.)

After adding and removing the stroke a few times, the difference becomes quite noticable: enter image description here
Am I doing something wrong? Is it a bug? I can't imagine this being the expected behaviour.

EDIT: I think I figured it out. Appearantly, turning 'Align to pixel grid' off doesn't affect previous shapes. If I turn it off and then recreate my shape from scratch, the problem is fixed.

However, I was wondering if their is a way to disable the effect for existing shapes. In other words, can I 'fix' the shapes I created while 'Align to pixel grid' was still on?

6
  • Just to clarify: in your screenshot, it goes from top left to bottom right, and the only change you're making at each step is adding then removing a stroke? And it's just adding and removing the stroke that seems to be causing the distortion in the top right of the chimney? If so, it certainly doesn't look like expected behaviour... I've never seen anything like that. Commented Mar 6, 2013 at 17:24
  • how did you create the shape? Did you use the Shapebuilder or Live Paint Bucket tools? I have not yet been able to recreate the behaviour you describe.
    – leugim
    Commented Mar 6, 2013 at 17:41
  • The only thing I can think of is, try turning align to pixel grid off. It sometimes has odd side effects. If that doesn't help, if you post the exact steps you're taking to add and remove the stroke, people might be able to spot something unusual. Commented Mar 6, 2013 at 19:53
  • @user568458 Yes, all I'm doing is adding and removing the stroke. I do this by selecting the shape (using the Selection Tool) and then changing the value next to 'stroke' on the top left of the screen. I tried adding and removing the stroke using the Stroke Panel, but the result was the same. 'Align New Objects To Pixel Grid' was allready off.
    – Dromin
    Commented Mar 7, 2013 at 10:55
  • @leugim As far as I remember: I first created separate shapes (a triangle for the roof, two rectangles for the walls and the chimney), then added rounded corners using Effect -> Stylize -> Round Corners. Then I 'applied' the effects by using Object -> Expand Appearance. Finally I merged the shapes using the Pathfinder Panel. The door was created and cut from the total shape in the same manner. (I have no idea if this is a 'correct' way to combine shapes. As I said before, I'm just a beginner.)
    – Dromin
    Commented Mar 7, 2013 at 11:04

3 Answers 3

5

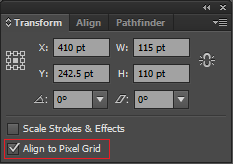
The control for whether or not each individual object is aligned to the pixel grid is hidden by default (in CS6, and I think in CS5 too). Why? No idea... one of those many confusing things.

In the Transform window (open it with Window > Transform), in the flyout menu (icon in top right corner), click Show options. In most panels in Adobe applications, many of the most important controls are helpfully hidden without trace like this...

That then gives you two checkboxes:

enter image description here

The 'Align to pixel grid' button controls the setting for whatever you currently have selected, and works whether or not you have Align new objects to pixel grid ticked.

I'm 90% sure that this is what Scott was referring to, and that because there was no visible Align to Pixel Grid button, you thought he meant the Align new objects to pixel grid option. Personally, I always hit 'show options' on everything and don't remember what's hidden by default and what isn't (because why would I ever hide options? Silly Adobe...).


Select everything (cmd+A), then tick the now-unhidden Align to Pixel Grid box until it's empty to completely cleanse your document of Align new objects to pixel grid having been ticked by default.


Personally, I don't really trust Align to Pixel Grid except as a last resort when designed-for-web images are rendering really badly - I prefer to use the Wundes script Pixel Align which just nudges the selected objects onto the pixel grid once with no unexpected consequences.

4

Uncheck Align to Pixel Grid on the Transform Panel.

4
  • I already tried that before I posted my question here. It doesn't appear to make a difference.
    – Dromin
    Commented Mar 7, 2013 at 11:09
  • @Dromin that is the only thing I'm aware of which would result in the distortions you've show. I've not heard nor seen any other issue causing what you describe.
    – Scott
    Commented Mar 7, 2013 at 19:07
  • Link to a file which shows the issue.
    – Scott
    Commented Mar 7, 2013 at 19:18
  • The issue is definitely in the transform window 'align to pixel grid' ... after reading above and 'testing' it, I believe our problem is solved. Now I hadn't had this issue until I started receiving vector files from clients. ai and/or pdf's. This is why I have always preached "Do not sent files with strokes!" This is only one issue you can have. You need to make sure all your defaults are set properly. I personally always convert strokes to fills and text to outlines....
    – user72165
    Commented Jul 26, 2016 at 13:26
1

Turning 'Align to pixel grid' off doesn't affect previous shapes. If I turn it off and then recreate my shape from scratch, the problem is fixed.

That is correct. Because the setting affects what you do from there on. But what is happening exactly here? The problem is that a stroke (typically with 1pt) is centered on the line, resulting in "half" pixels. Now Illustrator tries to set those new outlines on whole pixels, resulting in your curves moving. Here are two additional things (to turning off align to grid, as you might need the alignment) you can use to battles this from the start:

Work in 10-fold of the size. Why? All this typically happens when working on very small sizes (e.g. 16x16px). So If you work in 160x160 and export everything with 10% it reduces this problem.

Setting up the stroke in 2pt. I found out that you can also battle this behavior by setting the stroke to 2pt when you set it up, basically 1px on the inside and one one the outside. Then, align the stroke to the inside or outside. After that you can change it back to 1pt.

I myself work only with 1pt stroke aligned inside or outside anymore. The results are simply more crisp too as it eliminates the half-pixel problem on straight lines.

Your Answer

By clicking “Post Your Answer”, you agree to our terms of service and acknowledge you have read our privacy policy.

Not the answer you're looking for? Browse other questions tagged or ask your own question.