3

In illustrator, if you want to take a blend between two objects with a specified number of steps and give it a perspective-like effect - changing the curve of the blend from linear to non-linear so the blend has different density at different points - it's pretty straightforward. You add a spine to the blend and edit the spine until you are happy with it.

(to add an editable spine, an easy way is to plonk a line or shape on top of the blend, select it and the blend, then Object > Blend > Replace Spine)

Perspective blend by editing blend spine

However, this method does not always work well when the shapes you a blending have a common centre. For example, in A below, manipulating the spine requires pushing the blend out in a direction, like in B. Using this technique, the blend has to be lopsided, and can't be neatly centred and symmetrical like C (which I made for this examples via the tedious process of expanding the blend then resizing each line by hand).

Perspective blend with a common centre

How can you create an effect like C from a blend like A?

I'll accept methods that are not based on blend, so long as, like editing a blend's spine, they can be editted, tweaked and adjusted conveniently after they are applied.


Edit: After asking, it occurred to me that the blend tool spine alone will never be the right tool for this task since it controls only the positions of the intermediary shapes, while what I'm trying to do requires changing their sizes. So treat the blend spine thing as an illustrative example of the idea only - an answer is not likely to involve that technique. I imagine there is probably a good answer that involves envelope distorts, but I'm not having much luck making the details work.

1
  • 1
    Corel Draw, which I used to use extensively many years ago, had ACCELERATION controls for blending! Catch up Adobe!! ;-)
    – user10219
    Commented Feb 21, 2013 at 21:08

4 Answers 4

1

I've found one method (after remembering the search term "concentric", as in "concentric circles" or "concentric shapes"). It works for circles, or for shapes that can be distorted from circles. I'm keeping the question open because it's not very flexible: it only works starting with circles.

  • Dig out the Polar Grid tool from under 'line'
  • Put in some values that suit your case, with a skew of greater (or less than) than 100% and 0 radial segments

Give it a stroke and that's it, it creates skewed non-linear sized concentric circles for you. Annoyingly (in CS4) there's no preview option so expect a lot of trial and error.


Edit: you can do this with any shape if you expand and ungroup the polar grid, and use the wundes.com CopyToMultipleObjects script, selecting the circles and also the shape you want to apply to the circles at the top of the stack. While powerful, this option has very little flexibility after it has been applied.


Another method, which is more flexible but involves a lot of manual tweaking is to create an Envelope Distort on top of the straight blend with a 3x3 or 5x5 Mesh, and manoeuvre the mid points outward (or inward) until it looks smooth. If I find a magic formula where this works reliably without a huge amount of tweaking and twisting points by hand I'll post it as a separate answer with example images.

1

Another method for the circles.

Draw the outer circle, then double-click the Scale tool, enter a random value less than 100% in the Uniform field and hit the Copy button. Repeat until center circle is desired size.

The amount of randomness will vary based upon your input scale values.

As you've discovered all blends are linear and there's no way to introduce any random nature.

1
  • Or you can use the awesome Effects > Distort & Transform > Transform effect which lets you chose number of copies and remains an editable effect until it's expanded. I can only make %-scale-based tricks work for the opposite of C above: shapes getting closer together as they move towards the middle, rather than getting further apart towards the middle. Commented Apr 17, 2012 at 9:12
1

I think I've cracked it. This method is highly flexible, straightforward/reliable, and modifiable. The only weakness is it does distort the outer and inner shapes of some shapes (which can be a bonus depending on the effect desired). The other method using polar grids and the object replace script is probably better if you need to avoid shape distortion.

  • Create the blend
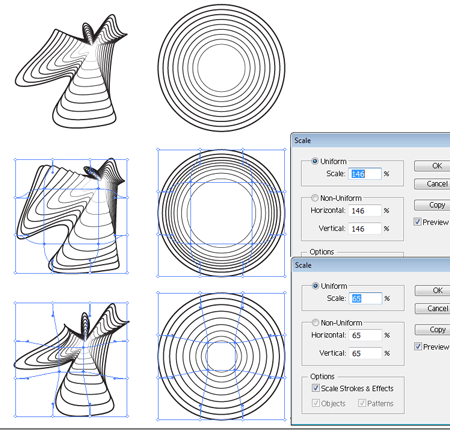
  • Select blend, make a 3x3 envelope mesh (Object > Envelope Distort > Make with mesh)
  • Select the corners of the middle square of the mesh (easy way: draw around them with the Lasso select tool (Q), make sure Edit Envelope is selected in the top left)
  • Use Object > Scale with 'Preview' ticked and adjust until it looks right. Both the blend, and it's envelope distortion, remain completely editable.

Envelope mesh on a blend

You'll see that the concentration of lines is highest towards the middle of the envelope, whereas in my example I wanted the concentration to be highest at the edges. You can control this by putting an invisible shape (grey in my example to be clearer) behind the blend to push the middle of the envelope to the position in the blend where you want the concentration to be highest - changing the size of this box gives you a lot of control on where to focus the distortion.

enter image description here

You can also get more control by adding more grid lines to the envelope mesh. Here's some examples that just use Scale at different points in the grid. Naturally you can tweak any point in the grid to any amount to get really precise effects.

enter image description here

1

As you found out, blending isn't the best option for what you're trying to do.

user568458's suggestion with the Polar Grid tool is ok-ish, but you get one object at the end of the process. If that's what you need, do this:

  1. click and drag a shape using the Polar Grid, but keep the mouse pressed
  2. while the mouse is pressed, use the X/C keys to control the distance % between circles and the UP/DOWN keys to control how many circles you want.

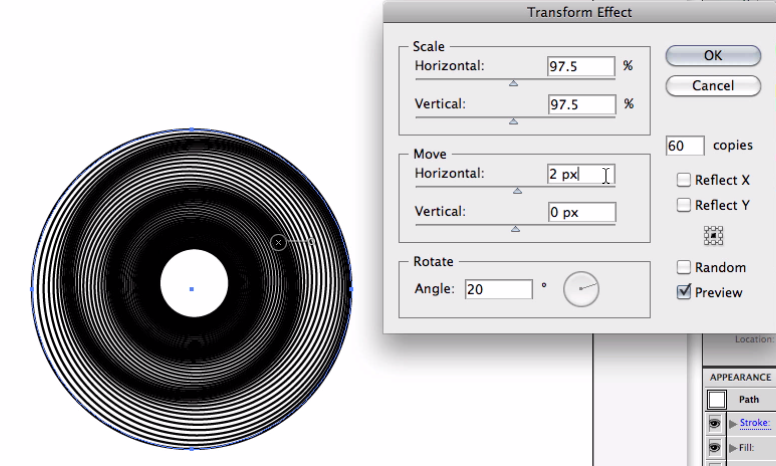
If you want to get an OpArt effect similar to Marcel Duchamp's Anemic Cinema you might want to try the Transform Effect: Transform Effect preview

I've uploaded a screencast explaining the process here and you can download my .ai file if needed too.

2
  • Polar grid with X and C plus distortion or the script in my answer, seems the best way, though the X and C controls are extremely sensitive. X and C... I'd never have thought of trying those keys! Commented Apr 25, 2012 at 12:22
  • Glad it helps ! I know, some shortcuts are quite obscure. Regarding sensitive controls, another option is to double click the polar grid icon in the Tools palette and try to play with the options there, although you loose the immediate feedback :( Commented Apr 25, 2012 at 12:47

Your Answer

By clicking “Post Your Answer”, you agree to our terms of service and acknowledge you have read our privacy policy.

Not the answer you're looking for? Browse other questions tagged or ask your own question.