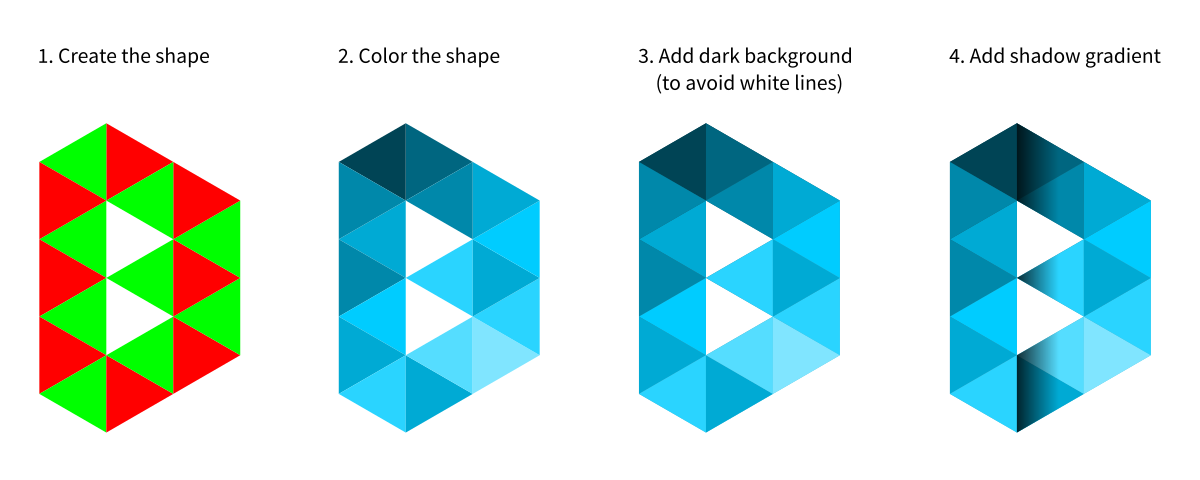
So the most elegant way is probably using axonometric grids, as suggested by Juancho.
However, for the few triangles you need, you can definitely do it by just using "Align and Distribute" (Shift+Ctrl+A).
Here's what I was able to obtain in a few minutes:

Step by step:
1. Create the shape
- Draw a polygon with
3 corners so you get an equilateral triangle that points to the right or the left.
- Duplicate the triangle (
Ctrl+D), then flip it horizontally (h).
- You may want to give the two triangles a different color, to better distinguish them.
- Now duplicate triangles and align them until you have the desired shape. To have the triangles connect at their vertices, use the "Align and Distribute" tools (
Shift+Ctrl+A).
For example, to fit one red triangle between two green triangles (see the image above), you would first duplicate the green triangle, select the two green triangles and then "align top and bottom edge" and "align right sides". Then you would temporarily group the two green triangles and "center on vertical axis" as well as "align left edges" the red triangle with respect to the group. Then you can ungroup.
After a while, you will be pretty fast with this technique and should end up with the desired shape fairly quickly. You can also duplicate entire groups of triangles you have already aligned.
2. Color the shape
- I simply picked suitable blue colors from Inkscape's palette at the bottom.
3. Add a dark background
Although the triangles are touching perfectly, you will obtain aliasing artifacts when exporting at high resolutions. This is because the white background may shine through where the edges of differently-colored triangles meet. To avoid this:
Select all triangles (make sure there are no groups) by dragging a selection box around them. Duplicate everything, then join the duplicated triangles into one shape by choosing "Path" > "Union" from the menu (or pressing Ctrl++). You will now have one shape that covers all triangles.
Move the shape a little, then fill it with a gradient, that roughly matches the colors you chose for the triangles. In my case this was a dark blue at the top left to a light blue at the bottom right. Hint: You can pick the colors from the triangles with the "Dropper" if you move the shapes apart sufficiently.
Move the shape back so that it is perfectly aligned with the triangles, then send it to the background ("Object" > "Lower to Bottom" or End). The white lines should be gone.
4. Add a shadow gradient
Finally, to better mimic the art style from the original you might want to add some shadows or gradients. I did the following:
Select all triangles in the second "column" of triangles. Duplicate, then join with "Path" > "Union" (Ctrl++).
Pick a black fill color for the newly created shape (#000000). Then draw a left-to-right gradient over the shape. The default gradient should be one that increases transparency, so that should give you the desired shadow effect. Finally, I reduced the overall alpha to 0.8 (so that the shadow would not be too heavy).


